myspace generator
Showing posts with label seeds. Show all posts

Saturday, April 3, 2010

OH PLEASE MR. OFFICER!

Mornin’! How are you doing today? I’m quite tired really. Mom and I were running the roads and consulting with stoned rabbits who carry my pretty colored eggs and rudely hide them from me! LOL Just kidding… I love the Easter Bunny. He brings me chocolate… and I like chocolate! It was an interesting day for sure!


My day started rather early, as you know. Once I completed my blog, I was in the kitchen and I just HAPPENED to notice all the seedling sprouts from the second batch of seeds my daughter and I planted! Even in the little croissant containers, there are sprouts! We have watermelon, peas, beef steak tomatoes, red cherry tomatoes, bell pepper, and a zucchini! If it’s pretty today, I will be transferring the older seedlings from batch one into 4in. pots and starting ANOTHER batch of seeds! I am shooting for my first plant sale in mid May. I want to have at least 50 small 4 inch pots and then some yuccas, sagos, etc. to offer.

So after I got all freakydeek about the seedlings LOL, I left to go pick up mom. DH had daddy duty so I made sure he was up and moving and alert LOL! I picked up mom and we started our day going to Jack in the Box to grab a drink cause it was a humid and sticky day! Well… it just so happens, there was a State Trooper in the next lane who just “happened” to notice a burnt out turn signal… UGH! So sure enough, as I turned left, he flipped on those bright lights and pulled me over! I gave him the “tender woman… oh please Mr. Officer… be easy on me” while I bat my luscious eyelashes routine LOL and was lucky enough to only receive a warning! LOL… you better believe I made sure to get a new bulb before I got home! He was really nice actually… but something that happened makes me go HUH? DUH?! The warning…. He gave me a VERBAL warning right? Ok so WHY in the world did he give me a paper statement of the verbal warning? Since WHEN do you write a “verbal” anything down? Doesn’t it become WRITTEN? LOL… That’s almost as confusing as MILITARY INTELLIGENCE!! Either way I was grateful not getting a ticket!

Then we went to the store and grabbed a few things to fill up the kids baskets for Easter and a few things for the house I forgot. The stores were full of weirdos who were arguing with themselves, racing around the store, talking to us about nothing really, and looking us up and down like a big lollipop or something! Last minute crazies running around like chickens with their heads cut off who were quite creepy at the time, but funny after we sat down and thought about it! Mom and I were glad to go home!

I hung out with mom for awhile chatting and laughing and just having fun. Then I headed out to CVS to pick up my blood pressure Rx only to have this woman, whom I have had NUMEROUS problems with before, tell me that they did not HAVE a Rx for me. EXCUSE ME? Uh yes you do… FIND IT! So I went round and round with her until she FINALLY found it. I think she does it on purpose because I have gotten her in trouble a few times before for not doing her job, being rude, and basically being incompetent! So does that mean if she infuriates me to the point of heart attack or stroke, my family can sue her? LMAO… don’t play with the BP meds broad! LMAO!!!!!


My last stop was to a small local mom & pop owned grocery store called Zieglers. They are having an incredible sale on stick butter… 2 boxes for $1. I HAD to get a bunch, cause I use A LOT of butter LOL! While there, I “parrused” (mom’s word of the day LOL) down the meat aisle and I found a few good sales. Tyson whole chickens were on sale for .79 cents a pound. I found 2 birds under $3 each. Family size chicken drumsticks were on sale too, and I found 3 packs of those for under $3 each. I found a couple of steaks for about $1.50 each which will become beef tips LOL, cube steak, and a big shank ham portion for Easter dinner. Jimmy Dean rolled sausage was on sale too, and I happened to have a coupon! Raid was on sale too… at $1.19 a can after my $1 coupon! YAY! Ants are NOT my friends LOL! I got all this stuff for about $30.

To Jean, don’t apologize for a joke LOL… it was quite funny after the initial shock LOL! Not many people even try to get me like that anymore LOL!


Oh I HAVE to tell you… since this is Autism Awareness Month, Toys R Us has partnered with Autism Speaks to accept donations for Autism research! Here is what it says on the site… In conjunction with Autism Awareness Month in April, all Toys"R"Us and Babies"R"Us locations nationwide and Toysrus.com will conduct a fundraising campaign now through April 30 to collect contributions to benefit Autism Speaks. Additionally, Toys"R"Us and Babies"R"Us together serve as the North American sponsors of 80 Walk Now for Autism Speaks events across the U.S. and Canada. Isn’t that cool? The site also gives you links to learn more about Autism. You can also make a donation online or in the store. Rest assured that your donation WILL help children in need, as Autism Speaks is a great foundation! Go to the TOYS R US site to donate today! Just think, for the price of a pack of cigarettes, you can help an Autistic child make a set of communication PECS or for the price of a whole carton you can help them buy a special weighted vest they may need for therapy! Please think about helping... kids who are just like my son would appreciate it!

Ok, so most of you know how I love food right? And I discussed that new show Jamie Oliver’s Food Revolution (which I forgot to watch but will re-air today at 2pm so DON’T TELL ME ABOUT IT YET MOM OR ANYONE ELSE LOL!). Well the other day I decided to test my Autistic 14yr old how many veggies and fruits HE could identify without help. I picked out 18 fruits and 18 veggies and printed them out like flash cards. Keeping in mind he has problems with some enunciation, I am proud to announce that he correctly identified all but 3 of the fruits and 5 of the veggies! And I picked hard ones too… like pomegranate, avocado, etc. I was SO very proud of him! I felt good about myself too… I must be doing something right when my 14yr old autie can correctly name off those and a classroom of 1st graders WITHOUT disabilities cannot! I had one of those teary-eyed proud mommy moments LOL! Well, thinking about school lunches and looking at all the reusable shopping bags inspired today’s craft.


Craft Idea of the Day: Fabric Lunch Sack

Materials Needed:

1/2 yard of fabric(can be coated in vinyl)
1" piece of Velcro

Instructions:

Step 1: Cut two rectangles 15 1/2" long x 12" wide from desired fabric. Cut 2" x 2" square from the bottom right and left corners of fabric rectangles.

Step 2: Use 1/2" seam allowance unless noted. For fabrics which do not ravel, press or finger press seams open. For fabrics which tend to ravel, do not open seams. Use a zig-zag stitch along raw edges. Pin bag front and bag back, right sides together. Stitch right and left side seams. Stitch bottom seam.

Step 3: Pull bag front away from bag back at bottom corners. Matching bottom seam and side seam, pin bag bottom to bag side.

Step 4: Turn bag right side out.

Step 5: Top Edge: Turn top edge under 1". Pin. Stitch close to raw edge.

Step 6: Side creases: Place bag on a flat surface. Measure 1 3/4" from side seam. Crease (or finger press) bag from top edge to bottom. Since backpack nylon cannot be ironed, stitch along crease as close as possible to fold, catching bag front and back. Repeat for remaining three side creases.

Step 7: Velcro: Cut 1 1/2" length of Velcro. Position and pin the “soft" Velcro piece to the front of the bag, centered 1/2" from the top edge. Stitch. Position and pin the “rough" Velcro piece to the back of the bag, centered approximately 3": from the top edge. Stitch.

Ok, isn’t that neat? Next, we have another favorite subject of mine… FOOD! Now tell me… what casserole week would be complete without the old fashioned, traditional TUNA casserole? None that’s which one! So, with a few tweeks and without further ado, I give you the…


World’s Best Tuna Casserole

Ingredients

1 (12 ounce) package egg noodles
1/4 cup chopped onion
2 cups shredded Cheddar cheese
1 cup frozen green peas
2 (6 ounce) cans tuna, drained
2 ½ (10.75 ounce) cans condensed cream of mushroom soup
1/2 cup of milk
1/2 (4.5 ounce) can sliced mushrooms
1 cup crushed potato chips
1/2 teaspoon cayenne pepper

Directions

Bring a large pot of lightly salted water to a boil. Cook pasta in boiling water for 8 to 10 minutes, or until al dente; drain.

Preheat oven to 425 degrees F (220 degrees C).

In a large bowl, thoroughly mix noodles, onion, 1 cup cheese, peas, tuna, pepper, soup and mushrooms. Transfer to a 9x13 inch baking dish, and top with potato chip crumbs and remaining 1 cup cheese.

Bake for 15 to 20 minutes in the preheated oven, or until cheese is bubbly.

Ok kids, that’s it for today! I’m off to organize, cook, clean, and drive my family nuts LOL! I hope you have fun with whatever you plan to do! Peace, Love & lots of HUGS!

Saturday, March 27, 2010

EVERYTHING’S COMING UP ROSES!

Well a beautiful morning to you all! How are you doing this absolutely gorgeous day? I am floating on rose petals! LOL… Last night I had to go to the stores for a few things we needed and I found some beautiful plant deals! I took these great pictures last night (everyone thank Dad for the card reader, which works great obviously LOL, letting me able to share lots of great pics with you again… Thanks Dad! LOL)


These are Yellow Diamond Jubilee Hybrid Tea Roses that I found clearanced to $4.50 a piece! I pruned off the dead parts of the plant and they don’t look so bad really! Each plant already has 4 buds on it and they are supposed to have a sweet fragrance. Anyone who knows me knows that my favorite flower is the rose… red and yellow ones firstly, but all roses in general. These were the only 2 yellow ones that they had for clearance and they were just SCREAMING “Take me home PPPLLUUEEAASSEE!?” LMAO!


Ok, so then I go to Home Depot to cash in on the awesome Garden Club Coupons I got in the email this month. More free flowers YAY! I got the mini roses for me and 2 packs of day lily bulbs for my mommy to replace the ones she lost. I hope she likes them! As for the mini roses, they are going into a big pot together to hopefully make a very pretty walkway decoration. I’m thinking small square planter at the front door, stained, and maybe even some fancy stenciling painted on it… or maybe just a big plastic pot LMAO cause that’s what I got right now LMAO!


I ended up going out to my mom & dad’s house yesterday and I did some more plant foraging. You will never guess what I found! Ok all over their yard is these little onion looking stalks. My parents say they are wild onions… ok… but we didn’t think you could actually eat them. That was until my Dad informed us that he has already eaten them before! So he goes and rinses a couple off and he and my DH chow down right there in the yard! OMG are you serious! YUCK! LOL… But as the day went on, I got to thinking more and more about them, I jumped online to check them out, and they are so totally safe and edible, so I pulled up a bunch more to take home and clean up to cook with. They are very strong smelling, but don’t make your eyes water like normal onions.


So mom and I are looking around in the house and I look out the window into the field next to their yard. And I see something… something that doesn’t look like a weed, but more like a lily or a gladiola, etc. I just have a gut instinct that they might belong/were once in my mom’s lily bed. SOOO lol I go frolicking in the lot and start pulling them up. They had these HUGE rhizomes on them! (For those who don’t know… a rhizome is a horizontal plant stem with shoots above and roots below serving as a reproductive structure. In botany, a rhizome is a characteristically horizontal stem of a plant that is usually found underground, often sending out roots and shoots from its nodes. Rhizomes may also be referred to as creeping rootstalks, or rootstocks.Thanks MOM for teaching me a new- and fun to say LOL- word!) I put a bunch of them into some soil in pots and I am praying they are going to survive and turn out pretty like the picture shows… I've been researching since I got home and the greens look like this picture, so we will see! Keep your fingers crossed! I've been crying at the thought this might be them (LONG story peeps...)

I always have so much fun with my mom & dad. She got some pretty lantana flowers and some other flowers to attract bees and butterflies to her garden, so she was potting those in some hanging pots. We also put tomato plants in her Topsy Turvey planters too. When we went inside and started talking, I got another crazy hair-brained idea! Mom was talking about all the wild edibles you can find all over the place. Plus I actually was doing some reading a couple of nights ago about all the stuff you can find wild in a town not to far from here. So my idea you ask? Oh well packing the kids and a picnic if you will and taking a road trip to this town on a foraging adventure! To see all the edible things we could find during our trip. Isn’t that crazy? But think about all the free food! Southern Dewberries (also called blackberries by some), grapes, strawberries, blueberries, dandelion greens, lettuce, ginger, onions, pecans and other nuts, fruits from roadside trees, you name it! I think it would definitely be interesting if nothing else. Of course you have to be careful you don’t pick some poisonous copycat… which are all over as well! Today mom told me about some HUGE patches of berry vines and fields full of white blossoms! Guess where I will be (and hopefully lots of helpers too) in a few weeks when they turn into ripe delicious berries!? YEP… pickin some berries! Free fruits to make jams, cobblers, eat fresh, make smoothies, you name it! YUMMY! Oh believe me, I will get you some serious pictures. If I am right, we are gonna have more berries than we know what to do with! Maybe I should call myself “The Frugal Forager” LMAO!

So today I think the DH and DS18 are gonna go help my Dad put in new flooring… so what does the woman folk do? Well I guess I am gonna try to finish conquering the mass chaos in the living room and I am actually feeling a bit crafty. Maybe I can get some sewing done. Being that April is Autism Awareness month, I am going to be sewing a lot of things with the puzzle piece fabric. Shopping bags, purses, luggage tags, pillow cases, scrub tops, etc. Whatever hits me is what I will make.

I like to do a lot of charity work. Guess its in my blood I suppose. My mom, dad, and brothers were volunteer fire fighters for many years. Yes I said my MOM too… so doing for others without expecting “repayment” has always been natural. Then throughout my life, many “causes” have effected my life or my loved ones lives quite extensively… I have battled a couple different types of cancer (successfully thank you), a near fatal car accident, bone disease, sexual assault, and quite a few other things in my life. My son lives with ADHD, developmental delays (classified as mental retardation), and Autism. My daughter also has ADHD as well as Asthma and severe allergies and joint disorders. Other things that have touched us include (but not limited to LOL) diabetes, high blood pressure, stroke (adult and pediatric), family of a serviceman, etc. SOOOO as you can see we could basically just pick and choose what we want to support LOL. Its really no laughing matter I know, but sometimes you gotta just laugh to keep from crying ya know? So being that I am not rich and famous and cannot donate hundreds of dollars… what can the “little man” do? Well… I sew… A LOT! I make all kinds of things with either cancer fabrics, autism fabric, yarned lapel ribbons, etc. Then I sell them. When I have great sales, I donate some of the money to those causes major foundations- Susan G. Komen breast cancer, Doug Flutie autism, American Cancer Society. And when sales are not so hot, that’s when I donate homemade items and care packages and other tangible things. I send care packages and cards to the troops, I donate toys and stuffed animals to the Children’s Hospitals and orphanages, toiletries and other homemade things to the Women’s Crisis Center, handmade walker totes to senior assisted living homes, homemade doo rags to the major cancer hospital treatment centers. Most of the time (if we can), the donations are anonymous (like to the hospitals, etc) because we are not doing this to be noticed… its to help. I urge all of you to do at least one good thing for a charity or maybe just even someone you know. It’s a wonderful feeling to know you helped make at least one day a little easier for someone less fortunate! And don’t pass up those bell ringers at Christmas either… every penny does help! My DD has always asked for my change to give since she was tiny… so I always kept a roll of nickels and a roll of pennies in my purse at Christmas time and gave her a few to give each time she saw a Salvation army bell ringer. She learned that giving to others who truly need help is a good thing. Now she has graduated to dollars LOL and sometimes if she has money of her own, she gives that too… but most of the time its mine LOL! I have really great kids. Even my DS14 gives to them and seeing an autie donate is a moving experience! I firmly believe that if everyone gave just a little bit of love in some way like that, the world wouldn’t be such a violent place.

Ok, now that I am blubbering again (I don’t know why I am so emotional the last couple of days) lets get back to crafts. Being I have talked about gardening, seeds, etc. a lot, a good craft for someone you know who likes to garden would be this nifty little nature craft!


Seed Packet Craft with Matching Pot
by Twila Lenoir

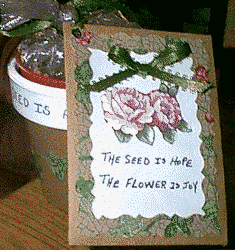
This seed packet and matching pot is a lovely way to share the seeds from your favourite garden plants, and it looks attractive enough to use a personal housewarming gift or gardening gift.

Seed Packet Craft

Craft Supplies:

free printable seed packet pattern
terra cotta plant pot
potting soil
2 small clear plastic bags
acrylic craft paints in brown and white
permanent marker
brown paper bag
wallpaper remnants or fancy printed gift wrap
decorative edging scissors or pinking shears
spray sealer
thin ribbon
Seed Packet and Pot Project

Craft Instructions:

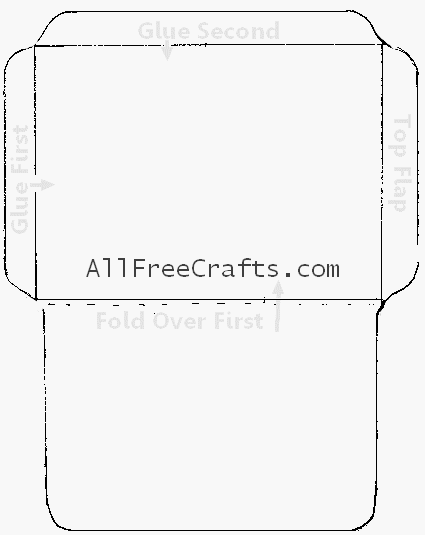
1. Print and cut out the free seed packet pattern. Trace the pattern on a brown paper bag, cut out, then fold and glue where indicated on the pattern.

2. With pinking shears or decorative edging scissors, cut out a rectangle from wallpaper or gift wrap. This needs to be a little smaller than the seed packet and should be glued to the front.

3. From white paper, cut a rectangle slightly smaller than the wallpaper rectangle, again using pinking shears or edging scissors. Decorate the top of this with a flower sticker or decal, a motif cut from wallpaper, or a rubber stamp design of your choice. You will repeat this decoration on the pot.

4. Write a positive message on the front the seed packet, such as "The Seed is Hope, The Flower is Joy." Glue on a bow made from thin ribbon over the top of this message.

5. Paint the terra cotta plant pot in a color similar to that of your brown paper bag. Paint the rim white. Once the paint is dry, use permanent marker to write the same message around the rim that you wrote on the seed packet. Decorate the pot with a flower motif, decal, sticker or rubber stamp that matches the one that you used on the seed packet.

6. Add some potting soil to a clear plastic bag, seal, and place inside the plant pot.

7. Brush a finishing sealer on the pot.

8. Punch a hole in the top left corner of the seed packet. Place the seeds in a small plastic bag (tiny ziploc bags work very well). Seal the bag of seeds then slide it into the seed packet envelope and glue down the top flap.

9. Thread another length of thin ribbon through the hole punched in the seed packet. Use this to attach the seed packet to the bag of potting soil in the pot.

Now what to eat… well everytime I go outside I find a red strawberry or I open my fridge and see fresh farmers market produce. I have been on a salad and fruit kick lately, so I thought I would share this refreshing salad recipe with you today.


Grilled Chicken Salad with Seasonal Fruit

Ingredients

1 pound skinless, boneless chicken breast halves
1/2 cup pecans
1/3 cup red wine vinegar
1/2 cup white sugar
1 cup vegetable oil
1/2 onion, minced
1 teaspoon ground mustard
1 teaspoon salt
1/4 teaspoon ground white pepper
2 heads Bibb lettuce - rinsed, dried and torn
1 cup sliced fresh strawberries

Directions

Preheat the grill for high heat.

Lightly oil the grill grate. Grill chicken 8 minutes on each side, or until juices run clear. Remove from heat, cool, and slice.

Meanwhile, place pecans in a dry skillet over medium-high heat. Cook pecans until fragrant, stirring frequently, about 8 minutes. Remove from heat, and set aside.

In a blender, combine the red wine vinegar, sugar, vegetable oil, onion, mustard, salt, and pepper. Process until smooth.

Arrange lettuce on serving plates. Top with grilled chicken slices, strawberries, and pecans. Drizzle with the dressing to serve.

Okie Dokie kiddos, I have to go get the manfolk up and dressed for a day of hard work. Then its time to clean and such… today is really going to be “Susie Homemaker” day LOL! You take care in your travels or whatever you find yourself doing and I will see you tomorrow! HUGS!!

Friday, March 19, 2010

LOTS O’ NEWS

Well good morning to all my peoples out there. How ya doing this fine March morning? I’m a little tired and a little banged up (very clutsy night on my part! I jammed my toe and burnt my finger LOL!) but I’m good. So how do you like the new décor? Pretty festive I think LOL!

We got a little less than 2/3 of my storage unit cleaned out YAY! A day or two of some hard cleaning and such and I should have that sucker knocked out and that bill eliminated… a month ahead of the goal I set for myself YAY! GO ME! Thanks to my mom for the use of the truck, and to my Dad, DH, and DS18 for moving all the stuff in and out of storage and the attic! I figure one day next week once the kids are back in school, the DH and I can go knock out the last of what is left in storage. No sign of Mickey the Mouse thank goodness… but I DID discover that little buzzard ate my paper mache skeleton torso I worked over a month on! Oh let me see him when I’m cleaning!

Ok, so the first bit of news… It was a good mail day yesterday! I got my free samples from Proctor & Gamble, Sams, Kotex, some seeds, my Burpee catalog (YAY!), the new JoAnns ad and coupon, and some other things! I love getting mail… and lots of it! I could’ve done without the very high electric bill or water bill, but the catalogs, free samples, etc were all super cool!


So, the other day I told you about a FREE seed offer from Wintersown.org where you print out the page request and send it in with a SASE and you would get some seeds. Well, I had sent mine in a couple of days after I printed it out and OMG I got my envelope back yesterday in the mega mail. Let me tell you , my envelope was FULL! I received 10 bags of seeds… I got on bag/packet of each of these seeds: tomato, Swiss chard, Purple Vienna Kohlrabi (aka a German Turnip), Eastern Bluestar Amsonia Tabernaemontana, Evening Primrose, Switchgrass, Celosia Plumosa, Cleome White Sparklers, Calendula, and a wildflower blend! So it’s off to the research for me! If you haven’t done this offer yet, ya gotta try these out! Who knows what types of seeds you’ll get! Follow the link to WinterSown.org and look on the right for the link to the free seed offer. It’s definitely worth your stamps!


They also let you know how to donate seeds to them as well… and I plan on it. Seeing as I have a big cup full of Poblano seeds I gathered and a few other seeds as well, I am gonna print out some of their cute seed envelopes and mail them as a donation to them. I have 12 envies of Poblano seeds ready to mail right now… hope they enjoy them. Now I am just waiting on the offer from Dinner Garden I completed… will let you know when that one comes in.


More news on the topic of gardening, seeds, etc… we had to harvest the first strawberry! It was trying to start being squishy on one side. Since it was bright red, you see me with my first berry of the season. I sliced it and we all tried it… OMG!!!!!!! Sweet, juicy, and oh-so-wet-myself-yummy! And I grew it on my own so that made it taste even better LOL! I can’t wait for tons of these delicious bites of heaven to come to me! Mom has some wild berry vines growing and taking over her shrubs in the back yard, so next week I will be adding those to my lovely hoard of plants invading my back porch! I imagine she doesn’t want them choking out her shrubs, and I love picking the berries… so let’s have some fun! LOL… I was gonna go hunt a bunch down on the sides of the road, but hey, this is safe and free so why not! LOL… get enough of them and you can make some most awesome jellies and jams, cobblers, fried pies, and SOOOO much more! So stayed tuned for pics of me in long sleeves sweating like crazy to get a ton of these berry vines transplanted into huge pots and hauled home.

My Dad mentioned something about the law and selling plants with patents. I am doing some research, but the preliminary reports show that I am ok as long as I call the companies and ask if its ok as long as its not a giant number of plants. Its part of the US code, so I am doing some legal research now (good thing my old job was all about legal research LOL!) about everything I need to know about seed propagation for profit. To Jean- thanks for the comment… as for the Brandywine tomatoes, we have never tried them. I would love to try them, but I don’t think I’ve even ever seen them locally. I would have to research them, if they would even grow in my zone. I did notice that Burpee has giant watermelon (supposed to grow to 200 pounds YAY! LOL) so I might look more closely in their catalog. I am thinking one giant pumpkin and one giant watermelon and I would be set LMAO! Oh I can see my landlord’s face with giant melons and gourds in my yard!

And then we have some funny/silly gardening news. Madison and I have come up with a new planter idea for next year! We have decided to make “The Purple Planter”. As we quickly skimmed through the Burpee catalog, we noticed all the various fruits, veggies, etc that come in/grow into purple foods… Eggplant, tomatoes, turnips, beans, lettuce, etc. So we figure we can build another planter and paint it purple. Inside the purple planter, we can grow nothing but purple fruits and veggies LOL! We think it would be kinda cool… and it would DEFINITELY be interesting to watch grow and flourish! LOL! Soooo... Dad... you have any paint from the front room left? LOL!

However, we do have some sad garden news to report… out of 8 corn plants… only 3 are still hanging in there. I have lost 5 of them. I have also lost 2 out of 3 of my bush pickle cucumber plants too. Not sure what happened… but we are praying for the remaining plants in the planter. I might go pick up a couple more bush cukes if I can find them… but I’m gonna try to avoid buying too many other things now that everything is pretty well established. The only other additions will be the seeds that grow that I don’t sell.

Alrighty… news on the craft horizon. I found this great gift box idea and I thought it was simply adorable! So I had to share it with you.


Craft Idea of the Day: Rascally Rabbit Gift Box

What You Need:

Oval box with lid (7-1/2 x 10 x 5 inches)
12 x 18-inch sheet of pink stiff felt
Stapler
Crafts glue
Double-sided tape (optional)
5 sheets of blue paper
White, black, purple, and yellow paper scraps
Thin white wire
1-1/2-inch pink pom-pom
2-1/2-inch white pom-pom
White crafts fur scraps
Hole punch
Orange curly ribbon

Instructions:

1. Cut two 4 x 18-inch ears from felt. Staple ears inside the box along top edge.
2. Cover box and lid with blue paper.
3. Have an adult cut a 1/8 x 4-1/2-inch slit on each side of the lid and slip over ears.
4. Cut out face pieces and glue to front of box. Add wire whiskers, a pink pom-pom nose, and white pom-pom tail. Glue a small piece of fur to top of lid.
5. Punch two holes at the top of each ear. Thread one curly ribbon through each ear. Knot ends together to create a handle.

Ok its time for food news… I made these last night for my gang in hopes there would be a few left but fear not… the family never lets me down to devour every piece of food I made! LOL! I am sure you could use other cuts of chicken for this recipe, but I had set out legs, so that’s what we had… along with corn, mashed potatoes, and some biscuits that were left over from the big breakfast I cooked in the morning.


Oven Fried Parmesan Chicken Legs

Ingredients

12 chicken drumsticks
2 cups grated Parmesan cheese
1 cup Italian bread crumbs
1 egg
1 teaspoon ground black pepper
1 teaspoon salt
1 teaspoon garlic powder
1 teaspoon oregano
1 teaspoon smoked paprika

Directions

If desired, soak chicken in 1/4 cup salt for about 1 hour to reduce the amount of blood that “cooks out” of the chicken.

In a shallow bowl, mix together salt, pepper, paprika, oregano, garlic, bread crumbs, and cheese. In a separate bowl, beat egg until lemon colored.

Dip chicken in egg, coating well. Roll in cheese mix.

Bake at 400 degrees F (205 degrees C) for 45 minutes, or until brown and crispy (flipping half way through the cooking process will make them crispy on both sides).

Well kids, after all is said and done, you’ve got another craft idea, another meal idea, and hopefully a lot of inspiration to boost up your day. I think today is lazy research day for me as we prepare for a family outing to the big farmers market in Houston tomorrow (if the rain holds out). Supposed to be clouds in the morning and rain in the PM, so we’ll watch the weather today before we decide. To each and every one of you, thanks for reading and I hope you continue to enjoy my blog everyday. Peace, Love, and tons of HUGS!!!

Thursday, March 18, 2010

CONQUERING CLUTTER

Hi everybody! How are you doing today? I am trying to get pumped up to get up and get motivated. We are going to be getting the big chunks of holiday stuff out of my storage unit today and moved over to my mom & dad’s garage attic. This is gonna be a big feat as I have many years of collecting stuff to move! Let’s put it this way… I rent a 10x10ft. storage unit and it is piled to the door and about 8.5-9ft. high…. Only having one little path on each side to maneuver around! A sad packrat isn’t it? So today my holiday stuff is being moved out to my parents so that I will be one step closer to conquering that goal of eliminating that bill! Wish us luck… cause we’ll need it!

Ok, the last few nights I have had a dream every night where I start with a tiny table selling plants and learning everything I can, even getting a botanist degree, and the venture turning into something similar to Mr. Maas nursery and home. I could definitely handle that! So yesterday Madison and I talked about the seed2plant sales. She thought it was a good idea and wanted to help. (I’m sure when the other kids find out about it there will be lots more hands helping LOL!) So we have a few pictures to share with you from our day yesterday…


Here is the DD on “Wasp Duty” LOL! She was a little spooked when we first went out there to plant because there were so many wasps. I had told them about my little run-in with them and she was afraid they would try to pollinate HER head LOL!


Did I not tell you that this strawberry has been taunting me? Its like practically over night this thing went from a pale pink to a fire engine red! All plump and juicy yumminess just calling my name… its not cool! Ya can’t eat just ONE strawberry… its like pringles! Ok LOL so anyway, my garden is turning into an overnight miracle! Definitely one for an impatient gardener! I don’t know what I did but I am saying thanks every morning!


DD again… planting our tons and tons of seeds. She keeps asking if I want her to take a picture of me, but I’, like “No thanks, you’re much cuter on camera than me” LOL!


Here is the table of seeds we ended up with last night. We now have over 100 seeds sowed. And we will be doing more when I get more containers. I almost have another egg tray emptied which is at LEAST 30 more seeds! We started Poblano, Green Bell Pepper, Jalapeno, Cantaloupe, Watermelon, Okra, 2 different kinds of tomatoes, and some peas. Gotta go through my stash of seeds and see what else I have to try to start. Hopefully I can have a nice variety of seedling plants to sell in about a month or so. That should be enough time for them to germinate, grow, purchase the pots and transplant them all. I can print out cute labels on my computer, so that won’t be a problem. Just getting those dang little pots right now is the big issue…

So that was our day of planting fun. Most of the plants are established now and doing their own thing. All I am doing is making sure they have water and mother nature is helping with the rest! But its so exciting going out there each day and seeing the, sometimes dramatic, changes with each plant. I have one broccoli plant with looks like a poofy yellow loofa of flowers LOL! I have a Roma tomato almost as big as an egg, and so many other small, but noticable things are going on too! It’s a wonderful feeling!

OK, so now that I’m done swooning over the garden LOL, lets get a little crafty. I found this cute addition to your décor on my Thrifty Fun pages and I thought you would enjoy it!


Craft Idea of the Day: Bunny Jar Vase

Create this cute bunny vase for your Easter table from a pint jar, felt, and few other supplies.

Approximate Time: About 30 minutes.

Supplies:

pint jar
white felt
pink felt
wiggly eyes
black marker
3 chenille stems
pink pom pom or pink cotton ball
white cotton ball
scrap piece of cardboard or poster board
pencil
scissors
hot glue gun and glue sticks

Instructions:

Draw a bunny head, including the neck onto a piece of thin cardboard or poster board; cut out the design. Using this as a template, trace around the head onto a piece of white felt; cut out. Glue felt head to cardboard template and set aside.

For arms, draw a football shape onto cardboard that measures approximately 4 1/2 inches wide by 11 inches long; cut out. Using this as a template, trace around arms onto a piece of white felt; cut out. Glue felt arms around jar; they will overlap slightly in front.

Draw an inner ear onto piece of cardboard; cut out. Using this as a template, trace around inner ear onto pink felt twice; cut out both pieces and glue to inside of bunny's ears.

Glue on wiggly eyes, chenille stem whiskers, and pom pom nose. Use black marker to draw on the paws and to draw on a mouth. Glue the neck of the bunny inside the jar to hold in place. Glue white cotton ball at the bottom center on back of the jar for the tail. Fill the jar with fresh or artificial flowers.

By Rachel's Mom from Wilkesboro, NC

I think I will make one of these and maybe put some fresh carnations or tulips or something “Spring-y” in to cheer up my living room! Ok, now on to my personal favorite part of the day… yep FOOD! OMG its no wonder I need to rent the local circus tent for a formal gown… cause I love food LOL! I love to grow it, I love to cook with it, and I especially love to EAT IT! Now here is an absolute easy one pot wonder… but I will say it has a slight “hot dog-ish” taste, so maybe try with an Italian or Andouille sausage or even chicken meat… either way, its yummy and oh so filling!


Baked Penne with Smoked Sausage

Ingredients

1 (16 ounce) package Hillshire Farm® Smoked Sausage
1 (10.75 ounce) can cream of mushroom soup
2 1/2 cups milk
8 ounces uncooked penne pasta
1 1/2 cups French-fried onions, divided
1 cup shredded Cheddar cheese, divided
1 cup frozen peas

Directions

Preheat oven to 375 degrees F. Cut sausage into 1/4-inch slices.
Heat a large skillet over medium-high heat for 3 minutes. Add sausage; cook and stir for 3 to 4 minutes or until lightly browned.

Combine soup and milk in a 13x9-inch baking dish. Stir in uncooked pasta, sausage, 1/2 cup French-fried onions, 1/2 cup cheese and peas. Cover baking dish tightly with foil.

Bake for 45 minutes. Remove foil and top with remaining 1 cup French-fried onions and 1/2 cup cheese. Bake for 3 minutes or until cheese is melted. Let stand 5 minutes before serving.

Ok kids, I have to go wake up the household and get them up and moving for the day so we can get the storage knocked out and hopefully conquer the clutter today! Ya’ll have fun and be good and I will see you back here tomorrow! HUGS!

Friday, March 12, 2010

BACK IN THE GAME

Good morning all my friends! How are you doing this bright and beautiful morning? I am doing much better today than yesterday LOL. DD texted me after she got off the plane and we chatted a bit, then she was off for a day of fun n the sun with her friends at Epcot! If you’re over that way, remember to wave HI to the Dickinson High School Band LOL! She sent me a space postcard and she was in it having a blast! Then she called me before she went to bed and all is well. And she even texted me this morning! Thank you to everyone for the comments yesterday! They made me feel a lot better. To my mother… you ALWAYS have to get that “I told you so” in there don’t you? LMAO… and to Cyndi… hun I am so sorry! I don’t want you to leave and I didn’t mean to make you cry. I can say I think I have some awesome kids… both biological and communal! They are polite and helpful and I would claim every one of them! As far as the cheesecake comment… oh I rolled LMAO and then I opened a candy bar! LOL! Talk about putting on pounds… take that doc! LMAO! But seriously, I AM glad that my thoughts can provoke powerful emotions in people. Sometimes that’s what we need… a good cry… it cleanses the soul. And thank you to Hazel and Vincent as well for being so kind. I couldn’t ask for better readers! I have the best in the world… commenters, emailers, and just readers all around!


Ok, I was trying to recoup from the emotional train wreck I was yesterday, so I built me a small planter from some scraps of wood. I stained it and let it dry all day in the sun. It’s small and cute! I love it! I made this one out of 2 x 12’s. I think this is gonna be either a box for a tree or for my peas… not sure yet LOL. The DH went over to the houses behind us, where they are building on the houses, and got some more scraps of various sizes. I can build another 2x12 box like the one I did today… just a little bit thinner (not as wide). And then there are a bunch of 2x2’s I think they are… that will make a cute thinner box; like a window sill box. I’m gonna need more screws though LOL!

OMG I so have to tell you what I discovered yesterday! Ok… I have been taking my trays of seeds outside during the day for the sun, fresh air, etc. (LOL they kinda sound like pets don’t they?) LMAO! Anyway, I put them out on the patio table, which is where I work with smaller plants, plant seeds, etc., and went to water them and low and behold I have yet another sprout! But this is no ordinary sprout! It’s a GIANT PUMPKIN!!!!!! Yes you heard me… one of the seeds FINALLY germinated! YAY!!! I was so dancing for joy!

My dad built my mother some raised beds on planter platforms… and she got her gift card, so guess what we will be doing today? Yep SHOPPING FOR PLANTS! YAY! LOL… Of course, I am so stoked about my giant pumpkin, I doubt I could find a plant as awesome! LOL… But mom has 2 rather large planters to fill, so I think we will be bringing home lots of babies LOL! I don’t mind. As you all know, I always have so much fun with my mom. And then Saturday we will be going to the Galveston Home & Garden Convention. Don’t worry I plan on taking lots of pictures and hopefully getting lots of samples, seeds, whatever!

Ok, Easter… here are some more crafts to get you in the Easter mood! Bunnies… there is nothing better than the image of a fluffy soft friendly little carrot nibbling ball of fuzz! So here are some crafts dealing with bunnies.

Craft Ideas of the Day: Easter Bunnies


Terra Cotta Easter Bunny

What you'll need:

2 Terra-cotta pots (any 2 of same size)
White Gesso
Gold glitter craft paint
Paint brush
White felt
Pink felt
Scissors
2 Small wiggle eyes
Hot glue or tacky glue
Pink ribbon
1 Tiny pink pom pom
3 White pom poms (at least double the size of the pink pom pom)
2 Small silk rose buds
Wire cutters

How to make it:

1. Base coat the two terra-cotta pots with white Gesso. Let dry.
2. Glue the terra-cotta pots together (see photo).
3. Cut a piece of ribbon to fit around the middle of the bunny. Glue in place.
4. Tie a bow with another piece of ribbon and glue on.
5. Add gold glitter craft paint on center of bow.
6. Glue white pom poms on right above ribbon (see photo).
7. Glue pink pom pom above and right between white pom poms.
8. Glue on wiggle eyes.
9. Cut out ears out of white felt. Cut ears a bit smaller out of pink felt. Glue together.
10.Glue ears on top of the bunny.
11. Cut the stems off the rosettes with the wire cutters.
12. Glue a ribbon rosette in front and in back of ears.
13. Glue bunny tail on the back of bunny, about half way up the bottom pot. Let dry.


Bunny Envelope

What you'll need:

4X6 envelope in pastel shade
Pencil
Scissors
Pink construction paper
White construction paper, optional for eyes
Black construction paper, optional for eyes
Red marker, pen, or crayon
Wiggle eyes, optional

How to make it:

1. Lick the envelope shut.
2. Turn the envelope up long ways (portrait). Note: Most of the envelope will be ears.
3. Leave about 2 inches to draw on the bunny face. Draw on ears and cut around the ears.
Note: This leaves you with a little opening for the grass and eggs.
4. Cut out inner ears out of pink construction paper and glue in place.
5. Glue on wiggle eyes, or cut eyes out of construction paper and glue in place.
6. Glue on pom pom nose, or cut a nose out of construction paper and glue in place.
7. Draw on mouth with red pen.
8. Fill opening with Easter grass and an egg or goodies.


Egg Bunny

What you'll need:

Hard-boiled egg dyed pink
2 medium wiggle eyes
2 medium white pom-poms
2 medium pink pom-poms (optional)
7 miniature pink pom-poms
¼ of a cardboard tube
Pink paint
3" x 3" piece of pink construction paper
Glue stick
White craft glue
Scissors

How to make it:

Dye hard-boiled egg pink, according to the instructions on the dye package. Paint the cardboard tube pink and set aside to dry. Place pink egg in the cardboard tube. Cut two long ears from pink construction paper. Glue the bottom of both ears onto the back of the egg. Use white craft glue to attach wiggle eyes to the front of the egg. Below the eyes, glue two white pom-poms next to each other to make the bunny's cheeks. Just above the two white pom-poms, glue one of the miniature pink pom-poms to make the nose. Lift the egg out of the cardboard tube and lay it onto its back on the cardboard tube. Allow the glue to dry. To make the feet, cut an oval from the pink paper, about 1.5" high x .75" wide. Cut the oval in half width-wise. Glue three miniature pom-poms to the curve of each foot. After egg has dried, set it on a towel while you glue the feet to the front of the cardboard tube. Place the egg back in the tube upright. OPTIONAL: You can also glue two additional medium-sized pink pom-poms on either side of the bunny to make paws.

Tips:

Instead of a boiled egg, use a plastic egg.

You can make a tube yourself out of construction paper to eliminate the painting step.

For a more simplified foot, skip the miniature pom-poms and draw on the toes with a marker.


Sleepy Bunny

What you'll need:

½ egg shell
Wooden doll stand
2 large white pom poms
4 medium white pom poms
1 miniature pink pom pom
Scrap of black felt
Pink and white acrylic paint
White felt
White craft glue
Scissors
Thin white ribbon

How to make it:

Be sure egg shell is clean and dry. Paint outside of egg shell pink. Paint the doll stand with a mixture of white and pink paint. Let dry. Glue the egg shell to the doll stand. Add some glue to the inside of the egg shell. Place one of the large white pom poms inside the egg shell. Glue the other large white pom pom on top of the first one. Glue two medium white pom poms to the inside of the egg shell so that they show at the top of the shell (paws). Glue the other two medium white pom poms to the head for the cheeks. Glue the miniature pink pom pom in between the two cheeks. Cut two long ears from the white felt and glue to the top of the head at the sides. Fold them downward and glue the ends to the egg shell. Cut two small crescent shaped slits from the black felt and glue on to head for sleepy eyes. Tie ribbon around the bottom of the egg shell and form a bow, trim the ends.

Tips:

Pom poms can be purchased in large value packs with different colors and sizes.
Be sure to check the craft stores following each holiday for major clearance priced items.

You could get even more creative and add a sleeping cap to the project by cutting a piece of pastel colored felt and rolling into a cone. Glue it to the top of the head and bend the end downward and glue to bunny’s back.


Bunny Ears

What you'll need:

White poster board
Pink construction paper
Scissors
Pencil
Tacky glue or school glue
Tape or stapler
Easter stickers, optional
Markes, crayons, or colored pencils; optional

How to make it:

Cut a strip of poster board about 2" wide by about 24" long. Cut out 2 ears out of poster board each about 8 1/2" long x 3 1/2" wide. Cut out 2 smaller ears out of pink construction paper. Glue the pink ears inside the white ears. Glue the ears inside the band, positioning to fit behind the child's head. Let the child decorate the head band with stickers, markers, crayons, or colored pencils if they wish. Tape or staple the band to fit the child. Cut off any excess.


Bunny Pin

What you'll need:

1 large round pre-cut wood pieces (recommended: Woodies)
2 medium teardrop pre-cut wood pieces
2 small teardrop pre-cut wood pieces
1 (1/4") pink pom-poms
2 (10 MM) wiggle eyes
Tacky glue
White craft paint
Pink craft paint
Paintbrush
Red thin line paint markers or permanent marker
Jewelry pin back

How to make it:

Paint the round pre-cut wood pieces white. Paint the 2 medium teardrop pre-cut wood pieces white. Paint the 2 small teardrop pre-cut wood pieces pink. Let all pieces dry. Glue the pre-cut wood pieces together as shown in the photograph. Glue the eyes and pom-pom nose on the round pre-cut wood pieces as shown in the photograph. Use the red paint marker or permanent marker to draw on the eyebrows and mouth. Let glue dry. Glue the jewelry pin back to the back of the round pre-cut wood pieces. Wear and enjoy!

So there you have it… lots of crafts about bunnies! I think bunnies are so incredibly cute! Fuzzy and cuddly… you just want to squeeze and hug them all the time! Now as for food, lets stick with some Easter bunny food too…


Easy Bunny Cake

Ingredients

1 (18.25 ounce) package yellow cake mix
3 3/4 cups flaked coconut
1 (16 ounce) package vanilla frosting
30 small jellybeans
4 red licorice

Directions

Heat oven and prepare two 9 inch round baking pans as directed on cake box. Prepare cake batter with as directed on package adding in 1/2 cup of coconut. Divide batter evenly between the prepared pans. Bake and cool cake as directed on package.

When cooled, place one whole 9 inch cake layer on serving tray, forming the bunny's head. Cut 2 convex shaped ears from each side of the second layer, place on each side of head to form ears. Use concave shaped piece for the bowtie, place about 1/2 inch below head.

Frost entire bunny covering top and sides of bunny. Pat remaining 3 1/4 cup coconut evenly over top and sides. Decorate the bunny face and bowtie with jellybeans and use the licorice to make whiskers.

Ok kids, I’m off to shop til we drop for plants and such! I’ll share lots of pictures from our adventures with you when I get back! Until tomorrow… HUGS!

Wednesday, March 10, 2010

CATCHING THE FEVER YET?

Well good morning all my faithful friends! How are you doing today? Me… well I’m still about the same except I have this crazy rash on my hands that I noticed yesterday. Good thing I’m fixing to head out to the doctor so they can tell me what it may be. I think I might be allergic to something I either ate or touched at one of the nurseries! UGH! I am leaning to touched something because its just on my hands and forearms. Anyway, I want to thank everyone for the comments you left me. It’s good to know that I’m not just being weird about this whole trip thing. And I am very happy to see my mom getting in the gardening mood/spirit! YAY! Everyone say HI MOM! LOL…

OK Susan, you asked a very specific question. Most of my gardening is always veggies and an occasional flower of sorts. I don’t do tropical house plants personally. BUT I spent a lot of the night researching for you and from what I can tell the Kaffir Lily and the Ponytail Palm would be good seeds to start. I also ran across cactus, bonsai, spider plants, aloe vera, and bamboo as being very good seeds to sow for indoor plants.


The Kaffir lily, miniata, is a tropical houseplant that thrives in the shade. Native to South Africa, it grows under the protection of trees and bushes in its natural habitat. As a houseplant, it prefers partial shade and well drained, slightly acidic soil. Kaffir lily plants can grow up to 18 inches tall and up to 25 inches wide, so a large pot is recommended. The plant takes about four years to fully mature, at which point it will flower in the spring and summer months.


Ponytail Palm: While flowers and hanging vines are fun, some indoor gardeners are more ambitious. If you'd like the joy of watching a tree grow in your living room, starting a ponytail palm tree, Nolina recurvata, from seed may be for you. This plant is not a true palm tree, but is a succulent, native to Mexico. At maturity, which can take up to 15 years in a pot, the ponytail palm reaches heights of 6 feet or more. This plant has a great amount of potential for people who occasionally forget to water their plants--over watering this plant is more harmful than under watering it. Requiring full sun and well-drained soil, starting this stunning plant from seed takes little effort.

As for plants to plant with the daycare children, to keep the interest of the little ones you might consider seeds that germinate and sprout fairly quickly. Some flower seeds that are quick to germinate include Centaurea (bachelor's buttons) -- 7 to 10 days; Dianthus (sweet William) -- 5 to 10 days; Rudbeckia (gloriosa daisy) -- 5 to 10 days; ageratum -- 6 to 10 days; cosmos -- 5 to 7 days; sweet alyssum -- 8 to 15 days; zinnia -- 5 to 7 days; and Mexican marigold -- 5 to 7 days. Vegetable seeds worth trying include corn -- 5 to 7 days; cucumber -- 7 to 10 days; lettuce -- 7 to 10 days; sweet peas- 7-10 days; and watermelon -- 5 to 7 days. To ensure success, plant your seeds in moistened seed-starting mix and keep them in a warm location. Also check out this website called Eartheasy and their article Gardening with Children for some more ideas! I hope some of this information has been helpful.


OK, since yesterday was Garden Comment day, I got to thinking…a lot of you are talking about it still snowing where you are… so why don’t you make a rain barrel or 2? Shovel some of that snow (which is full of nutrients BTW) into the barrel and then when it melts, you will have good water for your plants! Not to mention, that it saves on your water bill when you have it in reserve! You can also bring some of that snow inside and when it melts, you can water your houseplants with it as well! You can make a rain barrel out of food grade 55 gallon drums or even trash cans. You will need a spigot and a few other things. There are a ton of websites with instructions to make a rain barrel, but two of the best ones I looked at were How to make a Rain Barrel Cheaply and Recycle the Rain.


Now some of you have laughed at the fact that I said I wanted to grow giant pumpkins! And as of right now, it does not look like my seeds are going to sprout BUT I found a great article that might help me… so I plan on getting more seeds IF I can find them and trying again! I WILL have me a 500 pound pumpkin! LOL can you see my landlord’s face when it starts to grow?!? OMG if I can actually get one to grow, I will be LMAO. The world's largest pumpkin isn't just giant--it's gargantuan! The current record holder is Christy Harp's 1,725 pound Atlantic Giant pumpkin, which won the Ohio Valley Giant Pumpkin Grower's annual weigh-off in October 2009. Could you imagine if I could grow one BIGGER? Maybe THAT would be the World record breaker on my bucket list LMAO!


Oh I have to show you… I am so proud of the seeds for sweet peas I started! Look how big they have grown in just a few days?! The tallest one is over 4 inches now! I just smile when I go in the kitchen and see these little darlings shooting up! I planted 2 seeds per peat pot (total of 20 seeds) and only 4 did not sprout. Not bad huh? BUT I am gonna keep waiting on them, because one of the pots had a late bloomer… he’s just about an inch tall now. He’s a baby LOL!

And speaking of seeds, I found this site that has lots of good information about sowing seeds inside during the winter. Its called WinterSown.Org and they even have a link on their site for FREE seeds! Make sure to check it out! You have to print out the page and include it with your SASE and mail it within 7 days to get the free seeds. And if you donate $5, they will double your order, bringing the total to 12 free packs instead of 6. They are a 501c3 organization and you will receive a receipt for your donation. I sent mine off and I will let you know how that offer goes!


And I wanted to let everyone know that I DID receive my Free Houston Garden Centers Gift Card on Tuesday in the mail, so if you got it to get yours, congrads! If not, rest assured, I’ll be keeping my eyes wide open for more great deals like this! Now the hard part is deciding what to get with the card! LOL… DD15 wants berries, I want fruit trees, oh and some roses! And I could ALWAYS go for more veggies too! Now you see why its so hard? LMAO!


Ok, so as you have read my daughter leaves on her band trip tomorrow. (I want to thank everyone for their comments regarding how I was feeling BTW.) They are going to Orlando, FL. Well I made some luggage tags for her yesterday. As you can see, I had 3 different music note fabric, so that’s what I made and she could pick what she wanted. She came home from school and chose the black and the white ones… she liked the yellow one too, but opted for the darker 2. That’s fine… I now have the first one for putting in my crafts to sell! YAY! Go me! I originally posted this idea on Feb. 14th, so go check it out as it is a quick easy craft to make for the traveler in your life. I plan on making a ton of them to put in my craft booths for sale!

Now back to Easter crafting… how are you liking the ideas so far? Great… I’m glad you like them. I like doing all kinds of crafts- from sewing to cross-stitching and I like that each day I can come and share craft ideas that I both find online and/or come up with of my own that fits crafters of all skill levels! Here’s one I found on my Thrifty Fun website that I thought you might enjoy!


Craft Idea for the Day: Yarn Bunnies

Supplies:

1 3 oz. skein of white craft yarn
8x8 inch squares of felt, in pink, and white.
1 small spool of 1/2 inch pink satin ribbon
1 styrofoam egg shape 3" ball
1 small pkg. of movable eyes, 1/2"
1 small pkg. of white pom poms 1"
1 small pkg. of pink pom poms 1/2"
black wire, That can be cut into 2" pieces for whiskers
a decoration, for the bunny's hands, I used a small miniature plastic square basket and filled it with mini plastic eggs.

Directions:

Take the skein of yarn, Cut off wrapper, It should unfold in 1/2. Cut the skein of yarn in 1/2, Keeping it still together, Like in a long strips of yarn. Take the Egg for the head, Holding it, Place half the skein over the head evenly, So that each side hangs even. Now, Take the second half skein of yarn and fold it in the opposite way over the head. So now you will have four parts of yarn, hanging over the head. Take an elastic band and tightly hold all four parts of yarn together in your hand and wrap the elastic around until tightly wrapped. Now, You should have made the head and it should look like a mop head. With a 12" piece of pink ribbon, Gather a good amount of yarn from the top of the head and feed the yarn through. and tie in a knot at the end. This makes a pretty hanger for your bunny.

Take another 12" piece of pink ribbon, And just tie it around the neck to hide the elastic, And make a bow tie.

To make arms to hold any object you choose, Just take about 6 strands of the white yarn from each side of the dangling yarn, give each arm a twist, and place the arms together in the front, Tied with a 6" inch piece of pink ribbon. Now you can attach to the arms the basket with eggs, or just leave it with the ribbon tied in a bow.

Now, For the ears, Take one piece of white felt square, Fold it in half, Draw with a pencil, long oval pointed ears, Cut both at the same time, So the ears will be the same size. Now, Do the same thing with the pink square felt, Fold in half, But cut just a bit smaller pointed ovals, These will be hot glued in the center of the white ears. Now, After you are finished making the pink and white ears, Take your hot glue gun and just put two lines of glue accross the top sides of the head, Hold tightly until dry, They should stand up just fine. And last, The face, Glue on two eyes, The nose is made of one pink pom pom, And right below place two white ones. These will be hot glued on, And last, take each whisker, put a dab of hot glue on the end and stick it in between the nose and mouth. I use three on each side!

Ahh Easter… nothing says Easter bunny like a good old carrot. Wait a minute, yes there IS something better! CHOCOLATE! LMAO… Yes my friends I challenge you to tell me one person who doesn’t like a chocolate bunny waiting for them on that Sunday morning. The one with the hollow ears crying for you to rip them off with one big bite LOL! Yea… he is my friend. So let’s have a recipe involving delicious chocolate today shall we? How about...


Too Much Chocolate Cake

Ingredients

1 (18.25 ounce) package devil's food cake mix
1 (5.9 ounce) package instant chocolate pudding mix
1 cup sour cream
1 cup vegetable oil
4 eggs
1/2 cup warm water
2 cups semisweet chocolate chips

Directions

Preheat oven to 350 degrees F (175 degrees C).
In a large bowl, mix together the cake and pudding mixes, sour cream, oil, beaten eggs and water. Stir in the chocolate chips and pour batter into a well greased 12 cup bundt pan.

Bake for 50 to 55 minutes, or until top is springy to the touch and a wooden toothpick inserted comes out clean. Cool cake thoroughly in pan at least an hour and a half before inverting onto a plate If desired, dust the cake with powdered sugar.

OK gang, that’s it for today! I gotta get a shower and get my self to the doctor this morning. Plus I have tons of stuff to do and get ready for my daughter before the end of the night. So ya’ll take care and I will meet you back here tomorrow! HUGS!