myspace generator
Showing posts with label Grilling. Show all posts

Wednesday, July 14, 2010

AMAZING FINDS

Well a big Hi there and Hello to everyone out there in bloggieland! How are you doing today? I'm really exhausted actually LOL. I fell asleep kinda early last night and then woke up at about 2am with a horrible dream. Once I finally got back to sleep, the cats decided to first aggravate the tar outta me and then hog the bed. Thanks boys! LOL... I had a great time with my mom yesterday, as always, and tend to have some more fun again tomorrow and maybe even Friday LOL!

OMG I have to tell you about something I found yesterday! Ok, so while mom was in her therapy appointment, which I cannot go back for, I wandered across the street into the biggest Dollar Tree in our area. I mean I LOVE this store! So I am walking and wandering, just looking at all the neat stuff like school supplies... ah SCHOOL! YAY!!! I love school! LMAO... ok focus here Renee. Anyway, I was doing a serious food scoping and you will NEVER guess what I found in the freezer section... SEAFOOD! I mean scallops, salmon, etc! Can you believe that???!!! I was like OMG are you serious! We absolutely LOVE scallops! OK so I get a couple of things and head to the checkout... and I see these things called "Mudoku" pads. Have you ever seen those info-mercials about those foot pads that claim to dexot you while you sleep? I think they are called "Kinoki" pads? Many people say that they are a scam and don't really work. WELL... I figured, for a buck... let's find out! So I scrubbed my feet last night with some medical "green soap" and then applied these patches to the bottom of my feet. Applying the adhesive puts a unbreathable barrier around this patch. Now I didn't even notice that there was a faint smell to the patches. I kept thinking it was the grill still hot outside from cooking dinner. And I went to bed. When I woke up this morning, I removed those patches and OMG! WOW they were dark brown and the smell was horendous! I thought OMG they really DO work! That was until I did a little more experimenting! I took one of the NEW patches out of the package. First I smelled it... there was that small hint of odor. THEN I decided to see how "toxic" my tap water was... OMG... a few seconds later guess what was dark brown and stinking like crazy! Yep... total scam! There is a powdered iron sulfate or something in the patch that when your feet sweat at night, under that unbreathable adhesive, turns the patch brown and releases the sulfer stench! Its rather gross... but the experiment is complete and it only cost me $1. I feel sorry for all the people who wasted $20 or more for those things.


Of course, then I just told you how I was grilling last night. Oh boy did I have that sucker flamin and smokin! It was great LMAO! I had taken mom to Kroger and we found some clearanced sea scallops (YUM) so I seasoned those up and stuck them on the grill along with some hot dogs, burgers, and chicken leg quarters. The meal was the burgers, dogs, and scallops... the chicken was some extra batch grilling for dinners later this week. And guess what mom and I found when we went to Kroger. Near the checkout, I found a Coca-Cola cookbook. All the recipes contain cooking with the coke to make something rather interesting. This might make for some interesting meals and an interesting theme in the future but I have to try them first LOL!

Ok, so let's talk crafts! I got some serious fever going on, but I am not quite sure what I want to make. I thought about a travel first aid kit that's foldable about the size of a baby changing pad. I thought about a travel neat & discreet pouch for feminine products. I also thought about a few other things I would have to make up a pattern for. But I am pretty befuzzled on what I want to do, so I'm not gonna feature any specific craft today. Pretty soon, there will be crafts coming out of everywhere LOL!

Alright folks, its that time again! Time to chow down on some TERRIFIC TOMATO dishes! Today we are going simple and easy! Tomatoes are used in many food product, including, of course, tomato sauce (ketchup), pasta and pizza. According to a Steel Packing Council survey of 1997, 68% of chefs use canned tomatoes for convenience, quality and flavoring. It hasn’t changed much since. A fruit is the edible part of the plant that contains the seeds, while a vegetable is the edible stems, leaves, and roots of the plant. Cooked tomatoes have higher concentrations of lycopene than non-cooked tomatoes. Don’t store ripe tomatoes in the fridge. Cold temperatures lessen the flavor in tomatoes. If you have psoriasis, you should avoid tomatoes because of the high acid content.


American Classic BLT

Ingredients:

4 slices of bacon
2 lettuce leaves
2 slices of tomato
2 slices of toasted bread
1 tablespoon mayonnaise
salt & pepper (optional)

Directions:

Cook the bacon in a large, deep skillet over medium-high heat until evenly browned, about 10 minutes. Drain the bacon slices on a paper towel-lined plate.
Arrange the cooked bacon, lettuce, and tomato slices on one slice of bread. Spread one side of remaining bread slice with the mayonnaise. Season if desired. Bring the two pieces together to make a sandwich.


BLT Salad

Ingredients:

1 pound bacon
3/4 cup of mayonnaise
1/4 cup milk
1 teaspoon garlic powder
salt to taste
1 head Romaine lettuce, chopped (or prepackaged Spring Mix salad)
2 large slicing tomatoes, chopped
2 cups seasoned croutons

Directions:

1. Place bacon in a large, deep skillet. Cook over medium high heat, turning frequently, until evenly browned. Drain, crumble and set aside.

2. In a blender or food processor, combine mayonnaise, milk, garlic powder and black pepper. Blend until smooth. Season the dressing with salt.

3. Combine lettuce, tomatoes, bacon and croutons in a large salad bowl. Toss with dressing, and serve immediately.

Ok folks, its time for me to get off of here and get busy being productive somehow LOL. I got "the 3 C fevers"... (crafting, cooking, and cleaning LOL) so I have to take a mental aspirin and decide what I want to do LOL! You have a great day and I will chat with you tomorrow! HUGS!

Monday, June 21, 2010

ROSEY RED RUSSIA

Здравствуйте ("zdra-stvooy-tye" Hello) and good morning to all my друзья (friends) out there in blog land! How are you doing this first day of hot summer work week? I’m good… a little stiff and a few ant and mosquito bites, but other than that… ok!

I grilled yesterday for the DH for Father’s Day and I did some additional batch grilling to use in dishes the next couple of days. I grilled some Chicken legs in 3 different flavors (Buffalo, Oriental, and Cajun) but DH ate all the buffalo ones LOL… he loves my homemade sauce! But man did he pay last night for it LOL! Ok, then I grilled a pack of brats and a pack of hot dogs. Grilled some different flavored marinated steaks and then a T-Bone for DH. Grilled some fresh jalapenos too and some homemade veggie burgers! MOM… you are trying these… you cannot tell the difference from beef! Even DH was really liking them! I made them using… well I am not telling you LOL! Gonna make some for DD’s party as we have at least 1 child I know of that is a vegetarian! I really liked it- and I’m the kinda girl that you don’t play with my burgers! LOL! SOOOO…. Gonna make a bunch more and freeze the patties so I have plenty! Even DD thought they were pretty tasty! DS wanted nothing to do with anything but the hot dogs LOL!

Ok, I have got a kitten update for you all… they are doing much better. I got them both to eat some dry cat food YAY! And they drank some pedialyte. They have also pottied in the litter pan DOUBLE YAY! 1 little oops on the floor but it was near the pan so I think he just couldn’t make it in time. ALSO (and this is a doozy LOL) I think Miracle might actually be a boy… still kinda young, so rather hard to tell… I gave them another bath last night and tried some home remedies for flea treatment (cause lets face it “au natural” is better than chemicals anyway PLUS who has that kind of money to spend on that stuff that may or may not work? NOT ME!). I am happy to report that I have gotten rid of almost all of the fleas!!! YAY!!! I used a homemade rosemary spray on Gizmo and a Lemon spray on Miracle. I also used a few drops of Tea Tree Oil in their bathing and I used Johnson’s baby shampoo to wash them and drown those pesky fleas! I’m going to give them a break in the baths today (as it takes a lot of energy out of them LMAO) and maybe 1 more treatment tomorrow and they should be completely flea free! YAY! (Insert the happy dance here! LOL) I will keep you all updated.


Ok, so I got a question… do you think it’s worth it to “go green”? How green are we, really? Well what if someone told you they saved over $10,000 going green? Would you consider it then? I sure would… so I brought you this article I thought some of you might find interesting!

New York Woman Shifts to Green, Saves More Than $10,000
by Diane MacEachern

Our latest One in a Million member is Nancy, an Episcopal priest and practicing psychologist who lives in central New York state. The One in a Million campaign encourages people to shift $1,000 of their household budget to greener products and services. I was amazed to learn that Nancy shifted so much she actually saved more than $10,000 without feeling deprived. Here's her story.

What inspired you to make so many "green" changes in your life? My doctoral studies were in MindBody medicine and holistic healing...which led directly to my first change: become a vegetarian(1991)—which reversed bone loss. In the intervening years I continued to study, teach courses, and give lectures and workshops on holistic healing and spirituality. My studies and workshop presentations expanded in 2005 after I learned about the known health risks associated with land fills at a meeting of the local chapter for the League of Women Voters. The local land fill had expanded despite opposition and was (and is again) asking to expand.

Troubled by the evidence, I began reading about recycling, which led me to studies about plastics, cleaning agents, bath and body care, cosmetics, and, surprisingly, food safety and how they affected human health and the environment. The readily available evidence was, and remains, shocking and deeply distressing. I believe that all of us need to be more conscious of the factors which affect our health and over which we can chose to have control, with our voices, pocket book, and votes. As a person living with a life-long disability I felt that, based on this new learning, I had a responsibility to act on it by making conscious choices about my life and health as I move toward retirement and continued aging!

That led to my second change: I became a vegan, eating only organic foods at home, and have reaped more health benefits than I imagined possible. No more antibiotics and hormones I didn’t chose, need or want; no more insecticides and pesticides bred into Genetically Engineered foods—as far as I can determine and choose; reading labels to avoid corn derivatives and high fructose.

All of this learning, alongside continued growth and new learning in my spirituality and prayer life, led me to my third change: a decision to become conscious and present to the world and nature around me, as well as to family, friends, and neighbors. All of life breathes the same air, is exposed to the same water, and shares the consequences of toxins in the land fill. The very least I could do was to avoid adding toxic, disposable, meaningless stuff or organic garbage, leading to my fourth change: changing my patterns of consumption, understanding the what and why of every purchase. Suddenly you see the stuff that clutters home, office, car and life. Stuff that wastes financial resources and generally obscures the meaning or purpose of one’s life. De-cluttering is a lesson in letting go and led to my fifth change, saving money as my shopping habits changed.

Are your choices for you alone or for a household? I live alone but children and grandchildren visit often. They know the routine -- I have posted a list of what items go in the paper basket, the compost pail, the small garbage basket, the shredder and the recycling can (in kitchen). The cleaning woman, handy man, and lawn person know what goes where in garage containers each week.

What was harder than you thought? Eating out with NO dairy products. My experience has been that the majority of restaurants, chefs, and cooks in small cities are not well-informed or prepared to serve vegetarians and vegans.

What was easier? The absolute easiest thing was simply adding each new change as I came to it and then living into it. I have a savings account for my ‘annual savings,’ which I use for life-giving organic foods, addressing needs (recreation, retreat, play) instead of wants, and enjoying a healthier and more purposeful life!

What's next? These changes are part of a spiritual journey that I hope will continue to evolve and deepen. I hope my example or words will save at least one person and one child from the toxic effects known to exist in our environment, water, food, and products we consume or purchase in blind faith. My greatest hope is that in the near future, Americans will take to the streets and demand accountability of corporations and government agencies for safe food and water, and non-toxic, renewable and sustainable products. If we dream GREEN, we will become GREEN!

Nancy's Green practices explained with savings:

Switch to natural cleaning agents - saving $800-900/yr. By natural, I mean: vinegar, baking soda, lemons, castile or natural soaps, peroxide, salt. NO BLEACH.

Create zero waste - saving $180/yr. The zero-waste effort led to canceling my trash service. In addition to a monthly fee, they charged per bag beyond 2 bags, which can happen if your put leaves and grass clippings out. All organics, wet garbage, yard waste, and shredded paper, compostable picnic table ware (rare) go into compost. I have two piles so one is in use while second matures and gets used up. I use the simple layer method which Cornell advocates. I take my recycling to the municipal solid waste transfer station every 3 months. I also take one (1) $3.50 large plastic bag with non recyclable, non compostable garbage once a year.

Water faucet- Drink and carry tap water - saving $500+ annually. I don’t want plastic toxins leaching every minute into my water. Plus, I want to eliminate CO2 emissions and costs of plastic bottles and transporting water world wide, often at the expense of poor people with little or no access to their own water supplies.In addition to saving money, I am expressing my personal values and beliefs in the face of big corporations that bottle and sell for profit water at the expense of poor people whose right to it has been stolen.

Buy $.99 reusable grocery bags, eliminating real costs of using and disposing of plastic bags - savings $100/yr. These bags are also often used for giving small gifts rather than purchasing gift bags or wrapping paper, tape, ribbon, bows.

Limit gift giving - saving $500. My gift giving is generally limited to a small gift to open and a donation for relief of poverty in some way (e.g. mosquito nets; poultry to raise, feed, sustain income for a family; building a school in Sudan; and now, for Haiti.) There's no over-spending for “just one more gift.” No environmental costs.

Drive fuel-efficient car less - saving an average of $100-$150/month, or $1200 - $1800/yr. As often as possible, I plan errands, appointments, and work travel so I can drive in a circle and save extra trips to buy food. There are always the unexpected trips but planning cuts down on fuel costs. If I need something at the home improvement store/mall I wait, if possible, until I have a list of everything I need from stores in that area (12 miles away). This has cut shopping trips to the mall area to 4 or less per year. I generally work from a home office, which also cuts fuel consumption.

Buy no fragrances: no perfume, scented candles, or air-freshners - saving $500+ annually. I open windows or doors; use all natural cosmetics, limited to foundation & rouge (see Cosmetics Database). Bath and body products are w/o fragrance and generally cost less. The health benefits are related to avoiding carcinogens, nano particles, phthalates, and asthma-causing ingredients.

Avoid plastic wrap -- saving $150 annually. I use brown wax paper in microwave (limited use) and re-useable plastic bowl covers or lids for food storage in glass kitchen ware. I never purchase plastic food containers.

Minimize paper -- saving $300. I use compostable picnic ware for those few times I am unable to use washable ware. I read newspapers online. When purchasing subscriptions to journals or placing catalog orders I request my contact info not be rented or sold. I am registered on the Mail Preferencing services and have a note on my credit records. This effort dramatically reduces junk mail and the amount of recycling I need to do. All loose paper goes through my shredder and is added to compost pile. Magazines and journals are generally saved or shared.

Use compact light bulbs & other efficient appliances - saving $200/yr. CFLs, which last 708 years and use less electricity, power all light fixtures. I replaced my old refrigerator 4 years ago and purchased an energy-saving dishwasher recently. I turn off my computer when away from my desk for more than two (2) hours and overnight. I turn off and unplug all electronics not in use, including the flat screen TV. I only turn on lights in rooms being occupied by a person and have attractive night lights in rooms which we may need to visit briefly after dark. My TV use is limited to evening news and occasionally a PBS special.

Buy used, refurbished goods - saving $2,000/yr, plus gas, energy and time to shop. My purchases, beyond health and house maintenance, are generally confined to gently used, repurposed, or refurbished items.

Grow own food -- saving $450-$500 on food, garden chemicals. I have two “square foot garden” boxes in which I grow organic produce every year, and share with a daughter and family. I figure I save $700.00, of which I use $350.00 for a CSA share for fruits, potatoes, and other or, unusual, vegetables I don’t grow.

Conserve water -- saving $100/yr. I installed two free rain barrels, offered by our county storm water management for attending a course on storm water. The rain barrels collect roof water run off, which I use to water front and back, including vegetable, gardens. I have a small home but collected enough water to keep both barrels full all but a few days last summer, watering daily.

Installed gravel driveway -- saving $4,000. My paved driveway was torn up to install a dry ditch four years ago (for run off from a side hill). Hard surfaces cause storm water flooding and permit toxins to reach water supplies. Without hard surfaces, ground water is filtered by soil before it reaches water supplies. Consequently I choose not to repave the drive and instead have crushed stone. (I live in a traditional, residential neighborhood.)

Feeling inspired? Take the One in a Million challenge yourself.

So tell me… as far as crafts go, is there anything you would like to see more of? And is anyone going to take the 150 day Christmas Countdown challenge with me?? I would love to hear from you guys and girls out there! As for a craft for today, well… with summer here, and my love of fruits… I saw this cute idea and had to bring it to you! You can do them in all kinds of colors, etc. Check them out!


Craft Idea of the Day: Fruit Slice Placemats

A fun and quick craft you can vary just by changing the fabrics.

Approximate Time: 1 hour

Supplies:

1/4 yd of each fabric
fleece for backing
sewing machine
scissors
pins

Instructions:


Either enlarge my pattern or draw a wedge shape. By changing the fabrics, you can have a watermelon, an orange, lemon, apple, or whatever fruit you like.

For the watermelon, cut enough strips of various widths of several red fabrics, narrower at one end than the other to cover the pattern. Sew them together putting one narrow end together with a wide end until you have enough to cover the pattern. Cut out the base of your placemat.

Measure from one point around the bottom and up to the opposite point, add 2 inches. Cut this measurement from a white and a green for your outer rind and inner rind on the bias of a piece of fabric.

Sew your inner rind fabric on, being sure not to stretch the bias, iron flat. Repeat with outer rind, press flat.

Lay right side to right side with your fleece, pin and cut out. Sew a quarter inch seam leaving a 5 inch opening to turn your fruit. Turn and sew the opening shut by hand.

For the watermelon, sew "seeds" with embroidery floss. For the orange slice, divide the bottom edge into segments and draw a line from the center of the top to those segment marks. Sew with a zigzag just to the white fabric. Leave the rinds unsewn so they puff up a bit.

By Ann from Loup City, NE

OK are you ready cause today starts your new FOOD week! After thinking about what interested me, I thought about heritage… parts of my father’s family comes from the area of Lithuania/Ukraine, etc. so I decided that I would bring you some flavors from the largest country in the world… Russia! A great choice of soups in Russian cuisine is explained by the folk habit to have a soup meal at least once a day. Schi, borsch, rassolnik, botvinia, ukha, okroshka, solianka and many others has been a peculiarity of Russia since ancient times. Soups can be made on meat, fish, mushroom, vegetables or milk stocks. Russian appetizers (in Russian, they are called “zakuski”) were meant mainly not to provoke keen appetite but to have them with strong drinks. So, most favorite Russian appetizers were all kinds of pickles and cold meats which go best with ice cold vodka. But not only vegetable pickles were used in Russian cuisine, the abundance of sea and river food provided cooks with a wide range of various fish appetizers. So, we shall start the week with a soup and an appetizer to begin to tempt your taste buds… Eat & Enjoy!


Ukrainian Borscht

Borsch is the best known Russian dish beloved all over the world. To cook borsch is not an easy thing, you should know specific details to get this unforgettable sour-sweet taste and rich red color. Borsch can be made on meat, mushroom or vegetable broth. Another very important thing is to prepare beet rightly - it can be stewed, boiled, balked or steamed. Just find your way!

Ingredients:

1 qt Water
2 qt Beef stock
3 tb Sunflower oil
2 c Beer (not Lite)

-or-

2 c Beet kvass
2 ea Beets, lg. peeled & juliened
4 lb Beef, chuck w/ bone
3 tb Red wine vinegar
1/2 lb Smoked pork butt
2 tb Butter (NOT margerine)
1 ea Carrot, lg. scraped, diced
1 ea Onion, med. coarse chopped
1 ea Cabbagehead small shredded
3 tb Tomato paste
1 1/2 tb Salt
Black pepper to taste
4 tb Parsley, minced
1 c Potato, peeled & diced 1/2in
1/2 c Sour cream

Method:

In a large stockpot bring the beef to a boil in 2 1/2 qts. water with 1 tb of salt. After 10 minutes of boiling reduce heat & simmer for 30 minutes more, then remove meat, cool and remove meat from bone & cube 1/2". In a large skillet on heat the oil on medium heat. Saute the onion, beets, & carrot until they are soft. Add the potato & butter then cook for 2 minutes more. In the mean time bring the beef stock, water & beer (or kvass) to a boil in the stockpot. Add salt & pepper, vinegar, & meat. Drain the beet-carrot-onion & potato mixture & add to stockpot. Reduce heat & cook for 20 mins. then add cabbage, tomato paste & pork butt. Cook another 30 to 45 minutes. Remove from heat & allow to cool to room temperature. Refrigerate overnight, re-heat and serve. A large dollop or 2 of sour cream in the soup is mandatory when served. Allow each person to stir it in themselves.

*NOTE: You may add 1 1/2 cups of cooked white beans to this soup if you wish but if you do so soak them in the vinegar then add them to the soup.


Russian Meat Balls In Vodka

Ingredients:

2 1/2 pounds hamburger,
2 eggs, slightly beaten,
2 cups cracker crumbs,
1/2 pounds ground lean pork,
1 cup milk,
1/2 teaspoon lemon rind,
1/4 teaspoon nutmet,
1 teaspoon salt,
1/4 teaspoon pepper,

Method:

Mix well and let stand for 1 hour, then form into small balls. Brown in a skillet in drippings along with 3 cups thinly sliced onions for about 15 minutes. Remove from pan. To the drippings, add 1 cup sour cream and thicken with 2 tablespoons flour and 1 can condensed beef bouillon; cook until blended, then add onions and meat balls. Blend in 1/2 cup dry vermouth and 2 ounces vodka.

Well there you have it folks… the start to another rather interesting week. I think I am gonna go sew me some more totes and other crafts and see what other kind of trouble I can get into! Thanks for stopping in and I hope to see you again tomorrow! HUGS!

Monday, May 24, 2010

SUPER SALADS & SEWING

Hey there everybody! How are you doing this fresh first day of the work week? I am crazy stoked… I have lots to share with you from yesterday! I am quite proud of myself. I have already fed my kitties both inside and out, watered what’s left of the garden (including my new babies), picked a few yummies that wanted to come inside, taken the kids to school, and now I am writing you before I leave for work. Cool huh?


Well folks, Freshman marching band starts this afternoon, and my kids have to be there so they can get their partner. That means the chaos, which we call marching season, is right around the corner! Each year the upperclassman get “assigned a freshman”. The older band members are to tutor and mentor the young ones if they need any help. This year we are gaining 87 freshman!! That’s the biggest number in one year in the band’s history! (I wonder how many I will be gaining around my house LMAO!) Our band is getting close to covering the field with this addition! It’s Gonna be crazy now! Anyway, they have 2 weeks of freshman band before the summer and then the whole band starts summer training the beginning of August before school. This picture was our band this past year (October) at one of the competitions hosted by Sam Houston State University. LOL I know it (the whole band) doesn’t “belong” to just me, but I have a lot of pride in them and sometimes I just blurt out “That’s MY band” LOL! They are great kids! So it will be interesting to see how the new recruits do under the pressure… and if you think there isn’t any… GUESS AGAIN! Dickinson Marching Band is NOT for the faint hearted LOL! Let’s just say, it gets pretty tough! My brother even shattered his ankle one year and STILL tried to march! Yea band and football is a big thing around here… and I have one in each! CRAZY!!


I started out the day by running to the store to get a few things I kept forgetting to buy… including my B1G1F roses at Home Depot! Aren’t they just so pretty? And they weren’t very expensive either… 9.95 each, so it was $10.78 for both, or roughly $5.39 each… not too shabby I think. They are covered in buds, so I hope to have some beautiful bushes soon!


Once I got back home, the race was on… the sewing race that is! I made a list of 10 DIFFERENT things I wanted to get done. Sadly I only accomplished 6 of the crafts off the list, but I think I did pretty cool. This was the first thing… the Grandma T-shirt purse. I saw these shirts at Wal-Mart for like $5 and there were a couple I just had to get for the sheer purpose of making bags. This was the first one… and it reminds me so much of my mother! I matched the wording color with the butterflies on this fabric and I think it turned out really well!


This is the second T-shirt I got to make a bag… yes my pride in Texas really shines through huh? LOL! The state has the map on it and the awesome cow skull. I paired this with a pretty fabric that has the Texas Flag and bluebonnets (the state Flower) on it. I purposely narrowed the bottom as I was trying to make it similar to the shape of the state. I think its pretty nifty! I am gonna have a hard time getting rid of this one! LOL!


Here is a plastic canvas box with a Casino theme. I plan on using it to make a gift basket/package filled with Casino related items. I have a matching purse with the same print too. Isn’t it awesome!? I think it will make a good basket/container for a gift package.


Ok, this is a plain black apron my son got when he worked at Subway. He no longer needs it as he doesn’t work there, so he gave it to me. I wasn’t quite sure what to do with it then I said, “I’m gonna put some pockets on it and use it as a crafting and do-it-herself apron. I won’t be losing any more tacks, nails, etc. anymore as I work around the house! LOL I thought it was a pretty good recycle idea!


Ok, now since the band kids have to have a special towel to sit on when they are at games and such, I figured so do I LOL! So, I had bought these blue towels on clearance one time and had them sitting in a box you’ve come to know as “the green crate” LOL! What to do, what to do… MUSIC NOTE SCRAPS TIME! LOL! Now I have my own special pair of band towels for competitions, games, etc! In the school color too!


Ok, so its time to stop and make dinner. Now when I was at the store they had a really good deal on crispy chicken tenders so I decided to make the Seasonal fruit and chicken salad for dinner and try it with the crispy chicken instead of the grilled chicken like normal. While it was super delish, the whole family agreed that we like it better with the grilled chicken actually. But isn’t that so pretty?


What would dinner be without a dessert? The other day when I took my mom to the store I got some clearance breads for 49 cents each. I also had a few more packages of those apple slices left too… so I made Apple Cinnamon Bread pudding. OMG let me tell you, it made the house smell absolutely marvelous! It tasted really good too LOL!


Ok, so after dinner I was slowing down dramatically. So I was just really piddling with the scraps in the crate and I managed to make 10 cell phone pouches. BUT I ran out of snaps, so they aren’t all totally complete… I still need snaps for 3 of them and the store I need to get them at was closed for the day so they have to wait. But 7 are completed and 3 almost done. That was some pretty spiffy productive piddling huh? LOL!


And finally… the piece de resistance! The LOTTO TICKET BAG IS COMPLETED! OMG this is so freakin’ cool! I ran into a few bumps and snags along the way, but let me tell ya, this is the most awesome thing I have ever made I think! Not only did I recycle, its just freaking super-de-duper! And expensive LOL! The bag is made out of $54 worth of losing lotto tickets and then material, thread, etc. But I don’t care… I think its awesome!!!!!!! I probably won’t be making another one for a long time (that’s a lot of money for a bag) unless I put out an ad for people to save their losing tickets for me across the county! So that makes this purse truly unique as well! Ain’t that just the shiznizzle??!!!

So now you see my exciting day of sewing marathon… whatcha think? I think I rocked it out… especially the lotto bag. But all my stuff is super cool I think. And that’s what makes it so fun. So let’s get you into another great craft… especially if I have managed to inspire you! Now I told you I was gonna bring you some patio/garden crafts, etc. And yesterday I showed you a cute bird bath with terra cotta pots and told you how I love them so LOL. Well guess what… I have another neat little terra cotta craft for you!


Craft Idea of the Day: Clay Pot Wind Chimes

Materials:

3 to 4 clay pots in different sizes.
Jute (you can also use macrame twine)
3/4” to 1” wooden bead.
Paints of your choice.

Directions:

It is best if you paint your pots first. You can free hand a design or use stencils. There are a lot of decals on the market that you can also use. Any craft store will have decals in all different designs. Swans and ducks look really nice on chimes.

Cut about a yard of jute. Put one end of the jute into the wood bead. Tie a knot and pull the ball down to the bead. Tie another knot about 1 ½’ up from your bead. I usually put a washer on top of the knot because the knot will shrink in time and your pot will slip past the knot.

Put your smallest clay pot on next. You will have to judge where to put your next pot. It should hang over the smallest pot by about ½”. Keep working up the line with your pots getting bigger. After you have your last clay pot on tie a loop to hang it with. If you have extra jute at this point just cut it off.

You now have a clay pot wind chime that you can hang anywhere. These wind chimes are very easy to make and make great gifts.

Now, we have been having such fun with themed food weeks, I figured I would bring you another. So far, I've brought you casseroles, soups, pizzas, and grilling. Now I want to go to something else that sparks excitement in some and dread or fear in others… SALAD. This week is SUPER SALAD WEEK! Now salads don’t just have to be green lettuce with raw veggies, etc. You have many different kinds of salads… pasta salads, meat salads, veggie salads, fruit salads, etc. So this week is a sneak peek at salads unique! LOL! I’m not posting the salad I had for dinner last night again because I posted it on March 27th, so go check it out there! LOL I am, however, going to bring you the first salad, which also has a bit of grilling… the perfect cross-over recipe to start another fantastic theme!


Grilled Pepper Steak Salad

Ingredients

2 1/2 teaspoons minced garlic, divided
1 teaspoon freshly ground black pepper
1 pound lean skirt steak or flank steak
8 cups packed torn romaine lettuce or mixed salad greens
1 large tomato, seeded, chopped
1 ripe avocado, peeled, seeded, diced
1 1/4 cups Sargento® Shredded Reduced Sodium Mild Cheddar Cheese, divided
1/4 cup thinly sliced red onion (optional)
2 tablespoons extra virgin olive oil
1 tablespoon fresh lemon juice or white wine vinegar
2 teaspoons pureed chipotle chlies in adobo sauce (optional)

Directions

Rub 2 teaspoons garlic and pepper over steak. Grill over medium-hot heat on a covered grill 3 to 5 minutes per side for medium doneness depending on thickness of steak. Transfer steak to a carving board; tent with foil and let stand 5 minutes.

Meanwhile, combine lettuce, tomato, avocado, 1 cup cheese and red onion in a large bowl. Combine oil, lemon juice and remaining garlic in a small bowl; mix well. For a spicier dressing, add chipotle chilies. Add mixture to bowl; toss with lettuce mixture. Transfer to four serving plates.

Carve steak crosswise into thin slices; arrange over salads. Top with remaining cheese.

Okie dokie gang, it’s that time again. Time for me to get off here and get dressed and ease on down the road. I’ve had a blast this morning sharing my day off crafting photos and everything else with you today. I hope you can meet me back here tomorrow, because you never know what I’m gonna have in store for you! So until then… HUGS!

Saturday, May 22, 2010

1 DOWN, 5 TO GO!

Good morning everyone! How are you doing today? I am ok… a bit tired really but good. We had a weird night around here and for some reason I got really spooked. I would not let DH sleep cause I was so freaked out. It was strange. I even slept with a few "protective items" in my pillow and by my side of the bed. I don’t know why I was so stressin, but oh well. I need to apologize to Cyndi and anyone else who got disturbed when they read yesterday’s title. I really didn’t think about anyone thinking I was leaving until I read your comment last night. I figured the title was fitting seeing as I was talking about the band director, the graduating seniors, etc. I will try to watch how I word things from now on. I try to give you a interest-peaking “teaser” by making up clever titles, but it seems like this was a poor choice. Please forgive me.

Now… I am proud to announce that I finished one of the 6 projects I have been working on... Madison's room! I really have such a wonderful daughter. She said she “doesn’t deserve all of this” but in fact, she really does! So I made it a doozy! She screamed, almost cried and then took pictures with her phone and sent it to all her friends. They were loving it but jealous. So let me share the wonderful results with you!


This is the view when you are standing in the doorway. I made pillow cases for the brand new pillows Mom and Dad gave me for her room. The white pillows with the blue Band logo on them are actually towels. Small “hand” towels the kids must have each year to sit on in the stadiums so they do not snag their uniforms when they sit down. I bought 2 extra ones and cut some of the fabric with the notes to match as backs. Then I stuffed them and sewed them shut. Aren’t they cool? She took one on a band trip one time and everyone wanted one LOL! Looks like I should make a few more huh? LOL!


This is a closer view of the things hanging on the wall over her bed. The 4 picture frame has 2 of the marching pictures and 2 of her patches from her freshman year. I have to get another frame to put up some from this year. The wooden pennant and treble clef I painted the school blue and DHS stands for Dickinson High School obviously. The ribbons on the pennant are music noted LOL!


This is the wall on the side of her bed. Each of those Homecoming mums I handmade for her for the past 4 years. In between the mums are wooden painted music notes. Down the “flag” of each note is painted the years she is in High School and in the base of the note is her yearly band picture for that year. Hanging from the ceiling all over the room are plastic music notes with glitter. These are actually Christmas ornaments I found at Hobby Lobby. For the last couple of years I have bought all the silver ones of these I can find with the intent to do something like this from her ceiling.


This is the view of one of the corners of her room. We had a camo blue pillowcase we were gonna use on the bed, but didn’t have enough material for 2. So I wasn’t quite sure what to do with 1 stray pillowcase. So, I folded it in half and pulled it over the chair as a seat cover. Pretty neat huh? Then there is her wind spinner in the corner (that I still have to get a motor for), curtains, desk accessories, a hat rack, and the “graffiti art” her Dad made for her room.


As we move counter-clockwise around the room, you see her dresser and the other window curtain. Hanging from the window curtain, are little metal music notes with crystals on top. The crystals will hopefully catch the sunrays and dance very pretty on the walls throughout the room. You can also see the clarinet clock on the wall and the clarinet lamp on the dresser. Yes, before you ask, that is a REAL clarinet that was made into a lamp. She better take VERY good care of that as I cannot afford to replace it!! There is also a ceramic money box and numerous vases, centerpieces, etc that she has now on her dresser for decoration. Some will be used at her birthday party.


Ok this section of wall is no more than like 3 foot wide I think. On the right (when you are facing it) is the big closet (which you see now has the drapes as “doors”), and to the left is the entrance door. So, I wondered what to do with the little space. Now I was going to put the hat rack on top of these boards, but it was too long. SO, I hung the big treble clef over the message center. On top is a normal bulletin board that I tucked the matching fabric into and directly underneath is the white dry erase board. The letters are wooden and painted to accent the black and white stuff. I went ahead and put some pictures from freshman year that were not in frames on the bulletin board. I wrote her a note on the white board too, but AFTER I took the picture (hey SOME things will remain private LOL).


Here is a close up of the dresser so you can see the clarinet lamp and such a little better. You also see a clay pot “gum ball machine” I made her, her music bracelet, “piggy” bank, candy cane bouquet, and even a picture of her and her BFF Katie. I think its pretty cool! I really hope she enjoys her room. I get tickled every time I have went in there. It has been a project I have been “collecting” stuff for the past 2 years. To see all the bits and pieces come together and make one awesome completed project that she loves is the greatest feeling in the world. It makes me feel I did something RIGHT as a mom! So we have 1 project down and 5 more to finish LOL!

Ok, its time to get crafty! Now mom made a suggestion about patio crafts for people who live in apartments. I think that is a great idea, seeing as I used to BE an apartment “dweller” LMAO! There are lots of things you can do to “dress up” your patio. You can make unique wind chimes from tiny terra cotta pots, seashells, etc. You can make a bird bath, some outdoor party lights, tin can luminaries, wind socks, planters, and more! I tell ya, I love terra cotta pots! With a cute paint job, they can be sooo different. One time I painted lots of terra cotta pots in different “veggie” themes and made “rows” on my patio. It was pretty neat! You can also make things like seat covers for chairs, grill covers, and other things you have to sew. BUT if you use outdoor canvas, you can have a durable decoration that is machine washable! Now who doesn’t like that!? Today I want to show you a craft I just thought was very frugal. If you have a larger patio (like I did) this would be a great thing to make and sit on in your little “container garden field”. Make sure to read through some of the comments on this one for added ideas and instructions!


Craft Idea of the Day: Concrete Bench

Turn two $4.00 bags of ready mix concrete into a lovely garden bench. This bench is about 36 inches long by 18 inches wide. I took some old 2x4's and made a form for the seat and two forms for the legs. I mixed the concrete and poured it into the forms. I let it set for 4 days and removed it from the mold.

Now I have a beautiful garden bench that only cost $8.00. They are at least $50.00 at your local home improvement center.

By John from Haysville, KS


Ok, now if you are like me, you read a nice recipe and see a pretty picture and you get hungry real easy! You maybe even get the mouth watering and the tummy grumbling LOL! You know our barbecue week is coming to a close. Have you enjoyed it? What was your favorite recipe? Well around here we get roasts a lot and I am always looking for something yummy and different to do with it. This recipe will give you a roast that melts on your tongue like butter when you bite into it. Well worth the time and effort! And for dessert, a super crispy piece of dulce de heaven!


BBQ Chuck roast

Ingredients

1 (5 pound) chuck roast
1 cup barbecue sauce
1 cup teriyaki sauce
1 (12 fluid ounce) can or bottle beer
3 teaspoons minced garlic
3 teaspoons thinly sliced fresh ginger root
1 onion, finely chopped
3 teaspoons coarsely ground black pepper
2 teaspoons salt

Directions

In a large bowl, mix barbecue sauce, teriyaki sauce, beer, garlic, ginger, onion, black pepper, and salt. Place the roast into the marinade, cover and refrigerate for six hours, turning often.

Preheat an outdoor grill for indirect heat. Remove the roast from the marinade, and pour the marinade into a saucepan. Bring to a boil, and cook for 5 minutes. Set aside for use as a basting sauce.

Thread the roast onto a rotating barbecue spit above indirect heat. Cook the roast for two hours, or until the internal temperature of the roast is at least 145 degrees F (63 degrees C). Baste often during the last hour with reserved marinade.


Grilled Pineapple Milhojas

Ingredients

2 (5 ounce) cans sweetened condensed milk
3 sheets puff pastry
12 pineapple rings
1 pint citrus sorbet of your choice

Directions

To make homemade dulce de leche, remove and discard labels from cans of condensed milk. Place the unopened cans into a large saucepan and pour in enough water to cover by 1 or 2-inches. Bring water to a boil over high heat, then reduce heat to medium, cover, and simmer for 3 hours. Drain, and allow cans to cool to room temperature before opening.

Meanwhile, cook the puff pastry sheets according to package directions and allow to cool to room temperature. Pour the dulce de leche from one can evenly over a sheet of puff pastry. Place a second sheet of puff pastry over the first, then pour on the remaining can of dulce de leche. Top with the remaining puff pastry sheet, then cut into 12 triangles.

Heat a grill pan over medium-high heat and oil with cooking spray, or preheat an outdoor grill for medium-high heat. Grill the pineapple rings until warm and nicely marked.

Serve each triangle on a dessert plate garnished with a grilled pineapple slice and a scoop of citrus sorbet.

Ok everybody. I hope you have enjoyed seeing the finished project that is my DD’s room (I was quite proud and she seems to like it), and all the great crafts and food! Meet me back here tomorrow and we will have more great times and wonderful adventures! And I hope to have some great pictures from the Band Banquet tonight too! See you tomorrow… HUGS!

Friday, May 21, 2010

SAYING GOODBYE

Good afternoon lords and ladies. How are you doing this blessed day of days? I am well… somewhat somber hearted but good. I am sorry for the late posting, but we had a transformer blow on our street this morning and we were without power. So I spent the morning working on Madison’s room!


We went to the band concert last night and let me tell ya… there were some tears. We got home real late… I think we finally laid down around 12:45-1am… yea I am draggin’ today! Mr. McDonald, the band director at the High School is retiring this year. Our family has known the McDonalds for 17 of his 32 years of teaching. He instructed my brothers and now my daughter. His wife is one of the sweetest things you can imagine! We have the band banquet tomorrow night and I hope to get some great pictures there to share with you! So not only are we saying goodbye to our graduating seniors, but to the band director as well. Saying goodbye is rather hard to do. And the man who is taking the directors place is a guy I went to school with... the class under me actually! Do you know how old I feel??! Anyway, I wish Mr. Mac a Happy Retirement and Mr. Brazelton the best of luck with the new position!

I am not really gonna do a craft today as its kinda late. However I will make sure that there is one tomorrow and that we get back to normal with the postings. SO, now… Here’s the special feature I know you have been waiting for… FOOD! I am using seafood again and once again it’s one of mom’s favorites. I feature this ingredient again because I don’t think it gets enough attention honestly. While I am not too fond of them, I know lots and lots of people are, so I will give it the spotlight it deserves. So without further ado...


Grilled Mussels with Curry Butter

Ingredients

3 tablespoons butter, softened
2 cloves garlic, pressed
1 teaspoon curry powder
1/2 teaspoon ground cumin
1/8 teaspoon salt
2 pounds mussels, scrubbed and debearded
1 cup chopped red bell pepper
1/4 cup chopped fresh parsley
1 lime, thinly sliced
1 lime, cut into 4 wedges

Directions

Preheat an outdoor grill for high medium-heat and lightly oil grate.

Whisk together the butter, garlic, curry powder, cumin, and salt in a small bowl.

Arrange four large sheets of aluminum foil on a flat surface. Divide the mussels into four even portions and place one portion on each piece of foil. Dot the mussels with the curry mixture. Sprinkle the red bell pepper and parsley over the top of each portion. Top each with lime slices. Wrap foil tightly around the portions.

Cook the packets on the preheated grill until the mussels have opened, 5 to 10 minutes. Discard any mussels which do not open.

Transfer the mussels to small bowls and garnish each with a lime wedge to serve.


Grilled Sweet Potatoes with Apples

Ingredients

2 large sweet potatoes, sliced
2 apple - peeled, cored and thinly sliced
ground cinnamon to taste
brown sugar to taste
1/2 cup butter

Directions

Preheat an outdoor grill.

In a bowl, toss the sweet potato and apple slices with the cinnamon and sugar. Divide the mixture into 4 portions, places each on a large piece of aluminum foil. Top each with an equal amount of butter. Tightly seal foil around each portion.

Place foil packets on the grill, and cook 40 minutes, turning every 5 to 10 minutes, until potatoes and apples are tender.

Alright kiddies, its time for me to get off here and finish the DD’s room and then get dinner and such going… we all know what happened the last time I had a day off LOL! I went crazy LOL! See you in the morning with more great crafts, foods, and exciting adventures! Until then… peace, love, and lots of HUGS!

Thursday, May 20, 2010

GARDENDOWHAT?

Morning everybody! How are you doing today? I’m alright I suppose. I’m breathing right? Long night really. Not much sleep cause my brain wouldn’t shut up! LOL.

I have a few garden updates to tell you about. First off, I get home and the DH tells me that there are some red tomatoes I need to pick. So I go outside and there were another 20 or so. Ok then I see some strange things happening in my garden! First off, how are these sticks still producing little veggies? I mean the tomato plants are yellow and crispy blacks and its just very odd… but look at this…


This is my lettuce plant! It is now about 12-14 inches tall and so strange looking! And right behind it is 1 Brussels Sprouts plant that is a monster… but no stalk! The other 8 plants are tiny! Its really odd I tell you!


This is my stick okra plants! WITH A BABY OKRA!! How on earth can a plant that is MAYBE 3-4 inches high and as big around as a pencil lead be growing a baby okra?? It never even flowered! The flower is the okra?! What is going on here!?

I have berries too! Red berries, but still berries. The plants have a lot of brown dried up little berries, but those red ones are trying to hang on! My peas I was so proud of are all brown and dried up/dead. Parsley is ¾ gone, rosemary is ok still (thank god cause that’s an old plant), and most everything is gone. My celery has these weird little flowers in the middle of the green stalks. Having never grown celery I have no clue what that’s doing! It’s just a very weird thing going on out there. Maybe tomorrow I can tend to it a little bit and see what I can do. I have tomorrow off as mom has another appointment. Mom and Dad and I are all suspecting we got a very contaminated or bad batch of dirt and that’s why our plants are freaking out! We both did the same everything to our dirt and plants and we both are losing just about everything! Weird, I know.


I did manage to pick 4 jalapenos off my sticks and one banana pepper that was curled up into a ball. I have one odd shaped Roma (looks just like yours mom!) and about 20 cherry tomatoes of all sizes. DH was a dork and said he wanted to try a fresh jalapeno out of the garden. So I gave him one and he bit off the end and was like ok this is good… not a big bite to it. He continued and then you see his eyes water up and he starts fanning his tongue and reaching for a big glass of milk! LMFAO!!!!! Serves you right goon… they have been next to the habanero plants all season. I was HOPING for super hot jalapenos and it looks like I succeeded there! LMAO!

Like I said, I have to go and pick up my free roses from Home Depot with my Garden Club coupon, so I think I will pick up something to add to my dirt, etc. and maybe try again… who knows. All I know is I need a little therapy, so I will probably wander out there at some point tomorrow!

Ok, so tell me something. I try to bring a lot of different kinds of crafts to you so you have a wide variety of things. That way if you have no need for baby crafts, you can make the pillows or whatever else you might like. Is there anything you would like to see in the craft section or should I keep doing what I do and mixing it up? Help me out here peeps! Until I hear from you, I’m bringing you another craft today that is geared towards computers and protecting what’s yours. Maybe you have a feisty dog or crazy kid aways chewing on or tearing up things. USB devices can store years of work or memories for some people. And what a better way to enjoy those memories or hard work than with a snazzy Pez dispenser!


Craft Idea of the Day: Pez Dispenser USB Drive Modification

Materials:

Pez Dispenser
USB Drive
Hot GLue or Selastic

Directions:

Open dispenser as if to load it, overextending it so it will stay open.

Cut through both sides of the plastic Pez-holder, right near the very bottom. The whole thing will pop apart.

Study how it's assembled. There's a little plastic thing on the top of a spring. That pushes the Pez up. It travels in two grooves in the front and back of the body. It only fits in one way. The bottom part of the Pez holder also fits in the groove so that, when connected with the top part, it won't pull completely out of the body.

See if the USB key will fit into the body. If it does, your life is much easier. If it doesn't fit, disassemble it. The mini Cruzer that we used has a screw hidden under the label that holds the whole thing together. Once the case was off, it fit fine inside the body.

The drive will sit in the bottom part of the body. The plastic holder will fill up the rest of the body. Cut down the plastic holder part so it'll be the right length. Ours holds 4 Pez. Cut the spring, too.

Reassemble the dispenser. It's a little tricky because of the spring and getting the little plastic cap in right. We used packing tape to connect the top and the bottom back together. Taping on the inside seems to work better than taping the outside. There's actually very little clearance where the parts slide past one another.

Test it out with some Pez to make sure it still works.

Put the USB drive in and make sure it still fits.

Make any adjustments.

We used hot glue to secure the USB drive. Squirt a bit in the body and quickly squish the drive in place. Let it solidify and fill around the drive with more hot glue. Just be careful none drips down and interferes with the holder

Well its time to tease your taste buds with a little treat from the sea. It was funny because my mom mentioned yesterday that I should “Grill some fish” and I had already decided on this recipe LOL. She read my mind. She’s good at that. Fish is a very good food for the body. The oils, omega 3, etc. pose lots of benefits to the body. Regular consumption of fish can reduce the risk of various diseases and disorders. Selected research findings include: Asthma, Brain and eyes, Cancer, Cardiovascular disease, Dementia, Depression, Diabetes, Eyesight, Inflammatory conditions, and Prematurity. So go ahead and try to add a little fish to your menu!


Grilled Halibut with Zesty Peach Salsa

Ingredients

1/3 cup orange juice
2 tablespoons canola oil
2 tablespoons lime juice
1 tablespoon brown sugar
2 teaspoons grated lime peel
1 garlic clove, minced
1/2 teaspoon salt
4 (6 ounce) halibut steaks

SALSA:
2 cups chopped fresh or frozen peaches
1/4 cup chopped sweet red pepper
1/4 cup chopped red onion
1 jalapeno pepper, seeded and chopped*
2 tablespoons orange juice
1 tablespoon minced fresh cilantro
2 teaspoons lime juice
1/4 teaspoon salt

Directions

In a bowl, combine the first seven ingredients; mix well. Remove 1/4 cup for basting; cover and refrigerate. Pour remaining marinade into a large resealable plastic bag; add the halibut. Seal bag and turn to coat; refrigerate for 2 hours. In a bowl, combine salsa ingredients; cover and refrigerate until serving.

If grilling the fish, coat grill rack with nonstick cooking spray before starting the grill. Drain and discard marinade from fish. Grill, uncovered, over medium heat or broil 4-6 in. from the heat for 4-6 minutes on each side or until fish flakes easily with a fork, basting occasionally with reserved marinade. Serve with peach salsa.


Honeysuckle Pineapple

By: Robyn Webb
"Pineapple wedges marinated in honey, brandy and lemon juice and grilled. A hot, sweet island-flavor treat! This recipe is from The WEBB Cooks, articles and recipes by Robyn Webb, courtesy of the American Diabetes Association."

Ingredients

4 slices fresh pineapple
1 1/2 tablespoons honey
2 tablespoons cherry brandy
1 teaspoon lemon juice

Directions

To Marinate: Combine honey, brandy and lemon juice in a nonporous glass dish or bowl. Mix together and add pineapple; coat well with marinade mixture. Cover dish and marinate in refrigerator for 1 hour.
Preheat grill to medium heat and lightly oil grate.

Remove pineapple from dish or bowl, discarding any leftover marinade. Place pineapple wedges directly on rack or in a basket and grill for about 10 minutes, turning, until pineapple is hot and caramelized.

Alright folks, its time for me to get off of here and head out the door. I’ve had a blast with you today and hope that you will visit again tomorrow! Until then… HUGS!

Wednesday, May 19, 2010

HOW & WHY 2 STOCKPILE

Morning everybody. I hope you are doing well. I wish I could say the same, but the fact of the matter is that I am rather annoyed. Oh nothing you did, just something rather personal and what’s worse is I am absolutely powerless to do anything about it! And I can’t stand that! So I am gonna start my daily visit with you and hopefully calm down some before I have to leave out. So let’s chat shall we? Grab your cup of go juice and have a seat and enjoy the ride!


I went to Wal-Mart after school yesterday for a quick trip to use the coupons I found online and that came in from my order from Coupon clippers. As usual, it yielded some pretty awesome results! I had the $3.00 off on Men’s coupons for the Nivea Body wash (which were $3.97), $1.50 off any Whiska’s dry cat food (on sale for $2.97), $3.00 off each the BIC Comfort 3 Advanced and Soleil (which were on sale $2.88 each YAY!), $1.00 off 15 cans of Friskies cat food, $1.00 off Old Spice Deodorant which was $1.88, $1.00 off 1 Fruit Chillers which was $1.88, $2 off 1 Huggies wipes which were $2.27, 75 cents off Suave shampoo which was $1.38, and then the cheese, bread, chips, seasonings, and stethoscope (long story LOL) were all regular price. I think it was a great buy! Think I need some more of these coupons before they expire LOL! Factor only the coupon items and total before was $66.69 and AFTER coupons was $20.94! I saved $45.75 in coupons on just this little bit of stuff! COOL HUH? I’ve said it before and I will say it again… Coupons are such a wonderful thing!


We had a killer short storm while I had to be out picking up the kids. Afterwards, it was rather hot and sticky and miserable, so I wanted to make something light and refreshing and QUICK for dinner (DWTS results were on DUH! LOL am I the only one getting real tired of Brooke Burke constantly referencing to the season when she was on?!). I decided on Taco Salad YUMMY! My mom made it the other night for her dinner and it just sounded delish. I had most of the stuff except chips and cheese (which I picked up at the store) so that’s what we had! OMG it was killer!


Well I did it. Since the sewing fairies (did you even catch that yet? Fairies… Tinkerbell… hello? LMAO) were slacking on the job, I finished that Tinkerbell purse I almost completed the other day. I would say it’s rather spiffalicious… if you like Tinkerbell that is! She’s not my favorite cartoon I can tell you that… and please don’t ask why. It’s a rather silly reason but still it’s mine LOL!

Now I want to get to the Frugal tip for the day… Stockpiling. While you may THINK that stockpiling is no good, let me explain something. When you build a stockpile, it’s just that… stocking up. This way, you will not have to worry about not having something and trying to scramble for the change to buy what you need. Perhaps you run out of shampoo or body wash 3 days before payday… what are you gonna do, not bathe? GROSS! When you have coupons and a little extra cash and can get things for free or nearly free, go ahead and pick them up and put them away. So let’s take the razors I just got… NORMALLY $3.97 a package… now even with the $3 coupon, that’s a good buy. But, they were on sale for $2.88 each, making them FREE which is an even BETTER deal! When stockpiling, you have to remember- A.) the coupons might expire before you actually “need” the item, and B.) watch for expiration dates. Having to throw away stockpiles, is just waste… not being frugal! There are certain things that are advised and easy to stock up on. Items with ong (or even better) NO expiration dates. HBA items like shampoo, soaps, razors, tampons and pads, etc. are all good to keep a stockpile of… especially in a big family! Same with cleaners- laundry soaps and dryer sheets, bleach, etc. Plastic and paper goods is another one- foil, sandwich bags, paper towels, toilet paper, etc. The only time I can see stockpiling as not good is if you don’t use or need these items. Like I really don’t see men with a use for 10 boxes of tampons LMAO! CERTAIN foods can be stockpiled too… but it gets more tricky here! Canned goods are normally safe for a little longer than boxed goods or bags. If you cook a lot like I do, I would definitely recommend stockpiling the basics like canned tomatoes, condensed mushroom soups, broths, dry pastas, etc. Watch those rices and pastas though… weevils LOVE pastas, rice, flour, etc! If you can, store them in a large Tupperware container. Just something to keep nasty fellows out!

Another tip when stockpiling? Buy small, save big, and condense! Ok, ok, put the eyebrow down and let me explain LOL! Let’s use French’s Worcestershire sauce. Now the large bottle (think it’s a 16oz.) costs $2.19 and the small bottle (10oz) only $1.19. Ok, and I have a coupon for 35 cents off 1 ANY size bottle. My local grocer triples that coupon so it is actually worth $1.05 off 1! Now I could get the large bottle and pay $1.14 which you think is the way to go right? NOPE. I buy the SMALL one, which only costs me 14 cents after coupon! I can buy 8 of the small bottles for $1.12, which was a little less than the price of 1 large after coupon! And I now have 80oz. compared to just 16oz in the large bottle! Now hold on… before you start mentioning the amount of space to STORE 8 bottles… that’s where the condensing comes in. I bring those bottles home and pour them ALL into the 1 jug I keep in the fridge full of Worcestershire sauce! Depending on how much you cook, that almost 3 quarts could last you a long time! So you see now? Buy small, Save big (coupons), and condense! You can do the same thing with soaps, razors, etc. condense them into plastic containers if you have limited amount of space. Even take out all of those disposable razors and put them in a gallon ziploc bag! You don’t really need the packaging anyway, right?

Ok since we are on the frugality topic, I found this article on Yahoo yesterday evening that I thought I would share. While you may already know about some of these, it always helps to review!

5 ways to make extra money
by Lylah Alphonse, Shine contributor, on Mon May 10, 2010 5:56am PDT

Even with the economy starting to rally (or so we're told), it can't hurt to find ways to earn a little more money. But who has time for a second (or third) job? Here are five ways you can make a little cash without searching the want ads or adding to your commute:

1. Cull through your books, DVD, CD, and video game collections. Half.com is part of the vast online flea market that is eBay, but it's much, much easier to navigate. There are no listing fees, for one thing, and while you do pay a small percentage of the profit once your item has sold, it's really quite reasonable. You're listings are limited to media (books, audiobooks, video games, music, movies), but Half.com reimburses most of your shipping costs, collects the money from buyers for you, and pays out twice a month directly to your checking account. Cash4Books.net offers a decent price for newer hardcover books and textbooks (they even pay for shipping). If there's a used book store in your town, see if they'll give you cash, or at least store credit, for your books. Want to quit your bookstore addiction cold-turkey? The library is your best bet -- and they may even take some of your own books off your hands, and give you a bit of a tax deduction in return.

2. Make those coins count. It's amazing how quickly spare change can add up! So much so that some banks offer to manage it for you by automatically rounding your debit card purchases up to the nearest dollar and depositing the difference into your savings account. There's no reason why you can't do that for yourself: Instead of spending your coins, dump them into a container at the end of each day and haul them in to your own bank every few months. Don't think you have the discipline to do so? Trade them in for gift cards at those green Coinstar machines at your grocery store. Coinstar will count your change for free if you're using them to get a gift card or eCertificate; use the cards to augment your shopping budget if you need to. The gift cards are for big-name stores like Albertson's, Amazon.com, Borders, Lowes, and Old Navy -- check out the entire list at Coinstar.com.

3. Get crafty. If you have a hobby, put it to work for you. Do you like to make earrings? Sell them on Etsy. Make your own giftbaskets? Got a flair for graphic design? Make your own mugs, T-shirts, and more on Zazzle or Cafepress and sell them there or on Craigslist.

4. Make money by saving money. Raise your deductible on your car and home insurance. Look into ways to save on cooling costs this summer. Eliminate the extras, or substitute DIY versions so you can still indulge without the investment. (Example: Five Starbucks-type lattes a week = about $20. Five convenience-store coffees a week = about $10. Five made-at-home coffees a week = About $1.50 (and that's using $8-a-pound coffee beans, which brew up about 30 large cups of coffee per pound). Try swapping instead of shopping: At Zwaggle.com, which is free to join, members earn and use points by trading gently-used items (clothing, baby stuff, games and toys) with one another.

5. Clear out the clutter. There's Craigslist, of course, and eBay, but did you know that you can even sell your collections on Amazon.com? Yes, there's a fee, but you can reach a huge (and sometimes international) audience. Don't feel like listing your things or trekking to the post office? Donate them to charity and take the tax write-off instead; the Salvation Army offers a guide to how much your stuff may be worth.

Alright folks, lets get crafty! Now seeing as I featured TONS of cheap or free outings for the summertime to do with your family, your significant other, or even alone, what is something you are more than likely going to be carrying with you? Yep… a water bottle! Now do you honestly want to be stuck carrying everyone else’s water bottle? Me either! In browsing my favorite free pattern site, I found this water bottle carrier and thought it was genius! I plan to make everyone a carrier in a fabric they will enjoy! Check out the original website for great step by step instructional pictures too!


Craft Idea of the Day: Water Bottle Carrier

1. Cutting Instructions

Cut one piece of fabric for the exterior and one piece for the interior each 10 3/4 wide x 8 inches tall. I’ve pieced my exterior fabric with two coordinating prints in the tutorial pictures.

Cut 2 circles of your lining fabric, the circle should have a 3 3/4 inch diameter. The diameter of the circle stitching line is 3 inches. Add an additional 3/8 inch seam allowance making the cut circle diameter 3 3/4 inches.

Cut one piece of Insul-Brite 9 x 7 inches. Cut one Insul-Brite circle with a diameter of 3 inches.

For strap, cut one length of twill tape and one length of ribbon, both 42 inches long. This fits my 8 and 11 year old daughters. When I sized it for myself I cut it 50 inches long.

2. Sew exterior to lining along the top edge only, right sides together using a 3/8 inch seam.

3. Press open seam.

4. The Insul-Brite is going to get sandwiched between the exterior and the lining. Pin Insul-Brite to the wrong side of exterior fabric, aligning and centering top of batting with the joined seam line. Pin in place about an inch down to keep batting from sliding around. Fold over the the lining fabric and pin some more. Top stitch 1/4 inch along the top edge. This provides a baseline anchoring of the batting.

5. Pin entire sandwich like a quilt, securing as needed to keep layers from puckering when stitched. Stitch all layers as you please. Repeat this for the bottom circle. Finish bottom edge of top and edges of circle with a zigzag stitch or serger.

6. I used a French seam to join the side edges of the carrier. A French seam is two steps which result in the raw edge being trapped inside the second seam. Use some scraps and do a practice seam if this is the first time trying this. This seam is great for fairy skirts too!

Step One: Pin WRONG sides of sides together and stitch a 1/4 inch seam. Don’t press seam open, you want them to lay flat together.

Step Two: Turn tube wrong side out. Pin again along the edge, RIGHT sides together and stitch a 3/8 inch seam. This seam will ‘trap’ the previous seam inside. This gives you a nice clean finished edge for the inside of your carrier.

7. Leave tube with lining turned to the outside. Pin bottom circle to tube’s raw edge, right sides together. Clip edges of the tube to make fitting easier. Only clip about 1/4 inch into seamline.

8. Stitch using a 3/8 inch seam.

9. Turn carrier right side out.

10. Attach twill tape to ribbon with a single stitch down the center.

11. Turn up 1 inch of strap raw edge and attach to inside edge of tube, centering ends on either side of the carrier side seam. (After making this I think it would have been easier to attach the strap before creating the tube.)

12. Enjoy watching your kids carry their own water bottle.

Tips:

This carrier fits a small 500 mL bottle of water. I used a Crystal Geyser bottle that was 8 inches around. The finished tube is 9 inches in circumference and 7 1/4 inches tall.

The formula for sizing the diameter of the bottom circle is: the circumference of the circle divided by 3.14 (or pi). The circumference is measured by laying the top part of your bag flat, measuring the opening from one side to the other and then doubling. I usually round up the result of the formula just to keep things simple and add for a little shrinkage that will occur when the circle is quilted. I then add a 3/8 inch seam allowance or a total of 3/4 inch to the diameter measurement. In this example, a 9 inch circumference divided by 3.14 = 2.866, I rounded to 3 inches and added 3/4 of an inch for the total seam allowance.
Insul-Brite is a thin batting with a thin layer of foil. It will hold in heat or cold. If using it for potholders it’s recommended to use two additional layers of regular batting. I purchased mine at JoAnns.

Pretty awesome huh? And sort of frugal too! If you have a carrier, then you are encouraging a healthy drink AND saving money by taking your own! That makes it more special to me! Thanks to Kathy Mack for sharing this wonderful craft!

Now… onto the section, I know you are all drooling for with anticipation! GREAT GRILLED FOOD! YUM! Now, I got a confession here. When I was younger, I wanted nothing to do with eating BAMBI! I had a major mind hurdle with eating something not from the local Kroger! So much that I would peek in the garbage and if I didn’t see a “COW wrapper”, I threw all kinds of a fit or didn’t eat. But I grew up, my mindset changed, and now I thoroughly enjoy venison IF it’s processed and cooked properly! So food lesson for the day; even if you didn’t like something in the past, maybe try it again as your taste buds and likes/dislikes change over time! What you hated as a child might make you drool as an adult! And with that, I bring you…


Grilled Venison Backstrap

Ingredients

2 pounds venison backstrap (tenderloin), cut into 2 inch chunks
1 quart apple cider
1 1/2 pounds thick sliced bacon
2 (12 ounce) bottles barbecue sauce, your choice

Directions

Place chunks of venison into a shallow baking dish, and pour enough apple cider in to cover them. Cover, and refrigerate for 2 hours. Remove, and pat dry. Discard apple cider, and return venison to the dish. Pour barbecue sauce over the chunks, cover, and refrigerate for 2 to 3 more hours.

Preheat an outdoor grill for high heat. Charcoal is best, but if you must, use gas. Remove meat from the refrigerator, and let stand for 30 minutes, or until no longer chilled. Wrap each chunk of venison in a slice of bacon, and secure with toothpicks.

Brush the grill grate with olive oil when hot, and place venison pieces on the grill so they are not touching. The bacon will kick up some flames, so be ready. Grill, turning occasionally, until the bacon becomes slightly burnt, 15 to 20 minutes. The slower, the better. Dig in, and prepare to want more!

Now as a bonus, I know not everyone has deer that their man or themselves have obtained during hunting. SO, for those of you who don’t have access to venison, here is a BONUS recipe for some good old grilled COW!


Haitian Voodoo Sticks

Ingredients

2 tablespoons beef bouillon granules
2 tablespoons water
3 cloves garlic, minced
2 teaspoons cayenne pepper
1/2 teaspoon salt
1 teaspoon black pepper
1 1/2 pounds beef sirloin, cut into 1/2-inch cubes
10 wooden skewers, soaked in water for 1 hour
2 tablespoons vegetable oil

Directions

Dissolve bouillon in water. Stir in the garlic, cayenne pepper, salt, and black pepper. Toss the meat in the marinade, cover, and marinate in the refrigerator for at least 2 hours.

Preheat a grill for high heat.

Skewer the beef cubes, using 6 to 8 pieces per skewer. Pour the oil onto a plate, and roll the skewers in it to coat them on all sides.

Grill the skewers, turning frequently, until the beef has turned light pink, 12 to 15 minutes.

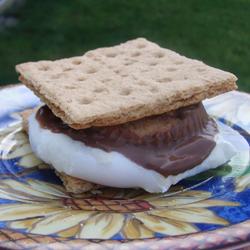
And then you have a grilled dessert to finish off these fantastic entrees! Check this one out… total yummy and super simple! This would be a great dessert when you have all those left over Reese’s PB cups at Halloween or Easter!


A Peanutty S'more

Ingredients

2 large marshmallows
2 graham cracker squares
1 peanut butter cups

Directions

Cook the marshmallows over an open flame or hot coals until they are browned outside, and soft all the way through, 2 to 4 minutes.

Place the marshmallows on top of one of the graham cracker squares. Place the peanut butter cup on top of the marshmallows. Top with the last graham cracker square.

OK gang… its that time again. Time for me to say STOP and then I gotta GO LOL! My morning cup of Java is dry and you probably need to refresh too, take a potty break, etc. So, I'll tell ya I’ve had a great time and I hope to see you back here again tomorrow! HUGS!