myspace generator
Showing posts with label gardening. Show all posts

Tuesday, July 13, 2010

HIDDEN TREASURES

Good morning everyone! How are you doing today? I'm still lagging pretty badly but I'm alive, so we're good. I got a wild hair to clean and organize late last night (around 11:30pm) so that's what I did for about an hour or so (think I finally quit about 1am LOL). I'm a bit tired this morning LOL! I get to hang out with my mom today, as she has a therapy apointment, so that's good. She always has that way of making me smile and feel better no matter what's wrong. I love hanging out with my mom... she's awesome! I just hope my DD thinks the same thing.


OMG I so forgot to tell you yesterday, when I was sitting in the garden thinking about the theme, what I saw! PEAS! Remember I told you I lost all the pea plants so I took the planter, doctored the dirt, and planted my bell peppers in there? Well when I was looking through the plants to see if there was any ready to pick, I found a few little pea vines in the back corner coming to life! I was like OMG are you serious?!? Aren't they the cutest little things?! Just have to try to keep them from choking out the bell peppers LOL!


As a matter of fact, there are a few garden updates and pictures to share with you. This first picture is the tomatoes that inspired this week's theme. I have many tomato plants and they are now starting to reproduce fruits, since the major first aid overhaul. I was so excited! These tomatoes seem like they are coming back bigger than the other ones were. But as you can see, the bottom branches are yellowing again. Its rather frustrating.


Then you have my okra plants... FINALLY have decided to sprout up and grow! I can't wait until I can start harvesting some fresh delicious okra! I have some little plants yet to sprout up big and tall, but they are all showing promise! YAY! I love fresh okra... you can fry it, dehydrate it, slice it in some gumbo, you name it! YUM! I am drooling just thinking about it!


This is my strawberry plants... well the runners of my plants! They hung down to the planter on the next step, which happens to have my butternut squash plant growing from it, and the plant sprouts have taken root in the dirt. Is that crazy or what?! Now I have to research and find out if I can clip the runners without killing the plants. If so, that will be so cool! MORE strawberry plants! Can you say YUUUUMMMMM!!!! With a capital "Y" no doubt!

I haven't been really in a crafty mood too much lately, so the challenges have kinda been halted. BUT I think that once I get home today I am gonna try to get my mojo back. All that is left in the kitchen is to tape off the bottoms of the cabinets and paint them and then once that dries to glue on some lemon cutouts. I am making it a goal to have it finished by the end of the week so I can scratch that project off the list! Shoot, I don't even remember everything on the list LMAO! Let's see, I finished Madison's redecorating of her room, so that's one down! Then there's the Birthday party, the kitchen remodeling, the Fabric crate challenge, the Ronald McDonald donations challenge, the breast cancer quilt, and soon the Christmas Challenge. Did I miss anything? I feel like I did, but I'm not sure... help me out peeps!? LMAO maybe I should write it down?! LOL... actually... seriously...I think I will! I was working on my Christmas Gift Recipient list yesterday, and so far there are 46 gifts that are "required" if you will... then there will be those friends and teacher gifts, etc. that are right now unaccounted for. Anyway, so what kind of craft would you like to do today? Well I think I am going to keep it sweet and simple and young. These go great as part of a child's gift basket or maybe a stocking stuffer!


Craft Idea of the Day: Homemade Coloring or Puzzle Books

To make these books is rather simple. You can use shoelaces, yarn, ribbon, plastic combing, wire spirals, or even metal rings. I prefer rubber cement and scrapbookng border stickers! There are thousands of websites where you can print out coloring pages for children or even puzzles like word searches and sudoku for teens or even adults. Once you print off your pages, use a binder clip to hold all the papers together and place rubber cement on the side that will be your "binding" side (normally the left or the top). Allow to dry completely while resting on a sheet of wax paper (prevents sticking). Cover the cemented edge with decorative scrapbook border stickers and voila! You have a perfectly personal coloring or puzzle book. And the good part about these is that you can make them in different sizes! 5 x 7 and 3 1/2 x 5 make for great travel size booklets!

Its time to eat my rockin readers! As you learned yesterday, this week is TERRIFIC TOMATO WEEK and I intend to bring you delicious recipes and tasty trivia about this beautifully versatile fruit! I hope that soon I will be harvesting a bumper crop out of my little secret garden in the back! The first aid is doing well for most of the plants, SO I sit and anxiously await the aromatic arrivals LOL! Tomatoes are rich in vitamins A and C and fibre, and are cholesterol free. An average size tomato (148 gram, or 5 oz) boasts only 35 calories. Furthermore, new medical research suggests that the consumption of lycopene – the stuff that makes tomatoes red – may prevent cancer. Lycopene is part of the family of pigments called carotenoids, which are natural compounds that create the colors of fruits and vegetables. For example, beta carotene is the orange pigment in carrots. As with essential amino acids, they are not produced by the human body. Lycopene us the most powerful antioxidant in the carotenoid family and, with vitamins C and E, protect us from the free radicals that degrade many parts of the body. The scientific term for the common tomato is lycopersicon lycopersicum, which mean “wolf peach.” It is a cousin of the eggplant, red pepper, ground cherry, potato, and the highly toxic belladonna, also known as the nightshade or solanaccae. There are more than 10,000 varieties of tomatoes. So with 10,000 varieties... LOL... I am pretty sure there can be some recipe to tempt your taste buds! Try this one on for size for example!


Alla Checca

Ingredients:

5 tomatoes, seeded and diced
4 cloves of garlic, minced
1/2 cup chopped FRESH basil
1/2 cup olive oil
salt to taste
juice from 1/2 lemon
2 tablespoons grated Parmesan cheese
1 pound pasta

Directions:

Combine tomatoes, garlic, basil, and olive oil in a non-metal bowl. Stir in salt. Cover with plastic wrap. Allow to sit at room temperature at least 2 hours, or as long as 10 hours.

Cook pasta in a large pot of boiling salted water until al dente. Drain. Pour uncooked sauce over hot pasta, and toss. Add grated Parmesan cheese to your liking.

Ok folks, its time for me to get off of here and get on the road again. I hope you have enjoyed our visit today and that I will see you again tomorrow. Be safe, be happy, and tons of HUGS!

Saturday, July 3, 2010

GIGANTIC GREENS

Good morning boys and girls. How are you doing this hot humid and wet weekend? I am suffering from a bit of bittersweet joy if you will. What do I mean? Well, seeing its 4th of July weekend, people tend to engage in celebrations with fireworks. They get drunk and inappropriately use fireworks. I don’t like fireworks! SOOO when it rains and keeps the drunken igits inside disabling their firework extravaganzas, I get tickled pink. But I am not fond of all this rain too… or the mosquitoes that come with it. Plus I know that whenever it stops raining they will be shooting those stupid things off… UGH! So you see, its bittersweet joy.

I woke up to the sun trying to peek at us this morning. With no rain this am, I decided to go check in on my garden… or what may be left of it thanks to flooding and winds. Well I almost fell over with shock when I got out there! A couple of my tomato plants exploded and the eggplant… well lets just say the leaves are bigger than my head! They are about 2-2.5 ft tall now! They are growing like weeds! Apparently I found the right blend of dirt/first aid cause these things are growing like wildfire now! The 2 stick banana pepper plants, still look very sickly but are putting off peppers now. I have cherry tomatoes starting to turn red all over the place. There are bell peppers that need to be picked, eggplant blooms by the dozen, berry vines climbing the back wall of my house, you name it! It’s great! It’s like a jungle out there LOL! The pumpkins both have blooms, but never make a fruit, which I find odd. Once the continuous rains break, I will have to go out there and work in there cause its growing wild! Shoot, I may just have to do it IN the rain, cause the weather channel says rain is forcasted for the whole week. Crazy goodness (and low water bills LOL) for the plants at least!

We got the invitations done last night. My lovely DD decided she did not want the treble clef and such on the front. Just the typed up party info cut out with edged scrapbook scissors and glued onto the blue cardstock. Simple and sweet… Then we also enclosed her picture to go with it. I have to run and make a few more copies of the pictures as I didn’t make enough, but those go out today! I also picked up the briskets for her meal (which HAPPENED to go on sale this week THANK GOODNESS!). I got 3 of the 11+ pounders I could find. I hope that is enough meat LOL! It’s set in stone now! The party is on!

Alright, today’s recycled craft was actually picked after thinking about my youngest brother’s GF. She is in a band and she plays guitar (so do both my brothers, but I don’t think this kind of jewelry would look good on them LOL!). When we went to the Casino, she had thee guitar pick earrings and I thought they were pretty cool. I ran across this and thought it might make a good present! Check it out for the “rocker” in your life!


Craft Idea of the Day: Guitar Pick Necklace

Materials:

Tooth-shaped semi-precious top-drilled stone ( I used Agate, but there are a surprising variety of stones available)
Guitar pick of your choice (I chose the glow-in-dark alien. My son thinks it's cool)
Lobster Claw necklace clasp (optional, but nicest alternative. I'll show you how to skip this step if you want)
Split rings (need 3) (optional, only if you’re using lobster claw clasp)
18-20 gauge craft wire (I used anti-tarnish silver) you’ll need about 2 feet
Leather Cord (at least 3 feet)
TOOLS
Wire cutters
Needle-nose pliers
Sharp abject, like heavy sewing needle, small nail (I used an awl) to pierce pick

Directions:

1. Assemble your materials and tools.

2. Pierce guitar pick in the center of the end you want to mount. Make sure you protect the surface you?re piercing into. You need about a 2mm hole (my kids said I should paint the hole with green or red fingernail polish to look like alien blood, but I declined)

3. Cut leather cord. If you're going to use the lobster claw, measure the length you want for your necklace (try it on around your neck) and add 3." If you?re skipping the lobster claw, cut 30".

4. To mount the pick, cut 4" of wire. Pass the wire through the guitar pick, then pinch ends up toward the top. About 1/4" above the place where wires join, grip both wires with pliers and bend ends at 90* angle. Grip pliers at joint after angle, and wrap ends back over pliers to form a loop, bringing wires down and around the vertical shank wires. Wrap ends around shank a few times, cutting any rough or uneven ends. Tuck edges in to avoid getting scratched by raw edges, and file if necessary with metal fingernail file.

5. To mount the stone, cut 8" wire. Pass through holes in stone, then pinch ends up toward the top. About1/4" above the place where wires join, grip both wires with pliers and bend ends at 90* angle. Grip pliers at joint after angle, and wrap ends back over pliers to form a loop, bringing wires down and around the vertical shank wires. Wrap ends around shank a few times, cutting any rough or uneven ends. Tuck edges in to avoid getting scratched by raw edges, and file if necessary with metal fingernail file.

6. String the tooth stone and the pick onto the cord. If you?re skipping the clasp, use a 30" piece of cord. Take each end and make a small over hand knot of one cord around the other cord, about 4" from the end. Turn the necklace around, and tie another over hand knot with the end of the free cord over the other cord. Pull both knots tight, and trim about 1/4" from the knot.

7. To adjust the necklace, use both hands, one hand on each knot, and pull your arms apart. You will see the necklace shorten as the knots pull further apart. To loosen, pull the knots closer together. Slip over your head, and pull necklace to tighten to a length that suits for wearing. Congratulations! You're done!

8. To attach the lobster claw clasp, cut 6" of wire. Slip a split ring on one side of the cord. Double the cord over about 3/4" and pinch the cord tightly. Bend a 90* angle in the wire about 1/2" from the end of one side, lay the wire against the folded cord and grip near the split ring/fold. Applying pressure so the wire will not slip, wind the wire around the cord tightly about 4 times to secure the cord and the wire. Angle the wire down toward the loose cut end of the folded over cord, and wind 3 or four times very tightly to secure the clasp assembly. Attach the lobster claw clasp to the split ring. There are special pliers for this, and though they are not really necessary, they work pretty well.

9. If this project is not just a one-time jewelry attempt and you want to make more, I suggest you purchase a pair for yourself. Using them makes split rings less aggravating. Repeat on the other side, without the lobster claw on the end. Instead, attach another split ring to the first ring that is strung on by the leather cord. Congratulations! You’re done!

10. The sky's the limit with this design. I've seen some people use metal guitar string instead of cord, and it looks really nice. Good Luck!

For today’s Dollar Store Dining recipe, I noticed that there was this recipe which is quite popular in many restaurants. I found it quite amusing that you can make a Dollar Store version of it actually. So for those of you with a hunger for Italian… try this one on for size!


Spaghetti alla Carbonara

Makes: 4 servings
Cost: about $2.99

This dish is quick, easy, and delicious. Bacon is the traditional ingredient and may be used if desired. If you are hesitant about the eggs cooking on their own, you can turn the heat on under the pot as you toss but be careful not to overcook.

Ingredients:

8 oz. Allegra No. 8 Spaghetti
1 (6oz.) can Libby’s chunks of ham or 6oz. Hot cooked diced bacon
2 country eggs
3 oz. Messana brand Parmesan cheese
McCormick salt & Pepper to taste

Directions:

1. Cook spaghetti al dente.

2. While it is cooking, cook ham or bacon in a frying pan until browned and crisp separating into bits as it cooks. If using ham, heat through until slightly browned and crisp.

3. In a bowl, beat the eggs well. Add 2oz. Of Parmesan and season with salt and pepper.

4. When spaghetti is cooked, drain and return to pot quickly, and add egg mixture (the heat of the pasta is sufficient to cook the eggs).

5. Add ham or bacon, toss well, and serve immediately with remaining Parmesan.

(***HELPFUL HINT***) Dried pasta doubles in volume when cooked. Measure dried pasta by weight and cooked pasta by volume.

Well folks, that’s all for today. I have to get ready to go to the post office to mail invites and get a couple of things at the store. But today, since there is more rain expected later, it will be all about cleaning and organizing while it rains, cause some areas have gotten a little out of control thanks to all the baby chaos lately. Have a great weekend and I will see you back here tomorrow! HUGS!

Tuesday, June 29, 2010

BABIES, BABIES EVERYWHERE!

Good morning boys and girls! How are you doing on this sticky icky morning? I am good. Still not feeling real well, but still alive with a great family by my side. So what’s new with you? Not much here… PC is still causing me more gray hair than I care to have, finances still making me ulcerate LOL, and house still cluttered with tons of crud! LMAO but I don’t care! I have made it to another day to fill my lungs with fresh air, so I am not gonna complain!

Well, we got word last night that Thursday will be the first day with our little visitor! DH and the kids better be doing some super heavy duty cleaning today while I am away! So much to do and not a lot of time to do it! When my day is done with mom today, I have to go home and do lots of cleaning and such (ya know those things I am not real fond of anyway LOL). I want a safe and happy visiting place for the little man to be. Ah babies, babies, everywhere! First kids, then cats, then bunnies, and now back to kids! The circle of life LOL! Ain’t it great?


Speaking of great… you wanna see the greatest thing? I mean so incredibly cute its almost unbearable?! LOL… Look… this is Miracle and Rescue playing together! I normally have been using the bed as a playpen for the bunny to exercise, and miracle was being nosey, so I let them “meet” LOL. I figure if Miracle can see what the white ball of fluff is, he will be less likely to harass her in the cage… I am hoping anyway! LOL… and I have to remember a salt wheel for Rescue… it’s the one thing I forgot. I remembered when she started licking me LOL!


How about this for cute! My mother harvested this the other day… think it was Sunday when I was over there. She actually got some potatoes to grow! And those green things are okra and on top are some elongated bell peppers! Isn’t that so cool! I’m jealous of the potatoes and the okra LOL! My okra plants are still kinda babies… not growing to incredibly fast, but hopefully soon! And I’ve never grown potatoes before so I can’t really be too jealous LOL! But I think it’s so cool!


So are you ready for today’s craft? With only 177 days left until Christmas (and 27 until I start working on that countdown), I am beginning to think of ideas for everyone. I have big problems with gifting the GUYS in my family most of the time… My Dad buys whatever he wants whenever he wants then tells me he doesn’t want anything (he better watch out, I got a jar of nothing now LOL!), and my first brother… well he’s a very unique person… HARD to gift. My baby brother is easy… he just likes food LMAO! There are 2 things I make (and one of them ONLY at Christmas time) that he absolutely LOVES and REFUSES to make himself LOL! Buttermilk Pie and Crepes! So he asks for nothing but those every year! LOL! I have even given him the recipe so he could make them, but he “claims I do something special to them… like stick my finger in the batter or something.” LMAO he is such a nerd LMAO! But I love him and what he doesn’t know is I will be getting his GF to learn to make them this year too! LMAO! But all year long I hear hints of Buttermilk pies and crepes to annoy me… but it just makes me laugh LOL! Anyway, so if you are like me, gifting for guys tends to be a major pain in the butt! So today I am bringing you something for them that they should like… guys like their cars and music right? Well why not make them a CD holder for their car. You ever see those ones you can buy in the stores that hang on the visor? Yea… those are so easy to make, its not funny! And you can make them for women too… its great! So here is your…


Craft Idea of the Day: Visor CD Holder

Materials:

Cotton fabric or a non scratching fabric (Novelty Prints are great for gift giving)
Craft weight fusible interfacing
Thread
1" wide Elastic ( 2 - 7" Pieces)

Cutting Instructions:

Cut 2 pieces of fabric 12" by 7" (Back both pieces with fusible craft weight interfacing)

Cut 10 pieces (all with the right side of the fabric facing up) to the measurements shown in this diagram.


Directions:

Note: All Directions use 1/2" Seam allowance!

On the angled edge of the pocket pieces, press under 1/4" and press under again, to enclose the raw edge. Stitch the hem.

Starting 1/2 from one end, place the pockets an even distance from each other with the last pocket lining up with the end of the 12" by 7" piece. Placement should be approximately 5/8" apart. Pin the pockets in to place.

Starting with the end pocket, stitch the pocket to the backing piece along the straight edge of the pocket. Once the pocket is stitched, fold it back out of the way and stitch the straight edge of the next pocket. Repeat until all the pockets are attached.

Lay all pockets flat and press. Baste the edges to hold the pockets in place.

Lay the elastic on top of the pockets 2" from each end. Stitch the elastic in to place in the 1/2" seam a allowance.

Take the second 12" by 7" piece and place it right sides together, on top of the pocket section. Starting on a 12" edge, stitch around the edges, leaving a 2" to 3" opening to turn the CD holder right sides out.

Trim the seam allowances (except at the area you left open) and the corners to eliminate bulk. Turn right sides out. Turn elastic to the back side.

Press the opening seam allowance inward, and press the whole CD holder flat.

Top stitch 1/4" from the edge all the way around.

You will want the wide part of the pocket to be at the bottom. Adjust the direction you place the pockets to have a holder for the drivers side and the passenger side of your vehicle.

Well kids, its time for another day of Dollar Store Dining! Today we will be tickling the taste buds with some frugal sides and soups! I tell you when I first picked up this book, I was like OMG are you serious? Some of the recipes in there are pretty smart… that led to my desire to try them! Just reinforced what I have believed for a very long time… that you can make a meal out of just about anything and that it doesn’t have to be expensive to taste or even look good! I admit it… I am a Dollar Store Junkie LOL! And I am lucky that where I am at, we have a few different ones all around us! So when browsing through this book, a couple of soups and sides jumped out at me from the 29 interesting choices this book has and I wanted to bring them to you today. I hope you like them… eat & enjoy!


Alu Bhaji (Savory Fried Potatoes)

Makes: 4 servings
Cost: About $3.99

These are a great accompaniment to Naan (a baked good) and also make a good filling for Chapatis (an hors d’oeuvres). When serving with Naan, include a yogurt dipping sauce to balance this great snack. Since it is also delicious when cold, it would be a nice variation of potato salad for a picnic.

Ingredients:

1 cup Spice Box dried chopped onions (use fresh onions if available)
2 (15 oz.) cans of Libby’s whole white potatoes
1 tablespoon Albergo olive/canola oil
1/4 teaspoon El Pique cumin seeds
1/2 teaspoon Spice Box turmeric
1/2 teaspoon Spice Box Mexican chili powder
1 teaspoon Baja Pacific salt

Directions:

1. Soak dried onions in hot water for 5-10 minutes. Drain.

2. Rinse and drain potatoes. Boil in hot water to heat through without allowing the potatoes to get mushy. Remove from heat, drain, and dice.

3. Heat oil in a saucepan and fry cumin seeds until aromatic.

4. Add onions and fry until golden.

5. Add turmeric and chili powder. Stir, then add potatoes, sprinkle in salt, and toss to mix well. Serve hot or cold.

(***HELPFUL HINT*** A slice of raw potato will keep down the pain and swelling of a bee sting.)


Ham Chowder with Sweet Potato Biscuits

Makes: about 8 servings
Cost: about $7.99

Ingredients:

Biscuits:

2 ½ cups Cinch pancake mix
1/3 cup Imperial Margarine, softened
1 cup S&W candied yams, rinsed, drained, and mashed
½ cup Springfresh milk

Chowder:

1 (15oz.) can of Libby’s whole white potatoes, mashed
1 (10.5oz.) can of Baron cream of chicken soup
1 (15oz.) can Libby’s corn
1 cup of Libby’s cooked diced ham
1 (15oz.) can Veg-All mixed vegetables
1 ¾ cups Springfresh milk

Directions:

1. Preheat oven to 450 degrees F.

2. For the biscuits: Mix all ingredients until a soft dough forms.

3. Place dough on a flour-dusted surface and roll to coat.

4. Shape into a ball and knead four times.

5. Roll to one-half-inch thick. Cut with a 2 ½ cutter dipped in a pancake mix to avoid sticking.

6. Place biscuits with edges touching on an ungreased cookie sheet. Bake for 10 to 12 minutes until golden brown.

7. While biscuits are baking, combine all chowder ingredients in a non-stick frying pan over medium high heat and cook until heated through, about 10 minutes.

8. Place chowder in serving bowls and top with 2 biscuits. Serve hot.

(***HELPFUL HINT*** In the United States, the terms yams and sweet potatoes are used interchangably but in truth, they are very different. They may both be roots, but a yam comes from the yam family and needs hot moist weather to thrive. Sweet potatoes are from the morning glory family and are more abundant in the States since they can withstand colder weather. The USDA requires food with “yam” on the label to be followed by the term “sweet potato”. Chances are, unless you have specially sought out a yam at an international market, you probably have never eaten one.

Well folks, that would be all I have for today! I might just make a visit to the Dollar Tree, which is right across from my mom’s therapy office, while she is in with the doctor to see what kind of tasty treasures I can find. It’s a HUGE store and one can get in lots of trouble in there LOL! They have a full out freezer section as well as non-perishables LOL… okie dokie, so I am off to take mom to therapy. You have a wonderful day and I will see you again tomorrow! HUGS!

Monday, June 28, 2010

DOLLAR STORE DINING

Good day to you my friendly flock! How are you doing this morning? I am alright. I had a rather rough night, and I am feeling a little ragged around the edges this morning, but I am alive so I am grateful. I’m glad you’re here, so grab your cup of Java and let’s chat, shall we?

When I got up this morning, the first thing was to feed the animals… so I thought. I got to thinking and I have to revamp my whole process of doing things because, well frankly, there’s a lot more animals to tend to now LOL! The outside cats are easy, the inside bigger cats are ok, the kittens were in the back whining and screaming their little heads off, and the rabbit was bouncing around crazy in the cage by the bed LOL! Lots to do, so I decided that maybe I should water the plants this morning first instead… LOL.

OK, so I go outside and there are kitties everywhere… getting underfoot and tripping me up. BAM! Down the steps I go with one big thud! Oh that hurts LOL. So I crawl back inside and gain my composure and the open bag of cat food LOL. Let’s try this again… Alright feeding the outside cats FIRST! THEN I go down the steps and get the water hose. Water the rose bed, which has such pretty new blooms that smell so wonderful (wish I could say the same for the INSIDE of the house LOL… just kidding!). Then I water all the plants on the porch… and its off to the back in the garden!

I get to the garden and see that I need to harvest a few things and that my eggplant plants are getting monstrous but the blooms are falling off… not cool1 THEN I see that my Romas are racing to heaven but no blooms even… odd. Then I spot it… holes in my leaves! OH NO!!! I am searching and searching but nothing… I lift EVERY leaf out there and can’t find a single worm, caterpillar, nothing! What on earth is going on… so I back up going down the stairs to the single pots of tons of things. Man my cherry tomatoes really bushes back out… YAY! Ok so anyway, I notice that my Italian parsley… the one that has been a beautiful bush of herby loveliness forever, is really short and spindly looking in some areas… I get closer… OH MY GOD!


I found them! 2 HUGE… FAT… UGLY caterpillars! Eating my parsley! First I got mad and then I started laughing uncontrollably! I remember back a few seasons ago where my mom’s garden was suddenly attacked by “worms” and she was chunking them across the yard LMAO… when she found out they were gonna be butterflies she felt so bad…LMAO my mom, the butterfly assassin! TOO FUNNY! So instead of chunking them across the yard, I gently removed them from my plants and took them and placed them on a branch of one of the trees in the back yard LOL. I let them live… just somewhere else LMAO!

OK back inside after the plants got plenty of water… it was time to feed and play with and love on animals. I started with the bigger cats. They need to know that they are still special, despite all the new critters coming into the house LOL. So after some special loving and canned food, it was off to the baby kittens, who by this time were literally climbing the wall/door and screaming their little heads off LOL! Ok, played with them and gave them some canned food and let them out into the big bedroom to play and have fun… then it was time for the bunny. I refreshed the water and pellets and cleaned the cage. I let her out on the bed after I blocked all the sides and turned it into a big playpen. She played for about 30-45 minutes then just came and cuddled up on me. So I get up to come talk to all of you and she is here with me now, cuddling on my chest grinding her little teeth in contentment LOL. She will soon be back into her home for awhile so that I can get some things done. I have to baby proof my home, because I will be having a visitor soon LOL. I will be “helping out a friend” by watching her little one while she tries to find a better job. I’m always happy to help someone bettering themselves. So since it is looking like rain outside (hearing the thunder now LOL gosh I wish I’d have known before watering the plants LOL), today is going to be inside serious cleaning day LOL! A new baby in the house will be my special motivation… always easier to accomplish goals (for me anyway) with a special “purpose” LMAO!

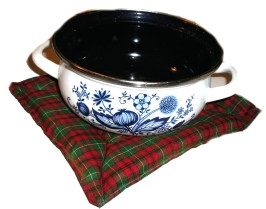
Alright, so after all that rambling, do you feel crafty? Well I saw this craft a while back and tried it and was so happy. So then I was sitting and thinking what I could possibly bring you that was new and unique. When I was in the kitchen feeding my bigger cats, I noticed my hot pad… my lovely lemon smelling hot pad and I thought OMG I could share that! It’s a simple but great little project that I really enjoyed and hope you will too!


Craft Idea of the Day: Scented Hot Pot Mats

Materials:

Desired cotton fabric
Sheet wadding (quilt batting)
Sewing machine access
Ground cinnamon or cinnamon Oil (other scents if desired)

Directions:

When you place your HOT pot on top, the fragrance of cinnamon will come wafting through filling the air with a beautiful aroma. Start by working out what size pot holder you want. Approx. 30cm X 30cm is suitable. Cut your fabric into the size you require allowing for 1/2 inch hems. Sew 3 sides of your fabric closed and slip in the sheet wadding through the last opening. You will need to either begin hand sewing or machine sewing this end closed. Just before you complete the closure Sprinkle about a teaspoon of cinnamon powder into the Project or sprinkle your drops of oil onto the wadding prior to placing it inside. You can finish it off by sewing some diagonals along the top to keep the wadding in place. The quilting also makes it look very decorative.

Ok so are you ready to cook? I hope so, because this week I have decided to bring you some recipes from something very near and dear to my heart… something I absolutely love. No not chicken LOL or strawberries… but Dollar Stores! WOOHOO! Nothing like Frugal cooking to enjoy dinner that much more! Awhile back I bought a book at Barnes & Nobles called “The 99c Only Stores Cookbook: Gourmet Recipes at Discount Prices” by Christiane Jory. I think I saw her or the book or something on a morning show and that’s how I knew what to look for. Anyway, every recipe I bring you this week will be out of that book and can be found in the 99c only store (some stores may not carry the exact same thing, but hey they should have something close to it LOL). I will include all the extra information from that page, recipe, etc. it’s a great little book! Most people have a Dollar store in their area… now I am not talking about a Family Dollar or Dollar general, where things can cost more than that $1. I am talking about a true… nothing is more than a buck store! Some of the more popular ones include: Dollar Tree, Everything $1, The 99c Only Store, Dollar World, etc. You won’t find anything more than $1 in these stores and THAT is the basis of this book! I’m telling ya, it will blow your mind some of the things in there! Easy to make, easy to afford, and easy to enjoy! I hope the theme for the week excites you and that I will tease your taste buds to try something new. We shall start out the Dollar Store Dining week with some lovely appetizers and hors d’oeuvres.


Clams Casino

Makes: about 15 Hors d’oeuvres
Cost: About $3.99

This is a classic that can also be made with oysters or mussels. In the original version, the filing would be put back into the half shell and quickly browned in a broiler. If you want the seared effect, place assembled hors d’oeuvres on a cookie sheet and broil for about 1 minute.

Ingredients:

1/2 cup Spice Box dried chopped onions (use fresh onions if available)
8 tablespoons Danish Creamery butter
1/4 teaspoon Spice Box paprika
Spice Supreme salt and pepper to taste
2 (6.5 ounce) cans Snow’s chopped clams
12 slices Branding Iron bacon, cooked and diced

Directions:

1. Soak the dried onions in hot water for 5 to 10 minutes. Drain.

2. In a large frying pan, saute butter, onions, paprika, salt, and pepper for 2 minutes for the reconstituted onions or if using fresh, saute until tender but not brown.

3. Add clams and simmer for about 3 more minutes.

4. Serve warm, sprinkled with bacon bits on toast of choice.

(***HELPFUL HINT*** Strain the bacon fat and use it to fry your next omelet. Store in the refrigerator for up to one week.)


One Bite Ham & Cheese Pies

Makes: about 12 Hors D’oeuvres
Cost: about $1.99

These are spicy, cheesy bite size biscuits. They can be prepared in advance, leaving out the last step of baking again for 1-2 minutes until right before guests arrive. My snobbiest, most skeptical friend loves them. Of course, I had to wait for her verdict before admitting they were part of the book.

Ingredients:

1/2 container (about 8 oz.) Pillsbury buttermilk biscuit dough
1 (6oz.) can of Libby’s Chunk Ham
1/2 (5oz.) jar of Kraft Old English cheese spread
1 tablespoon Oscar Mayer real bacon bits
Eden garden nacho sliced jalapeno peppers

Directions:

1. Preheat over to 400 degrees F.

2. Peel the thinnest layers possible from the biscuit dough and form into the cups of a mini muffin tin.

3. Bake 3 to 5 minutes or until golden brown, watching closely to avoid burning.

4. Remove from over and fill cups with a layer of ham, then cheese spread.

5. Sprinkle with some bacon bits and top each one with a jalapeno slice.

6. Bake again for 1 to 2 minutes, until cheese is bubbly. Serve Warm.

(***HELPFUL HINT*** These can be prepared and frozen in advance, allowing you to always be prepared for unexpected guests.)

Well everyone, that’s it for me today. I hope you will join me again tomorrow for some more fun and crazy antics. As for me, I am going to get off here and get some cleaning done and maybe finish up DD’s birthday invites! I hope you have a great day, be safe, and see you tomorrow! HUGS!

Tuesday, June 8, 2010

FARMER FAVORITES WEEK

Well a big HI THERE and HELLO to all my faithful followers! How are you doing this absolutely horridly humid morning? LOL… I am well. Full of summertime spunk and craziness!

To address some comments… First I figured MOM would be excited when I said it was FARMER FAVORITES LOL! She is a veg-a-holic! LOL! Sorry it rained on your tree day mom… but be patient… your tree day will come! And MOJO sauce is something you can buy in a jar at the store or make it yourself. Here is something I found on tasteofcuba.com for you!

The authentic mojo is made with juice from sour oranges. It still has that little orangy taste, but its very acid and tart. You can come close by mixing equal amounts of freshly squeezed orange juice with lime juice (*). If you live in areas with large concentration of Latinos you will probably find bottled Mojo (Goya brand makes one) or their produce department might have the slightly bumpy, thick skinned sour oranges. This recipe makes one cup.

1/3 cup olive oil
6 to 8 cloves garlic, thinly sliced or minced
2/3 cup sour orange juice or lime juice
(or equal portions orange juice and lime juice)
1/2 tsp ground cumin
Salt and freshly ground black pepper, to taste

Heat the olive oil in a deep saucepan over medium heat. Add the garlic and cook until fragrant and lightly toasted. Don't let it brown or it will be acrid tasting, just about 30 seconds should do it.

Add the sour orange juice, cumin and salt and pepper. STAND BACK; the sauce may sputter. Bring to a rolling boil. Taste and correct seasoning, if needed

Cool before serving. Mojo is best when served within a couple of hours of making, but it will keep for several days, well capped in a jar or bottle, in the refrigerator.

Use with Cuban sandwiches, boiled yucca, grilled seafood and meats, fried green plantain chips, etc.

*I have seen recipes for mojo using cilantro in it, but that is not traditional to Cuban Cuisine.


To Tabitha- ok dear, I am not trying to offend, but where on earth do you live to think MY life is interesting?? LOL… I do thank you for the compliments though… you are too kind! Yes I took my lotto bag to the casino, but ya know I got more compliments about the money scrub top than the bag LOL… go figure! I got a lot of compliments on it at the mall though! And I am so glad you have had good experiences with the Farmers Market. Just remember not to buy overboard LOL cause you don’t want things to go to waste!

To the Carter Family- I am sorry to hear you are having garden problems, but I CAN say this… DO NOT GIVE UP! Sure you may need to doctor and baby the plants, change the dirt, or other vegatative first aid actions, but it DOES help! I rescued what I could, disposed of what was dead, made a better dirt mixture, added some nitrogen rocks/food, and prayed! Be vigilant about the watering and care and maybe even research the specific problems you are having online for more advise. And your lucky, part of what I occupied my time with yesterday was my gardening and plants, so guess what you get to see today! LOL and here we go!


OK let’s start with my bell peppers. What once were mere sticks are now thick thriving stocks of green goodness! Look at the size of those bell peppers! And the best part is that these plants are COVERED in them! I have at least 10-12 fruits and/or blooms! WOOHOO! I got my mojo back I think LOL!


These are the cucumber plants that I need to get a trellis for and get put in the garden! They are a rich green and have huge leaves. They are very healthy… let’s pray I can keep them this way! I have some yellow squash plants which are green and crazy similar to these too!


My strawberries are sprouting back up YAY!!!! They are so healthy and green! Simply Beautiful! They are putting off fruit again too and now are even sprouting some runners! YAY! The berries you see are about the size of my thumb down to the first knuckle. Aren’t they lovely! Hopefully I can get them growing great guns again! That would be awesome!


OK, so you want to see the craziest thing? I had brought back a couple of pieces of cactus from the field behind Mom & Dad’s house… intending to get them planted (seeing as you can eat them and all!). Well I never got around to it. In fact, I FORGOT the pieces were on the top of a box sitting under the outside portion of the window unit! Well… apparently these dang things don’t need any dirt to grow LOL… just a little bit of water! Look at all the new green growth on that thing! Growing in a condensation puddle on top of a Rubbermaid box on the porch under the air conditioning unit… INSANE! Anyway, I will get them potted… eventually LOL… but at least I am not as worried about them as normal plants now LMAO!


Open my door and what do I see? Not one, but 2 pretty topsy turveys! LOL! Yes I got the dirt mixed, the anchors into the beams, the baby tomato plants in the containers, nitrogen rocks/food in, and hung up! They are cute and I hope that they bush out and give me pounds and pounds of beautiful red tomatoes! Those things are very heavy… LOL especially when you are standing on a chair on the porch! I thought I was gonna fall over the railing! LOL… I was a weeeeeee bit nervous for sure! But I got them up and they look super spiffy!


What you see here is an eggplant bud! Yes, after fixing the dirt, my eggplants shot up into gigantic leaves and tall shoots! They are much healthier now… all 9 plants are showing a great amount of progress! And they are beginning to bud! They will put off these cute purple flowers and then it’s on to fruits! YAY! I see some eggplant Parmesan in the future! LOL!


These are my Husky Cherry tomato plants that I saved. They are a rich green now. Still no fruit, but that’s ok… It started lightning and thundering while I was working on planting these, so I had to stop gardening for the day. 4 cherry tomato plants sadly have had to be put out of their misery… the last of the tiny tomatoes turned red and I disposed of them.


I also didn’t realize that I have a smaller/younger cherry tomato plant so that leaves me with 5 if I can get them all to flourish again! We shall see! I repotted each Cherry tomato in their own pot and gave it fresh dirt mix and nitro rocks, so here’s keeping our fingers crossed that they thrive and produce for a good long time! Ya know what I thought would be cool? Buying a bunch of these bigger pots and planting a big tomato bush in each one and lining each side of my driveway with them! OMG that would look super cool… but sadly we don’t exactly live in a neighborhood conducive for that kind of thing. Oh well, it was a thought!


This is the beginning of the Toy Story Duffle Bag I am making for Alex. I had to stop once I got the handles attached though because I didn’t have a color coordinating zipper to match that was long enough! All I had were pink zippers and I don’t think that would’ve looked very good with this LOL! Needless to say, I plan on getting a zipper today so I can finish the bag! All this cuteness from an old stained and ripped up sheet… crazy huh?


Then my lovely DD tells me that she wants to go with all the centerpieces for her party in the glasses. I cocked an eyebrow and went “WHAT?” SOOO we played around and came up with these 2 centerpieces to use… all in the glasses! I got 8 of them done (minus one photograph on the note) and now I need 4 more. UGH! Oh well… good thing they weren’t expensive or too hard to make!

Then I had the heart attack of a lifetime! While I was crafting, I had put my dinner in the oven to cook. About 13 minutes into it, I was sitting at the table crafting and all of the sudden I hear this buzzing… kind of like you hear a neon sign or a bug zapper doing. I walk into the kitchen and the inside of my oven is crackling and on fire! I was scrambling for the extinguisher and I was shaking so badly, I couldn’t get it unhinged off the wall, so I shut down the oven and immediately unplugged it from the wall. I watched as the flames went away and I saw this orange glowing heating element that had split in 2! OMG once I quit shaking like a leaf, I called my dad who is the all-knowing electrical man and asked if that “normally” happened. He assured me I acted correctly and when you cook as much as I do it does tend to happen… especially with an older stove. So that helped me calm down a little… THANKS DAD! But my blood pressure and heart rate didn’t get back to normal for an hour or so… basically when the oven was cool and I knew everything was ok, I was good to break down and cry then LOL! Needless to say, I don’t think my landlord is gonna be happy about this one… first it was a new breaker box and breakers, then that was followed by a water heater, a fridge, an air condition, and now the stove? LOL… what can I say… when I do it, I do it right! LMAO! Anyway, after that, the craft mojo was so incredibly gone… sad too cause I was starting to get into it!

Ok so let’s talk crafts. Now the late Spring through summer season offers a few patriotic holidays. Many people have celebrations and decorate in the Red/White/Blue theme. Well we covered a lot of Patriotic crafts during the May Memorial Day weekend, but here is another that is just so cute, I couldn’t “can”tain myself LOL! I don’t like regular fireworks, but this one really pops with pazzaz! LOL!


Craft Idea of the Day: Firecracker Cans

Materials:

1 round can with lid - Can made from cardboard, hot beverage cans for things like coffee or cocoa work well. You can also use cans from items like raisins or nuts.
4 pieces - Medium or Large Construction Paper (2 blue, 1 red, 1 white)
Star Confetti (any firework like decoration kids can paste onto the paper, like confetti, stickers, buttons, beads, or cutouts)
Star Tinsel (any kind of shiny, colored, wire tinsel)
Star button/bead (any medium sized, single star decoration)
Glue
Scissors
Ruler
Pencil (for tracing and rolling paper)

Directions:

1. Take your clean, round can and remove the lid. You need to cover the can with paper, but the size of paper will depend on the exact size of the can used.

Measure out your can and add about 2-inches extra to the length. This will give you enough paper to cover the can and create those neat "firecracker" rolls.

So, cut blue paper (2 inches longer than can) rectangle out. Have children cut into paper at the bottom, making 2 and 1/2 inch cuts in, spaced about 2 inches apart, all the way along the bottom of the paper. Then take a pencil and roll each paper strip around it, then release. Now the ends of the paper are curled.

Cut out a white piece of paper, the exact same size as the blue, only two inches shorter. Repeat the cutting and curling process.

Take the red piece of paper and make it two inches short than the white paper, or four inches shorter than the blue. Repeat cutting and curling.

2. Take the curled, blue piece of paper and wrap it around the can tightly, letting the curls fall to the table. Make sure the paper starts right below the opening rim on the can, and glue on.

Take the curled, white paper and glue it around the can. Start right below the opening rim on the can. Let the curls fall down onto the blue paper. Repeat with red paper, starting it right below the rim and letting the curls fall onto the white paper.

3. Take star confetti, or other decorative items, and glue them onto the can. Remind children to get both on top and under the curls of paper around the can.

4. Take some decorative star tinsel, garland, or other shiny and linked decorations to twist around can body. Glue ends to can once wrapped, making sure the lid will still fit.

5. Take a pen, pencil or pair of scissors and poke a large hole in the middle of the can lid. Have children cut 5-8 strands of tinsel, each about 5inches long. Twist each strand of tinsel into a loop, twisting the ends together.

6. Push ends of tinsel loop into hole in lid and glue into place. Create a firework flower pattern on top of the can with the loops. Glue a single star button/bead in the middle of the lid.

7. Let can dry, then use to store trinkets or treats! Makes a cute "exploding firework" can for any child to enjoy.

This craft lets kids use the firecracker/fireworks theme without being tangled into problems of safety or policy. At my summer school (and most schools in my area) we are not allowed to make rockets, or real looking fireworks, because of safety issues. Therefore, instead of a rocket, we made colorful firecrackers that were already "exploding."

I used some "Star Spangle Banner" saltwater taffy to fill the cans with, making a cute gift for kids to give their parents. Some of my students decided they liked storing crayons and markers in the can instead. One family made a bunch more "exploding firecracker cans" and a huge mountain of homemade fudge. They filled the tins with fudge and gave one to each teacher with an adorable card that read "For my teacher, a firecracker exploding with sugar!" I have to admit that I just loved that gift, and that fudge!

Okie dokie, now with summer here and heating things up, the last thing we want to heat up is the house, right? So natually, we gotta have a great garden grilling item or some BBQ or something during the FARMER FAVORITES WEEK! I have a couple of items here that I am pretty sure you will enjoy out on the grill or in your house!


Black Bean Veggie Burgers

Ingredients

1 (16 ounce) can black beans, drained and rinsed
1/2 green bell pepper, cut into 2 inch pieces
1/2 onion, cut into wedges
3 cloves garlic, peeled
2 egg
1 tablespoon chili powder
1 tablespoon cumin
1 teaspoon Thai chili sauce or hot sauce
3/4 cup bread crumbs or crushed whole wheat Ritz crackers

Directions

If grilling, preheat an outdoor grill for high heat, and lightly oil a sheet of aluminum foil. If baking, preheat oven to 375 degrees F (190 degrees C), and lightly oil a baking sheet.

In a medium bowl, rinse the black beans thoroughly and then make sure to dry them off completely! Then mash the black beans with a fork until thick and pasty. (The trick to keeping a good patty together is to drain as much of the excess water as humanly possible!)

In a food processor, finely chop bell pepper, onion, and garlic. Strain to remove excess water. Then stir into mashed beans.

In a small bowl, stir together eggs, chili powder, cumin, and chili sauce.

Stir the egg mixture into the mashed beans. Mix in bread crumbs until the mixture is sticky and holds together. Divide mixture into four patties.

If grilling, place patties on foil, and grill about 8 minutes on each side. If baking, place patties on baking sheet, and bake about 10 minutes on each side.

(NOTE**) You can also add corn kernals to the mixture for an added oral adventure! You can also freeze formed patties and cook them at a later time or even grill them frozen! I personally recommend the whole wheat Ritz crackers instead of bread crumbs, but whatever is to your liking… This is a very versatile recipe!)


Crispy BBQ Tofu

Ingredients
1 (16 ounce) package extra firm tofu
3 tablespoons olive oil
1 egg white
1 tablespoon barbecue sauce
1 cup all-purpose flour
1 teaspoon salt
1/2 teaspoon pepper
1 cup barbecue sauce

Directions

Drain tofu, and slice into strips. Place in a plastic bag or container, and freeze overnight. This will give the tofu a meatier texture. Thaw tofu strips, and blot with paper towels to dry.

Bake tofu on a non-stick sheet at 350 degrees for a few minutes on each side- until they are golden brown.

Heat olive oil in a large skillet over medium heat. In a small bowl, whisk together the egg white and 1 tablespoon of barbeque sauce. Combine the flour, salt, and pepper in a separate bowl. Dip the tofu slices into the egg mixture, then into the flour mixture, shaking off excess flour. Fry in the hot oil for about 1 minute on each side, until golden brown. Just fry enough at one time so they are not crowded. Remove from the oil to paper towels to drain and cool.

Preheat the oven's broiler. Brush tofu slices with additional barbeque sauce, and allow to marinate while the broiler heats up. Arrange them on a broiler pan, or wire rack set over a cookie sheet for best results.

Position the oven rack about 6 inches from the heat source. Broil for 5 minutes on each side, or until browned and crisp, watching closely so as not to burn them. Serve warm with the remaining barbeque sauce for dipping.

OK gang, I am gonna get off of here and skidaddle over to mom’s house. She has therapy today! After chillin with her for awhile, I am not sure what exactly I am going to do, but I am hoping it is severely interesting LOL! So I hope you enjoyed your visit today and will join me again tomorrow for more of “The life and times of the Frugal Mom” LMAO! Until then… HUGS!

Monday, June 7, 2010

QUALITY FAMILY TIME

Good morning children of the blog LOL! How are you this bright and sunny day? I am good I suppose. I plan on being very busy today actually. We had a very busy, but oh so fun day yesterday too. Thanks for the great comments and advise yesterday. Things will all pan out over time… I hope LOL. To Cyndi- I am glad I could inspire you. The hope is that you felt a sense of accomplishment when you were done! To me, that’s the REAL reward… the great feeling you have afterwards.

Ok, so we wanted to do something fun and family time… ya know just the DH, the kids, and myself… but with little to know cash. So we searched wallets, pockets, books, etc. and gathered up gift cards that have balances, coupons, etc. We had a lot more than we thought. And we headed out! First we went to CVS and picked up a lot of prescriptions for the kids… like 5 of them. BUT I had to make sure I have a month’s extra worth in the med box “in the event of” ya know? Ok, so got the yucky stuff done… lets go have some fun!


We went to Petsmart first. I has come serious coupons, a couple of GC’s with balances on them, etc. We had fun looking at the animals… until I saw the hairless rat! YUCK! OMG that thing was so nasty! I had to leave the area LOL! So I go to the back where the dry cat food is. I knew that Friskies was “redesigning” the bags (from a coupon preview in one of the smaller bags I got a couple of weeks ago LOL) and I actually found 2 of the 16 pound bags with the new design! I got them… yes because of the picture! I plan to do something crafty with them that you will see soon enough LOL! So I go up to the register and after coupons and GC’s and such, I paid $4.16… not bad huh for 32 pounds of food that was normally about $23 LOL!


Then we went over to the next store in the parking lot… Home Depot! OMG I wandered around in the garden center for at LEAST an hour! I couldn’t make up my mind on what I wanted LOL. Well I saw the Topsy Turvey Planters on sale for less than half of what you normally find them, and I said THAT’S IT! I got a couple of younger tomato plants to fit in them and 2 planters and a couple other plants and I was out the door! Total after GC… 12 cents! I can most definitely handle that!!!! We decided we didn’t want to go home after that and sit around and be bored, so we dropped the plants off and went back out! (Just like pets, I don’t believe in leaving plants in hot cars either! And it was 98, so there was no way I was going to cook my beauties!)


Our first stop was to show the gang the inside of Bed, Bath & Beyond, which they had never been in. Their faces glowed with amazement and said they had to keep me out of there because as soon as you walk in, you see a 20 foot wall of kitchen gadgets LOL! I admit it could be a potentially dangerous store really LOL! So unless I have killer coupons or need something very specific, I will stay away LOL! We did leave with a bottle of hand soap (the pink grapefruit scent) that they had for $1 and a package of Charmin Toilet Seat covers (travel pack) because I was out LOL! Total was $2.16 in that store! YAY!


Then the DD wanted to go to Barnes and Noble (yes this picture is the one in our town LOL) which also has a Starbucks… DH and I both had Starbucks cards as well. OK lets go! Went into Starbucks first… DD got hers, and DH ordered his. Well they realized they were out of the bananas to make DH’s so they wanted to give him credit back on his card… AND the drink. So I thought ok, maybe it was a partial credit… NOPE FULL PRICE! His drink was free… little turd! LOL. I couldn’t get the Strawberries & Crème Frappacino because all they had was regular milk and I didn’t have any pills with me. SO I opted to try something new… I tried the Shaken Iced Passion Tea Lemonade. It was pretty good actually. Gave her my GC and was on my way. We wandered, DD found her some books, I found a bargain book about Farmers Markets which was really good and cheap, Alex found a book that had a little toy with it, and we were gone… an hour later LOL! Total here $10.03!


Off to the mall to window shop, get some gift and craft ideas, etc. LOL! I had a GC and coupons for Aunt Annie’s and Bath & Body. So we walked around- OMG this one little booth had the cutest cover for Madison’s phone… AUTISM PUZZLE PIECES! But I couldn’t afford what they wanted. They didn’t have any covers for my phone, so we walked on. Oh let me tell ya, there were all kinds of free samples in the food courtyard LOL! So we went to Aunt Annie’s and cashed in the coupons for pretzel dogs, etc. then made rounds through the courtyard, sat down, and ate it all… we had almost a full meal each which was so funny! Total cost of food was $2.98! Then we walked to Bath & Body works where we were greeted at the door by a lady handing out coupons and free little bottles of hand sanitizer! OMG it was so cool! We definitely went to the mall on the right day! Free goodies everywhere we turned! We got some holsters for our santizer (in Gator Blue & White no doubt for me and DD and a green tie dye for the DH… DS14 didn’t care about them LOL), a few other scents of sanitizer (cause they were on sale), a LEMON hand soap for the kitchen (also on sale), a LEMON fabric refresher (on sale 50% off), and then the coupon said free item with a $10 purchase, so I got a free full size shower gel. Total out the door was $12.51… not too shabby for 11 normally very pricey items!! We wandered some more and found more free samples (like at the candy store, etc) and then we decided it was time to go home. DS wanted to go home and honestly, after the 2nd day of walking for hours… so did momma! LMAO! Our total out of pocket cash for the day (not counting GC's, etc.) ended up being $31.96. This was left over from my reserve cash I had to pay for the medicines and in my pocket from the casino LOL... Not bad huh? For about 6-7 hours of fun and outing...

I fielded some interesting calls last night and after that, I crashed… HARD! Today is going to be shape up around the house day. I have some important calls to make and then cleaning and tending to plants. I have to mount anchor screws to hang my planters and aggravate my landlord LMAO! And of course cooking, etc. Think I might actually bust out some crock pot recipes today and make some dinner for tonight and maybe even the next few nights! Either way, once I wake up I will be off and running LOL… right now I am still shaking out the cobwebs!

Ok so the craft today… are you really liking these crafts BTW? Or is there something you want to see? You have to let me know so I can cater to your likings! LOL. Anyway, for this craft you are gonna recycle some old jeans! Many of us have an accordian folder holding letters, bills, etc. Well here is a way to dress them up pretty spiffy like!


Craft Idea of the Day: Denim Jeans Letter Binder

Materials:

Jeans
Craft Glue
Binder
Ribbon


Directions:

Before - Nice flowered box, but all tore apart

Step 1 - I used a new binder (cut to the right size, and i had to got rid of the iron parts first), then covered it with jeans-fabric, using textile glue.

Step 2 - I made the inside out of thin cartbox (see next image for sizes) and glued them together with bison-kit

Step 3 - Adding ribbon to the corners (textile glue) to nice-it-up :)

Step 4 - Adding label, ribbon (to close the box), flower and notes

After - Taaadaaa!

Pretty neat if you ask me! OK now this is the part I know you all have been waiting for! FOOD!!!!! Ok, I hear you drooling and panting with anticipation to see what type of theme I have for you this week LOL. Well, after careful consideration (and recent overindulgence LOL) I am NOT doing seafood this week… maybe next week. I just can’t “stomach” more seafood right now LMAO! BUT this week is going to be healthy, inventive, and locally grown! Yes my children… its FARMER FAVORITES WEEK! All veggie meals made with locally grown produce! It’s a great alternative… maybe you can substitute those greasy artery clogging burgers a couple of times a week for one of the fresh crisp healthy homemade meatless meals LOL! Vegetarian meals can be very tasty… but you have to give it a shot before you turn up your nose at them! To quote Sydny Carter…”Whether you're a dyed-in-the-wool vegetarian or just want to up your intake of vegetables, legumes and grains, there is a world of meat-free recipes to choose from.” So I hope you are looking forward to this week and that you enjoy these A+ meals!


Addictive Sweet Potato Burritos

Serve these with sour cream, chopped green onions and salsa. For truly vegan burritos, omit the cheese and sour cream. These may be made ahead of time, individually frozen, then heated. For an interesting variation, try deep frying these tasty burritos."

Ingredients

1 tablespoon vegetable oil
1 onion, chopped
4 cloves garlic, minced
6 cups canned kidney beans, drained
2 cups water
3 tablespoons chili powder
2 teaspoons ground cumin
4 teaspoons prepared mustard
1 pinch cayenne pepper, or to taste
3 tablespoons soy sauce
4 cups cooked and mashed sweet potatoes
12 (10 inch) flour tortillas, warmed
8 ounces shredded Cheddar cheese

Directions

Preheat oven to 350 degrees F (175 degrees C).

Heat oil in a medium skillet, and saute onion and garlic until soft. Stir in beans, and mash. Gradually stir in water, and heat until warm. Remove from heat, and stir in the chili powder, cumin, mustard, cayenne pepper and soy sauce.

Divide bean mixture and mashed sweet potatoes evenly between the warm flour tortillas. Top with cheese.

Fold up tortillas burrito style, and place on a baking sheet.

Bake for 12 minutes in the preheated oven, and serve.

OK everybody, I have some household chores calling me and some plants who need my lovin! The garden first aid seems to be working cause I am seeing some serious green popping back there again YAY! Join me back here tomorrow for another head spinning crazy day packed full of interesting adventures! Take some motion sickness pills and you will be ok LOL! Until tomorrow… HUGS!

Saturday, June 5, 2010

ODDBALL GAMBLING


GOOOOOOD Morning boys and girls! How are you this fine day of days? I am ready for some side splitting adventures as I am on a “business trip” today LMAO! Mom and my brother want to go to the CASINO in Louisiana LMAO! Yep, we are off to the Indian Casino called the Alabama Coushatta Casino in Kinder and it plans to be fun and entertaining! I particularly do not like to gamble, but the buffet is worth the trip! OMG!!!!!! I think I just gained 5 pounds thinking about it! Anyway, it will prove to be an adventure for sure! I woke up and my hand was itching, so maybe it will prove to be a profitable day as well! My hand never lies… I always get money SOMEWHERE when my hand itches LOL!


Okie dokie… so I had to get a new phone last night, right? Well, let me tell you... It’s crazy! I’m not all for these new fangled phones, and the only phones they had were the touch screens and I have moose hands so I was learning all night! You think that they would make bigger buttons for goliaths like me! Well, everyone was texting me all night and I didn’t get a chance to really learn about the phone so guess what I will probably be doing on the long car ride LOL! Yep, got the instruction manual in my bag, so that I can read! I always have told my kids to make sure to read the whole manual before using the phone and here I am operating before instruction LOL… what kind of example am I? Well, wish me luck on learning the new technology! LOL!

OMG I saw the coolest news article this morning about Downtown Houston… Check this out!


Veggie Gardens to Spread in Downtown
Updated: Friday, 04 Jun 2010, 10:21 PM CDT
Published : Friday, 04 Jun 2010, 10:21 PM CDT
JOHN PERERA
Web Producer

HOUSTON - When Vegetable Gardens Attack! - Part 1.

The Mayor's Office of Sustainability alongside other organizations committed to the first phase of a two-part plan to make Houston just a little bit greener.

Around 11 a.m., the general public was invited to contribute to a container vegetable garden at the City of Houston Public Works building across from City Hall.

The vision is to have vegetable gardens all along the sidewalk in the 600 block of Walker Street, according to a statement.


Isn’t that the coolest thing? I think all cities should get in on the container gardening! Now my only question, is how in the heck are they going to keep people (IE the homeless, the hoodlems, etc.) from eating all the produce or destroying the plants. And what are they going to do with them all? Hopefully the food will be used appropriately... like used in the soup kitchens or donated to smaller food pantries, or something. Lets all keep our fingers crossed that they have thought this thing through! But I thought it was a good human interest story to spotlight today!

Ok, so are you feeling crafty today at all? Well I found this craft that makes you go “WTF?” LOL Since I am in an oddball mood and I think its exciting to try weird things, I am bringing it to you! It recycles, its funky and fun, and its definitely a conversation starter LOL! I want to see my kids faces when I tell them I want a pair of these LMAO!


Craft Idea of the Day: Newspaper Slippers

Materials

Newspaper
Glue
Stapler
Tape

Directions

These fun disposable slippers are ideal for the beach, painting in or yard work.

For the soles stack 12 pages together. Draw an outline of both your feet on the top page.

To hold the pages together staple inside the outline of the heal then cut out the shape.

For the straps make a 3 inch wide strip from a half page for each slipper.

Lift up about 6 of the pages of each sole outline. Place the strip inside the front part of the sole and adjust the size. Then staple in place.

Bring down the remaining 6 layers of the sole and glue down, then bind the front edge of the slipper with tape.

Is that not super crazy or what?? Ok, now today’s food… well with going to the casino, we are always teasing mom about her WINNING Mojo LOL, so today I thought it fitting our trip that I give YOU some mojo… chicken that is! And for the pie… well you have to show no emotions, especially on the tables like Poker and such. You need to be transparent. So what better than a pie that’s transparent too? LOL! Enjoy the oddball recipes I brought you today… in the spirit of the Casino fairies LMAO!


Broiled Mojo Chicken Wings

Ingredients:

1 lb drumsticks
1/2 cup Mojo Sauce
1 tbsp of garlic salt
1 cube Butter
salt to taste
3 garlic cloves sliced

Cooking Directions:

Pour mojo sauce over wings and marinate in the refrigerator for at least 4 hours.

Drain excess sauce and add garlic salt, garlic cloves, salt and pepper.

Broil in the oven for 20-25 minutes.

Have extra Mojo sauce for dipping wings in.

This recipe will serve 4 people. Pairing: Great to have with ice cold beers of your choice.


Transparent Pie

Ingredients

1/2 cup margarine, melted
1 1/2 cups white sugar
4 eggs
1 tablespoon distilled white vinegar
1 teaspoon vanilla extract
1 (9 inch) pie shell

Directions

In a medium bowl, beat eggs well. Mix in sugar and margarine. Blend in vinegar and vanilla extract. Pour filling into pie shell.

Bake at 450 degrees F (230 degrees C) until pie starts to brown. Reduce heat to 350 degrees F (175 degrees C), and continue to bake for about 25 minutes.

NOTE** you can put fruit or nuts down on the bottom before adding the filling for an upside down pie!

OK friends, as Lady Gaga would say, time to put on my POKER FACE and get on down the road! LOL! It plans to be a very exciting day with tons of great food (my 2nd reason for going- mom would be my first LOL!) and lots of slots ringing and people screaming LOL! Ya’ll have fun in whatever you choose to do today and I will meet you back here tomorrow to tell the tale of my travels! Until then… HUGS!