myspace generator
Showing posts with label Crawfish. Show all posts

Monday, August 9, 2010

HOPPIN JALAPENO WEEK

Good morning everyone. How are you doing this cloudy Monday morning? I was watching the sprinkles fall here outside my window but they have gave way to a hot humid morning. The DN is asleep taking a nap and the DD is at band practice. I was going to go out this morning, but plans have changed, so I sit here contemplating things like crafts, food, etc. Perhaps I will go later on today. Not sure yet...

So I wanna talk about a frugal topic that I absolutely love... garage sales! When I was younger, my grandmother, mom, and I would go "garage sale hopping" on the weekends to see what we could find. Sometimes we would get lucky and sometimes... well not so much. I ran across this article which made me think back to those fun times, and I decided to share it with you. Maybe you can find something useful from it.

The Garage Sale Lady shares bargain-hunting tips
12:33 PM CST on Thursday, November 13, 2008
McClatchy-Tribune

ORLANDO, Fla. – Shelley Kincaid digs three objects out of a canvas tote bag – a slightly dented plain lampshade, the sleeve of an old stretch-lace T-shirt and a crocheted scrunchie.

She slides the lacy sleeve over the shade, securing it with the scrunchie.

Voila! She has created a pretty new lampshade from throwaway items purchased for pennies at garage sales.

Kincaid – better known to her many DIY fans as the Garage Sale Lady – was a headliner at the Southern Women's Show in Orlando, Fla., recently. During her twice-daily presentations, she transformed bargain-rack blouses into gift bags, cast-off jewelry into candelabra, and created a tuffet (Think Little Miss Muffet.) from salvaged chair legs and old curtain fabric.

"None of these things started out beautiful," Kincaid said. "You've got to mix and match, fix and patch, screw and glue."

Shelley Kincaid

Considering the dire state of the economy, there is no better time than now to catch garage-sale fever, Kincaid said.

Want to make a little extra cash? Hold a garage sale, she said.

Need to save money? Become a garage-sale shopper.

Kincaid has been doing both for more than a decade. As a result, she has made more than a little money and saved a great deal. Almost everything in her house was once someone else's throwaway – from furniture to bedsheets, towels and tools.

It was a "nightmare move" from Kansas City to her present home in Denver that sparked her passion for garage sales.

"The movers destroyed everything," she said. "My dishes were pulverized. There was all kinds of water damage. My wood furniture was buckled, my sofas were moldy."

And after the insurance claim was settled, "The insurance company took everything."
"That's when I went to my first garage sale. I started finding old things and fixing them up. I'm a designer with an engineering background. Fixing things really got my creative juices flowing," she said.

MCT Shelley Kincaid makes lampshades from a variety of materials including this one made with old lingerie.

"People admired my stuff. They wanted to know how to do it. I wrote down instructions, which eventually became a book."

Kincaid's "The Garage Sale Decorator's Bible," first published in 1997, is now in its fifth edition. It is available on her Web site, garagesalelady.com, from amazon.com and at Barnes & Noble stores.

"Then out of the blue, I got a call from a Denver TV station to do a show, "Trash to Treasures." I've been on the air for 10 years," said Kincaid, who also is a frequent guest on HGTV, the Discovery Channel and DIY Network.

It is a myth that you only find junk at garage sales, she said.

"In reality, I often find brand-new things selling for a few pennies on the dollar, she said. "Clothes people buy then never wear. Wedding gifts. Christmas gifts. Birthday presents they don't like," she said.

But it's the gently worn and even totally trashed items she treasures most. The antique china and vintage fabrics, the wonky chairs and battered jewelry, the fringe on old drapes and appliques on worn T-shirts. Things she can mix and match, fix and patch, screw and glue.

"I'm saving money. I'm creating something unique. And best of all, I'm recycling throwaways," she said. "And that's good for the planet."

TIPS FOR SELLERS

Most garage sales are on Friday and Saturday. Get a jump on the competition and hold yours on Thursday.

If most sales in your neighborhood begin at 8 a.m., start yours an hour earlier.
Advertise in newspapers, online and with neighborhood signs.

Post easy-to-read directional signs. Bright paper plates with bold arrows are inexpensive and eye-catching. Your sale is only as good as your signs, Kincaid says.

Wear your money. Keep cash close in a fanny pack for speedy transactions and to discourage theft.

For the convenience of shoppers, keep a tape measure and extension cord handy.

To entice shoppers to linger and buy, merchandise should be clean, clearly priced and attractively displayed.

Have a toy box to keep kids amused while adults shop.

Position large items out front. Dealers and people in need always want furniture.

TIPS FOR BUYERS

Shop early on the first day of the sale for the best bargains. Shop toward the end of the sale for rock-bottom prices.

Plan your route carefully.

Make a list of items you need.

Before leaving home, jot down measurements for window treatments, mirrors and furniture.

Bring a tape measure, magnifying glass and extension cord.

Stock up on small change.

If you don't see the items you're looking for, ask. You might get lucky.

Pretty interesting huh? And some of those things you find at garage sales, you can use for crafting! Now speaking of crafts... today I offer you a wood working craft that can be used for lots of things... special celebrations to hold gifts of giftcards, cash, etc. or use it as a planter, or whatever you like! That's the fun thing about making your own things. You can do basically whatever you want with them! Now there are alot of steps to the process of today's craft, so instead of post them ALL here, I will link you to the site to find this extraordinary idea!
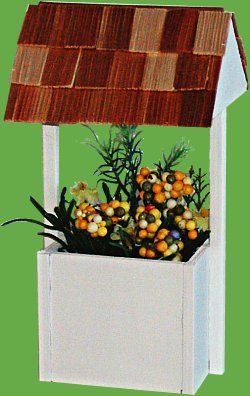


Craft Idea of the Day: Wooden Wishing Well

You'll need the following supplies:
Two 1/8" thick balsa wood panels 4" by 2 1/2" .
Two 1/8" thick balsa wood triangles 2 3/4" on each short side.
Five 1/4" thick balsa wood squares, 2 3/4" on a side.
Four 1/4" square posts of 2 3/4" length.
Two 1/4" square posts of 6" length.
Two 1/4" square posts of 3 3/8" length.
One piece of 1/4" or 3/8" square stock of 4" length.
One piece of 1/8" dowel cut to 4 1/4" length.
Some dollhouse shingles.
Wood glue, paint, decorations

Ok gang, its that time again... time to munch on some superb sustainance! Now I have done some themes based on music, some on fruits, some on methods, etc. but I am really loving the theme I have picked this week. You see, its something I eat just about everyday with at least 1 meal! I know my dad eats alot of these too, and so did my mom back in the day! My dear friends... in honor of the scorching summer heat, I figured I would heat up the recipes this week with some HOPPIN' JALAPENOS!! Those little green pieces of fiery heaven... yes the jalapeno! So delish... OMG gonna go throw some in some omelets when I am done here LOL! I love them about as much as I love garlic! YUM! LOL... ok so this week I will bring you jalapeno facts as well as some sizzling recipes!


Some Interesting Facts about Jalapenos:

The Jalapeno was the first pepper to be taken into space.

Dried and smoked jalapenos are chipotles, generally known in a class of their own.

The generic Chili plant interestingly enough is classified as a fruit, and not a vegetable and came from either Peru or Bolivia sometime around 7000 BC. The seeds of the plant were carried by birds across to other parts of America; Central, South and Southern North America. The Jalapeno (Chili or Chile) pepper got its name from a village by the name of Jalapa in the area of Veracruz, Mexico where it is said to have originated. It is by far the most popular form of chilli eaten especially in the US and Europe!!

Jalapeno peppers come from the capsicum family and are dark green in colour but turn red when mature. Their shape is long and like a cone and they normally reach a length of approximately 2 inches when fully grown. They are rich in Vitamin C, A and E, potassium and folic acid, so are rich in nutrients.

There are at least two varieties of Jalapeno peppers, the North American variety, and the Mexican variety. They are the two locations where they are grown the most. The North American type needs dry air with lots of water where as Mexican variety does well in the heat and humidity. Hence there is a decline in production of the North American Jalapeno during the hot summer. In general, it takes about 2.5 – 3 months for the pepper to grow and each plant will yield about 30 pods.

Jalapenos are known for providing that ‘kick’ in food. The ‘kick’ comes from the seeds and the rib of the skin so many people remove both these parts if they want just the flavour and not the heat!! The heat or spice comes from a group of 5 chemicals that are called Capsaicinoids. Each chemical in the family has a slightly different affect. The hottest one out of the five is the capsaicin which produces the fire sensation or burning in the mouth.

So now its time to eat these little Southern beauties! Today I am stuffing them! I know you have heard of classic cheddar cheese and cream cheese stuffed peppers, but check out some of the other stuffings you can put into these hot little "poppers" LOL! Eat & Enjoy!


Stuffed Jalapenos with Smoked Gouda and Pineapple

Ingredients

12 fresh jalapeno peppers
1 (8 ounce) package cream cheese, softened
6 ounces smoked Gouda cheese, shredded
1 tablespoon real bacon bits
1/2 cup canned crushed pineapple in juice, drained and juice reserved

Directions

Preheat oven to 350 degrees F (175 degrees C).

Cut a slice off the stem end of each pepper, and use a sharp paring knife or pepper corer to scoop out the veins and seeds from the peppers (wear rubber gloves and avoid touching your eyes or nose).

Mix together the cream cheese, Gouda cheese, bacon bits, pineapple, and about 1 teaspoon of reserved pineapple juice, or as needed to make a workable filling, in a bowl until thoroughly blended. Using a small spoon, stuff the hollow peppers with the cheese mixture.

Place a rack or several disposable foil bread pans upside down onto a baking sheet. (See notes for how to make a pepper rack from a foil pan.) Stand the peppers, stem sides up, into the rack, and bake in the preheated oven until the peppers are softened and the filling is hot and bubbly, 30 to 45 minutes.


Firehouse Jalapenos

Ingredients

30 jalapeno peppers, halved and seeded
1 (8 ounce) package cream cheese, softened
60 small smoked sausages (such as Lit'l Smokies®)
1 (1 pound) package thin-sliced bacon, cut in half
60 toothpicks
1/2 cup barbeque sauce

Directions

Preheat an oven to 350 degrees F (175 degrees C).

Fill the jalapeno pepper halves with softened cream cheese, then place a smoked sausage into each pepper on top of the cheese. Wrap each piece with a half strip of bacon and secure with a toothpick. Place the peppers onto a baking sheet and brush with the barbeque sauce.

Bake in the preheated oven until the bacon is crispy, about 30 minutes.


Bacon-Wrapped Peanut Butter Jalapenos

Ingredients

8 jalapeno peppers, halved lengthwise and seeded
1/2 cup peanut butter
8 slices bacon, cut in half

Directions

Preheat oven to 350 degrees F (175 degrees C).

Fill each jalapeno half with peanut butter and with a piece of bacon; secure the bacon with a toothpick. Arrange the wrapped jalapenos on a baking sheet.
Bake in the preheated oven until the bacon is dark brown, about 25 minutes.


Crawfish-Stuffed Jalapenos

Ingredients

8 ounces bacon
8 ounces bulk lean breakfast sausage
24 large jalapeno peppers
1 cup shredded Monterey Jack cheese
1 cup shredded Cheddar cheese
4 ounces cream cheese, softened
1 cup shredded Muenster cheese
1 pound cooked and peeled crawfish tails, coarsely chopped
1 quart vegetable oil for frying
2 cups all-purpose flour
1/2 teaspoon paprika
1/2 teaspoon white pepper
1 teaspoon garlic salt
1 1/2 cups beer, or as needed

Directions

Place bacon in a large, deep skillet. Cook over medium high heat until evenly brown. Drain, crumble and set aside. Stir the breakfast sausage into the skillet, and cook until crumbly and no longer pink. Meanwhile, place the Monterey Jack, Cheddar, Muenster, and cream cheeses in a large saucepan over medium-low heat. Once melted, stir in the crumbled bacon, breakfast sausage, and chopped crawfish tails. Set aside.

Remove the stems from the jalapenos, and cut a slit lengthwise down one side. Wear gloves while handling the jalapenos (trust me, I learned the hard way). Remove the seeds through the slit. Hold the seeded jalapenos lengthwise between your thumb and forefinger, and stuff with the meat and cheese mixture (you remembered the gloves, right?). Place the stuffed jalapenos onto a dish, and freeze overnight or until solid.

Heat oil in deep-fryer to 375 degrees F (190 degrees C). Whisk together the flour, paprika, white pepper, and garlic salt in a bowl until combined, then quickly whisk in the beer until a batter has formed.

Use a skewer to stab a frozen jalapeno, then dip it into the batter until coated. Place the jalapeno in the hot oil, and hold for a few seconds just below the surface, before twisting out the skewer. This will help keep the jalapeno from sticking to the bottom of the pan. Cook until golden brown all over, then remove and drain on a paper towel lined plate. Repeat with remaining jalapenos.

Ok kids, that's a wrap... a bacon wrap LOL... for today! I hope you are excited for a new week, a new theme, and new fun and adventures! I think I AM gonna take the DN, DS, and myself and go out for the day. We are gonna make a baby hunting adventure! Hunting for furniture LOL! And who knows what else! Of course, I still might just stay home and cook and sew LOL! I never know. Thanks for coming in and sitting with me this morning and be safe today in your travels and your own adventures! Until tomorrow my friend... HUGS!

Sunday, June 6, 2010

CASINO COMA

Well a big hi there and hello to all my readers! How are you this muggy Sunday morning? I am actually in a good and anxious mood! Oh boy do I have LOTS to fill you in on!

It seems my little bloglets were very very busy yesterday! Good for you! I love reading the comments from you guys! Its awesome! Ok, so lets take a moment and address my peoples LOL!

First, to Jean- girl I am sorry to hear of you and the DH health issues. Glad to hear you didn’t reinjure the knee, and I know sometimes it may feel like it! Hang in there and all will be well soon! Baby it, but work it and you will be running marathons in no time!

Then there is Cyndi- I am with you on the gardening. I say plant anything you have the remote chance of eating and not only will the plants be helping the environment, but you can be partially self-sufficient and saving money on groceries too! Good for you!

To my dear Melissa- OMG WELCOME BACK! I am sorry to hear of the hard times you have endured the last few months, but I am so happy that my writing kept your spirits up and that your baby is home and doing well! Now would be time to put that crock pot to good use! LOL!

To My mom- oh boy oh boy did we have some fun yesterday huh? I can’t believe you are not fond of the slippers! I thought they were cool! LOL! And you want me to talk about seafood after all that I devoured (and snorted) yesterday?? LMAO! I’ll have to think about that one cause those crawfish are still swimming into the Gulf Stream this morning LOL! But OMG did I sleep like a rock! LMAO!


And to my Dad- WOW… You posted more than one line! I’m impressed LOL… just kidding. And do not be fibbing to these people… you ARE long winded, but that’s why we love you! LOL! Yes I can take a hint and that is why there was pie waiting when you came home LOL! Wasn’t it great and isn’t it pretty? See, I DO listen to you LOL! And OMG, Dad I love you… but you are a nerd! LMAO… think outside the (planter) box!? Are you serious?? LOL actually it made me chuckle… You are a goober but we love you! Thanks for finally not just lurking/blogstalking! LMAO!!

OK folks, now that our warped family humor has entertained you all, its time to get down to work. Actually this is not work, its very fun. I like chillin with ya’ll LOL! It has definitely been an interesting few days…

First off, many of you have noticed I have not made much reference to the DS18 in a little while. This is because we have been having some major problems with him. Long story short, he decided to move out yesterday while I was gone. Guess he would like to act grown up but still doesn’t have the guts to FACE me like a grownup… which is sad. I wish him the best and hope he stays safe but from now on don’t look for references to him, as there will be none.


Look at all this food! This was my first run on the buffet yesterday at the Casino! You can also see my mom’s hands and my DB’s GF in the background LOL! All you can eat crawfish boil and seafood and OMG yum! I literally sat there for 2 hours eating! I told you I go for the food! We had a food incident though, that while it makes me look SOOOO unintelligent, was funnier than stand up comedy! So I am gonna share it… laugh out loud all you want because even I laugh about it! LOL!

Ok, so anyone who knows how to eat crawfish and crab, know that it is very labor intensive chore with your hands. Well when you do a Cajun Crawfish boil, there is some serious spicy seasoning going on and your hands get coated in the grainy spicy goodness! OMG ok so my nose started itching and I was so into the serious munching I was doing, that I totally forgot that the spices were on my hands and I commenced rubbing under my nose… inadvertantly inhaling some of the seasonings LMAO! I was snorting crawfish! At the same time I also accidentally rubbed my eye! So not only did I burn the inside of my nasal cavity, I blinded myself as well! I was crying it burned so bad and the waitress was cycling iced tea to me as fast as her little legs could walk LOL. She was telling me, with her sweet little Louisiana accent that I was not supposed to put it in my nose LOL and giving me the look like Texans were so dumb and needed to go home LMAO!!!! But I must note that I didn’t stop eating through all this LMAO! Then once the sting settled enough to see, I decided to eat some more crab and I flung that in the eye I just scorched LMAO! But after 2 hours I couldn’t take no more (well I probably COULD but wasn’t going to) and so I took mom to play more games! We had a great time!

Now anyone who has been to the casino knows that there are these nice little ladies who come around asking if you would like anything to drink. It was free and so Leslie (the DB GF) and I took full advantage LOL! Let’s just say the ride home with me and her slightly inebriated in the back seat was quite humorous… Mom, DB, and the 2 of us were laughing all the way home… across the border and into the night. It was really fun! I remember gas station of love, sluts, marriage licenses, dollar menus, walking pineapples, falling in a toilet, and some other really funny stuff! My sides are a bit sore today! Cutting up can be so much fun!

OK now I have a hypothetical situation I need my readers help with. It’s a scenario I have been presented with and I need to know what you would do so I can advise this person what might be the best course of action. OK, so Person A tells person B that they are drinking, smoking weed, being promiscuous, etc… a bunch of bad things they shouldn’t be doing. So you have these beliefs about drug use (seeing it IS illegal and all) and know where Person A works. That job has a random drug test policy. Would you call in an anonymous tip about Person A (trying to get them some help) based on the hearsay from person B and your own suspicions? Help me out here folks… gimme your opinions!

Ok ok, I hear ya… lets get crafty. Today is a recycling yard project that I thought was super spiffy! If you happen to run across this at a yard sale, thrift store, etc. it would be the cutest outside decoration!


Craft Idea of the Day: Stained Glass Yard Light

I bought this stained glass lamp shade at a garage sale, and the table base at a different sale. I bought a solar rope light and coiled it around a clear glass vase, and put it under the lamp shade. (Note the solar collector at the left base of the stand.) I tied the shade to the base with green twine, so that it wouldn't blow off.

By kflocey


Now sadly, it is the last day of Chicken and Pie week. I hope you have tried some of the recipes and liked what you ate. Now this chicken is something very popular around here and the pie… well with the sadness and comas today, this pie is only fitting LOL!


Chicken Stuffed Chilies

Ingredients

24 fresh green Chile peppers
1/4 cup olive oil, or as needed
3 cooked, shredded chicken breast halves
4 cups shredded Cheddar cheese, divided
3 cups enchilada sauce, divided
1 (2.25 ounce) can black olives
1 (8 ounce) container sour cream

Directions

Preheat the oven broiler. Brush peppers with oil and arrange on a baking sheet. Broil peppers 5 minutes, turning occasionally, until scorched on all sides. Remove from heat, cool slightly, and peel. Reduce oven temperature to 350 degrees F (175 degrees C).

In a bowl, mix the shredded chicken, 2 cups cheese, and 1 cup enchilada sauce. Cut a slit in each roasted chile pepper, and stuff each with about 1 tablespoon of the chicken mixture. Arrange stuffed chiles in a single layer in a large baking dish. Cover with the remaining enchilada sauce.

Bake 35 minutes in the 350 degrees F (175 degrees C) oven, until bubbly. Sprinkle with remaining cheese, and continue baking 5 minutes, or until cheese is melted. Garnish with olives and sour cream to serve.


Funeral Pie

"This a pie seen quite often in Amish homes. Because it is easy, quick and made from non-seasonal ingredients, it was often taken to the family of those grieving over a passing."

Ingredients

2 cups raisins
2 cups water
1/2 cup packed light brown sugar
1/2 cup white sugar
3 tablespoons cornstarch
1 1/2 teaspoons ground cinnamon
1/4 teaspoon ground allspice
1 pinch salt
1 tablespoon cider vinegar
3 tablespoons unsalted butter
1 recipe pastry for a 9 inch single crust pie

Directions

Preheat the oven to 400 degrees F (205 degrees C). Line a pan with half the pastry and chill.

Place the raisins and 2/3 cup of the water in a saucepan and heat over medium heat for 5 minutes.

Combine the sugars, cornstarch, spices, and salt in a bowl and , mixing all the time, slowly add the remaining water. Add this mixture to the heating raisins. Cook and stir this until the mixture starts to bubble. Add the vinegar and butter and heat until the butter is melted. Cool until just warm.

Pour into the prepared shell and top with the second crust. Bake 25 minutes or until golden. Cool.

**NOTES** You can add various other fruits in place of the raisins. Pecans and chocolate chips make for a sweet candybar-like pie.

Well kids, it’s a day of relaxing with the family and being leisurely today. Not sure what is in store for us today, but things will definitely be different around here now. I hope you all have a wonderful day in whatever you decide to do. Until tomorrow… HUGS!

Sunday, April 18, 2010

MARKET WARES

Good morning everyone. How are you doing this muggy morning? I’m ok. Got a few things on my mind that are making me a little space cadet, but I’ll get to thinking straight soon enough. I want to thank everyone for the comments and emails about my mom. I will pass your messages on to her when I talk to her next!


Well after running my errands yesterday, we went to the big Farmers Market. Let me tell ya we went nuts! They had some incredible sales so we stocked up on just about anything and everything! This was our haul. We got a 25lb. bag of carrots, a 25lb. bag of red onions, a 20lb. bag of grapefruit, 2 big bags of peanuts, 2 ribs of celery, 2 flats of strawberries, a pineapple, 2 bunches of green onion golf balls LOL, 5lbs. of yellow onions, 8 cucumbers, 8 zucchini, 8 yellow squash, 8 green bell peppers, 8 red bell peppers, 16 green apples, 1 Jicama, 7 round zucchini, 14 pounds of jumbo yams, 1 huge cabbage, 10 pounds of bananas, 10 lbs. of broccoli, 10 lbs. of Roma tomatoes, 3lbs. of fresh jalapenos, 1 small personal watermelon, 4 pounds of green beans, 2 lbs. baby new potatoes, 4 pounds fresh okra, 2 bags of radishes, 1- 2lb. 1015 onion, 5lbs. of grapes (both red and green), another 6lbs of carrots (long story LOL), 7 avocados, and a partridge in a pear treeeeeeeeeeeeee! LOL!


Ok, let me tell you about this carrot LOL. I bought the 25lb. bag in the main market right? Real cheap… so I am walking around back with the small vendors and I see this bag of carrots… with one in there that could choke Godzilla! I HAD to have it LOL! The carrots in that bag were about 6lbs, but for only a $1 I HAD to get it LOL! It’s a Goliath carrot… 12 inches long and 8in. around at the thickest part, so about 3 inches in diameter! This thing is flippin’ HUGE!


You Ever see a yam this big? This was one of the smaller ones! Over 9 inches long and 11.5in. around! Like I said, these were some of the smaller ones I found in the bin!


This ugly monster is called a Jicama (hi-ka-mah). Jicama is a crispy, sweet, edible root that resembles a turnip in physical appearance, although the plants are not related. Jicama has been cultivated in South America for centuries, and the vegetable is quite popular in Mexican cuisine. Jicama has a unique flavor that lends itself well to salads, salsas, and vegetable platters. The roots can sometimes grow to be quite large, although when they exceed the size of two fists, they begin to convert the sugars that give jicama its sweet flavor into starches, making the root somewhat woody to the taste. Jicama is actually a legume, and it grows on vines that may reach 20 feet (six meters) in length. The vines tend to hug the ground, terminating in tubers that may grow up to 50 pounds (22 kilograms) in size, although the majority of jicama roots sent to market are approximately three to four pounds (1.3-2 kilograms) in weight. Before eating, the coarse brown outer layer of the jicama should be peeled to reveal the white inside. When choosing jicama at the store, look for medium sized, firm tubers with dry roots. Do not purchase jicama that has wet or soft spots, which may indicate rot, and don't be drawn to overlarge examples of the tuber, because they may not be as flavorful. Jicama will keep under refrigeration for up to two weeks. Jicama is excellent raw and is sometimes eaten plain. It can also be used as a substitute for water chestnut in Chinese dishes, in which case it should be thrown in right before serving. Jicama also appears in stews, juiced drinks, stuffings, and a variety of other recipes. In addition to having a unique flavor and texture, jicama takes flavor well, making it well suited to culinary experimentation. Jicama is a great source of vitamin c and is fat free—making it a superb on-the-go snack.


These are some big old green onions I found from the private vendors in the back. The bulbs, as you can see are bigger than golf balls. I measured one of the bigger bulbs… 6 1/4in. around!


Seeing as the last time I had a berry bandit attack my box of strawberries, I went ahead and bought 2 flats yesterday LOL! So that’s about 16 pints of strawberries. Of course, I feel the Berry Bandit right on my heels and a pint (or so LOL) has already disappeared! I can’t catch him though… he’s a quick little sucker LOL!


This is just one of the cucumbers that we got… HUGE! It is the same size as the monster carrot! 12in. long and 3 in. in diameter! It’s crazy! AND on top of that, they were on sale for 50 cents each!


This is the monster 1015 onion I found. It weighed 2 pounds by itself. The DH kept calling it my “baby’s head” onion because it is literally as big as a baby’s head! LOL! Can you imagine the size onion rings you could get out of this sucker? LMAO!

We also paid a visit to the Spice Shop and the Bakery… oh big mistake! I got some churros and brought them home. When I bit into the first one , I did not know that they had caramel filling in them! OMG!!!!! I died and went to sweet treat heaven! I ate them all and didn’t share them with anyone LOL! I know… shame shame on me! (Guess who didn’t take her blood sugars last night cause she KNEW the numbers were gonna skyrocket?! LMAO All in all it was a good day at the market! A very good “OMG-you-came-on-monster-produce-harvest” day! LMAO


I also stopped by H-E-B. and got some of those Okra Snax I was telling you about along with some of the other deals. I let my brothers try them and they liked them so I got them one, and then everyone in my house loved them (I can’t keep them out of them!), so I got us one. And then I bought one for my mom… That’s a lot of okra! LOL! I also picked up the deals on the bread, the donuts, the hot dogs, and a few other things. I had coupons for 75 cents off Ronzoni pasta too, and guess what was on sale for $1 a box? YEP 25 cents a box for Ronzoni Smart Taste pasta… I can deal with that! Same with Idahoan pouch potatoes… on sale 4 for $1 and I had coupons!! WOOHOO! And then the piece de resistance!!! They had LIVE CRAWFISH on sale! OMG I shouldn’t… I shouldn’t… but I did! LOL!


Guess who came to dinner? LMAO yea you guessed it! Last minute crawfish boil! The gang stayed outside purging the crawfish while I was inside prepping veggies and putting stuff away… well putting it away the best I could LOL! (I think that’s when the Berry Bandit followed me into the kitchen LOL!)

Well that was our day and our finds. I got a $10 Kohls card in the mail yesterday too, so I am gonna go see what I can find there in the next few days too LOL! Hey I like free stuff! Now its time to focus on today and all the wonderfully yummy dishes I can make with these items. Of course, there are some of them… just so large I don’t want to cut them LOL. I want to marvel at the sheer size of them! LOL! Kidding. So you guessed it, today is cooking and chopping and kitchen dancing! Of course, I will probably try to do some crafting while each meal is cooking. Which leads me to the idea for you.. I give you the:


Craft Idea for the Day: Soup Can Cup

Materials:

1 Campbell's Soup can 10.75oz pop top type
6 cardboard disc 3.5" dia.
6 cardboard disc 2.5" dia.
6 cardboard strips 1/2" x 5"
1 cabinet knob with screw
2 small brads
Two part epoxy, white glue, walnut stain, and amber shellac

Directions:

1. Cut 6 disc from shoe box cardboard 3.5" dia, glue disc together with white glue(make sure to leave plain surface face on both sides) place a weight on top to clamp.

2. Cut 6 disc from same type cardboard 2.5" and glue together to form lid.

3. Cut 6 strips of same material 1/2" wide and 5" long, glue together and bend into the shape of the handle as in photos, let dry in this shape, round off ends when dry and punch small hole at both ends for small brad.

4. Sand all the assembled cardboard pieces(make sure to sand out any glue marks to allow staining), and stain all pieces.

5. Attach the handle to the side of soup can and larger disc to bottom of can with 2 part epoxy.

6. Cut both brads off(just long enough to go the handle, not the can) so that they can be placed into the holes in the handle to give the look of rivets.

7. Drill hole in center of smaller disc and attach cabinet knob(I used a clear metal knob, but you could use a wood knob, the metal colors the same as can when shellac is applied) the screw may have to be shortened with hack saw.

8. Apply about 4 0r 5 coats of amber shellac(the amber shellac creates the bronze look as in photo) to all assemblies.

9. Allow cup and lid to dry completely before putting together.

Isn’t that pretty cool? I thought it was neat when I saw it, and it keeps with the Earth Day/Week recycling theme! Now let me ask you… are you hungry? Here is a dish that has absolutely no meat… a vegetarian dish if you will. BUT your carnivorous little bunch will never miss it! I urge even those who do not normally like eggplant to try it. You might be amazed!


Eggplant Parmesan

Ingredients

3 eggplant, peeled and thinly sliced
2 eggs, beaten
4 cups Italian seasoned bread crumbs
6 cups spaghetti sauce, divided
1 (16 ounce) package mozzarella cheese, shredded and divided
1/2 cup grated Parmesan cheese, divided
1/2 teaspoon dried basil

Directions

Sweat eggplant in a bowl of water with some sea salt added for approximately 30 minutes to remove bitterness.

Preheat oven to 350 degrees F (175 degrees C).

Dip eggplant slices in egg, then in bread crumbs. Place in a single layer on a baking sheet. Bake in preheated oven for 5 minutes on each side.

In a 9x13 inch baking dish spread spaghetti sauce to cover the bottom. Place a layer of eggplant slices in the sauce. Sprinkle with mozzarella and Parmesan cheeses. Repeat with remaining ingredients, ending with the cheeses. Sprinkle basil on top.

Bake in preheated oven for 35 minutes, or until golden brown.

Alright kids, I have tons of produce and such calling my name in the kitchen, so I need to get off of here and get to work. I will see you all back here tomorrow to see what I made ok? Until then… HUGS!

Wednesday, February 17, 2010

IT’S PARTY TIME!

Morning guys and gals! How are you this blistery morning? I’m freezing really, but in general good spirits considering I have sick babies, busted pipes under my house, and a broken side mirror on my car! I hope you enjoyed yesterday’s Mardi Gras festivities. As I discussed a few days ago, its time for me to start planning my yearly parties. And of course I know I’m always talking about the parties we have here. Well, I’ve been asked in an email I received from Tabitha, and yes I’m gonna share all those ideas with you as well so you can have your own fun and festivities! Together we’ll be discussing decorations, foods, and everything in between! You can choose to just have holiday parties or you can have themed parties just as an excuse to get together with family and friends (that’s my excuse LOL)! If planned properly, you can have the best time and make some great memories while being nice to the wallet too! And if you are a “people person” or like to entertain crowds, then maybe hosting a couple of parties would interest you but you just don’t know where to start. So I’m gonna help you!

OK, so while sitting there yesterday with my ill kids, I got out the trusty “Mom Planner” as well as paper and pen. I thought about parties I had last year, and ones I want to have this year. I plan fiscally LOL so this “year” will be from Feb. 2010 to Feb. 2011. There are 3 obvious BIG ones ahead… Halloween and Christmas, which are just always a must, and my DD’s Sweet 16 Birthday Bash! The guys want another Poker night, and there is Easter (which is on April 4, 2010 btw) as well… ok so we have 5 so far. We’re gonna be some party throwing fools LOL! Gonna aim for a big 4th of July BBQ cookout and Crawfish Boil which will also double as my Dad’s birthday party… yep, he’s an independence baby! I want to do a Fiesta/Mexican theme dinner party and an Italian night. Then of course we have Super Bowl and Mardi Gras NEXT year, as well as St. Patrick’s Day. But we really don’t “Party All Out” on those like the others, so I don’t really “count” them, I just plan for them. So we’re up to 8 now right? OK I also thought of Circus day! I think it would be neat to have games, etc… and maybe things like Dunking Booths or a Moon Walk or something! Wouldn’t that be AWESOME! I know some people and maybe I could barter for those things! Anyway, as you can see I have a HUGE list already working, and I have more ideas for themes, so get ready cause the next year is gonna be full of fun times, fun crafts, and really fun food!

One of my friends once told me that I should do party planning for a living. He said everyone always has such fun at my parties and they are always decorated and catered so well. He thinks I could make a lot of money like that. Well I told him thank you for all the great comments but not many people are looking to host parties in a recession. Of course, I may be wrong… I don’t know. So I thought the next best thing would be to help everyone have homemade fun instead. So I want to talk today about the steps to make you a good “Party Planner”.


1. Invest in a good calendar! It can be one that you hang on the wall or carry with you. I use the “Mom’s Plan It” products. I carry the “Engagement Calendar” with me everywhere! It’s awesome. It has tear out lists and even cute stickers to mark special events, etc. They also make magnetic calendars, paper calendars, etc. Check out the line of products on Avalanche Publishing (which BTW is having a 75% off sale on all 2010 dated items advertised on the homepage). If you’re like me, once you use it, you won’t want to use anything else! We LIVE out of my planner LOL! And you can use it for everything, INCLUDING planning your parties! Day Runners and even homemade calendars work well too! Use whatever is easiest for you.


2. Pick dates for your parties. Generally, I hold most of my parties on either Friday nights or Saturdays. That seems to be when MOST people are available… they don’t have to work, they can get baby sitters, etc. Of course, my parties are all “kid-friendly” so that’s not an excuse my friends can use for not coming LOL! There are also people who may work odd shifts (like MANY in my family!)- refinery shift workers, doctors and medical personnel, fire fighters, etc. etc. etc.! Try getting together with everyone a month or so in advance and asking if they would be able to attend your party on such date. Try to be considerate of your guests and pick dates that are good for them to attend. This insures you HAVE guests show up, and that they all have a terrific time!


3. Pick themes for your parties. If you are going to host on a day other than a Holiday, pick a theme and plan accordingly. You don’t HAVE to have a theme, but it tends to make the evening more interesting! For instance, trying to figure out who is who at a costume party or masquerade ball is quite fun. Or having everyone dress as their favorite 50's Rock & Roller is cute too! If you just would like to host a dinner party, why not turn it into a themed “cuisine” party (IE. Italian Night, Fiesta Night, etc.). When you figure out a theme, then the menu, decorations, and general planning comes easily!


4. Research your theme. Ok, so you chose to host an Italian night… awesome! That can be a fun night! Rent or borrow (or even invest in) some round tables. Cover them with Red gingham fabric table clothes. Hang some cardboard cutouts of Italian flags or famous Italians such as Galileo, Sophia Loren, or Luciano Pavarotti … etc. etc. etc.! How do I know this? RESEARCH! Look up ideas for your theme on the internet or at the library. You can find ideas for a wide range of themes. And, even if you are making it up, then maybe research the history of your topic and you may pull ideas from the information you find. Find out about games played in that region, traditional gifts of the area, costume, etc. All these things you can incorporate into your party!


5. Plan and make your invitations. You have the dates, now you need to figure out what time you will have your party and how long you want it to last. (I normally do not put an “end” time.) Type up and print your invitations on your computer. You can buy printed stationary or ready-to-print invitations, print stationary online, or you can buy invitations that you hand print the information on, all to match your theme! I usually print out the information on printed stationary or make the invites myself. I think its cuter and the full size paper allows me to put as much, or as little, information on them as I need. Make sure to mail out your invitations far enough in advance so that your guests can make arrangements. Request R.S.V.P.’s no later than 1 week before your party so that you can get a final count of expected guests and make enough food, preparations, etc. Mention on your invites the date, times, address, if there will be games, a buffet or formal dinner, if costumes are required, etc.!


6. Plan and make (or purchase) your decorations. Now you don’t HAVE to decorate by any means… but it gives ease to any atmosphere. It makes the situation fun… somewhere people WANT to be and can relax. My guests often tell me they look forward to my parties because it gives them a temporary escape from all their troubles and they can relax and in turn become refreshed to deal with their lives. Do you know how GOOD that makes me feel when they tell me that? It makes me think I am doing something right! So, when you did your research, you learned the traditional colors, etc. that would be appropriate for your theme. Make flower arrangements, poster cutouts, print pictures from the internet, etc. If you choose to purchase, allow yourself at least 6 weeks in advance to place and receive your order. Two websites I order some of my things are Bargain Balloons and Party Cheap. They have great variety and really good pricing! The only thing with Bargain Balloons is that you will need your own helium tank to fill the mylars you purchase because they are NOT inflated. But you can buy a disposable tank at party stores, Hobby Lobby (online too. Oh and make sure to wait for the 40% off coupon to save money!), and even Wal-Mart. You can also check out Oriental Trading Company and Party City for great party theme packages and items too! Decorations can also be used as game props. Decorations include table centerpieces, wall pictures, party props, etc. Go all out… It’s fun to be creative!

7. Plan your menu. Now this can be a bit tricky. Make sure to prepare a wide variety of things allowing for all kinds of situations- vegans, allergies, etc. Menus will vary depending on the type of party you are having.


Most of my parties tend to be buffet style… tons of variety and serve yourself types. But I do also host the traditional sit down dinners as well like Thanksgiving, Christmas, etc. On “International” themes such as Italian, Mexican, Greek, etc. I try to have 3 of each- appetizers, entrees, and desserts… all served with a themed salad and bread. So your menu might look something like this (yes this is a small version of one of mine!)


For example, if you have an Italian Night you menu could include: Lasagna with meat sauce, cheese tortellini, Chicken Parmesan, and veggie bruschetta. Have loaves of bread with olive oil for dipping and wine and sparkling (non-alcoholic) drinks and even desserts if you like. Cheese trays with various cheeses and crackers are good too! So are fruit plates with grapes, berries, etc! If you plan to serve hot foods, either keep them warming in your oven until ready to serve (but make sure they don't get dry and unedible) or buy a couple of those buffet servers with the warming sources. They are not real expensive and a one time investment. Then all you need to worry about is aluminum pans in the future!


Now you can go out and BUY premade platters of food, but you are going to pay an arm and a leg sometimes. So if you want to DIY, then go online and find pictures of professional platters and make yours look like those! Then when they ask where you got them, you can remark how you made them yourself and watch their faces in amazement! (I made this “Meathead” platter for our last Halloween party! The guests were really diggin it!) For the very creative, you probably won’t even need a picture guide… but it’s perfectly alright if you do! Be prepared to tell people what’s in a certain dish in case they have allergies to certain things. An alternative to this is to print out the recipe on an index card and place it by the platter so they can see what’s in it. After the party, if they enjoyed the food, let them take the recipe card home as an added bonus! You can even prepare copies enough to pass out if others want the recipe as well.

8. Plan gifts and games galore! Many hosts/hostesses like to give their guests complimentary favors as a token of their appreciation for coming to their parties. I do this at every party I host. I appreciate my friends and family taking the time out of their schedule to come be with me for a while. These can be small or large or whatever you find appropriate.


For example, those who come to my Italian Night party will each receive a small bottle of olive oil or balsamic vinegar that has the recipe to one of the dishes I will serve (with also uses the vinegar or oil in the recipe). The recipe is printed on pretty stationary I found on clearance at Office Depot. It’s then rolled and tied to the bottle using color-coordinated ribbon. Favors could be edible or not, its up to you. You can make them theme related or personal to the guest. Favors are not a requirement by any means... just a nice little token of appreciation!


Games could include “Guess that Italian” using the pictures you print of some of the famous Italians you find online. LOL You’d be surprised how people stumble on names even of more famous and recognizable faces LOL! It can be very fun! The prize could be an Italian Dinner for 2 Gift basket (as the one I make pictured) or something else you would love to give. Incorporate some of the games of the region you found during your research. Give prizes for the winner of your games or just play for the fun. As the host/hostess, the choice is yours!


9. Party Day- TIMING! Give yourself enough time allotted to set up decorations, complete foods, etc. If your party is at 6pm, and you have tons of decorations, etc. try setting up/hanging some the night before (if you have to work the next day) or take the whole day of (non-working) to decorate and prepare. Always allow for some extra time because you never know if you’ll run out of staples and have to run to the store to get some when you are hanging decors, or any other little OOPS-es that you didn’t plan for! PLUS, you always have those “early bird” guests who arrive before everyone else and it can be a little awkward if you aren’t prepared.


10. Enjoy your party! You’ve “done your homework” and prepared an awesome party for your family and friends. You put your best foot forward with the time and effort you used in planning this party. Now sit back and enjoy the ride. Host the dinner and the games and just have fun. Take photos and have a lot of laughs with the ones closest to you! It will be something you can all talk about for years to come!

OK, let’s talk food! Now, within this blog, since I have started, I have posted a total of over 150 recipes with at least 30 of them being “Party Appetizers”. Depending on your party, any of these could be appropriate for serving. Or your secret family recipes or ones you find on the internet would work too! Just a word of caution though…. always try out new recipes first to see if they are any good or need to be changed. A trial run is always wise before serving a group of people!

As for my dinner tonight? Well since we got some sick babies in the house, its gonna be soups and hot sandwich night… things easy enough to swallow and digest. Macaroni & Cheeses, etc. and other things easy on their little tummies! I saw some frozen crawfish tails in the freezer and some Crawfish Po’boys are sounding mighty yummy for my sandwiches though LOL! Oh gee, I love living on the Gulf Coast with all the yummy seafood. Never had one? Oh boy… oh boy… oh CrawDaddy PO’BOY! LOL… Try this recipe on for size!


Crawfish Po’boys

Ingredients

Vegetable oil for frying
1 cup corn meal
1/2 cup all-purpose flour
2 teaspoons Creole seasoning
1 teaspoon salt
1 teaspoon ground black pepper
1 cup buttermilk
2 teaspoons hot pepper sauce
1 16-ounce package crawfish tail meat, rinsed and drained
4 hoagie rolls, sliced in half horizontally
Shredded green leaf lettuce
1 recipe Remoulade Sauce (Recipe follows.)

Remoulade Sauce:

1 cup mayonnaise
3 tablespoons dill relish
2 tablespoons fresh chopped parsley
2 tablespoons fresh chopped chives
2 tablespoons chopped capers
2 teaspoons Creole mustard
1 1/2 teaspoons chopped shallots
1 teaspoon hot pepper sauce

Directions

1. Fill a Dutch oven or deep fryer with vegetable oil to a 2-inch depth. Heat oil to 350 degrees.

2. In a medium bowl, combine cornmeal, flour, Creole seasoning, salt, and pepper.

3. In a separate bowl, combine buttermilk and pepper sauce. Soak crawfish tails in milk mixture for 10 minutes. Dredge crawfish in flour mixture.

4. Fry crawfish, in batches, for approximately 3 minutes per batch, or until golden brown. Drain on paper towels.

5. Serve on hoagie rolls with shredded lettuce and Remoulade Sauce.

Remoulade Sauce:
In a small bowl, combine all ingredients, stirring well. Cover and chill.

Yep, we LOVE seafood in this house! And I am lucky to live on the Gulf Coast to where we can get fresh seafood all the time pretty much! But in the summer is when its best… AND CHEAPER! So be on the lookout for lots of seafood recipes this summer! Alright gang, I’m outta here for the day! Ya’ll be good, be safe, stay warm, and meet me back here tomorrow! HUGS!

Tuesday, February 16, 2010

HAPPY MARDI GRAS! FAT TUESDAY

Well WHO DAT be knockin at my bloggin door?! LMAO! Welcome to the Mardi Gras edition of my life LOL! Its gonna be a cold one, let me tell ya! Freezing temps must be combated by none other than what else?


Yep… A PARTY!!! Get the warm ovens and cookers going and the blood flowing and we’ll have no problems staying warm! So today is about decorations and foods for the last day of Mardi Gras! This year, Mardi Gras Day is on Tuesday, February 16, 2010. Mardi Gras begins on "Twelfth Night," (12 days after Christmas) on the 6th of January, culminating on Mardi Gras Day. Each year, Mardi Gras Day is 46 days before Easter, and thus is on a different date (although always on a Tuesday) each year. Mardi Gras which is French, meaning "Fat Tuesday", is the day before Ash Wednesday and the start of lent. For many, the celebration is highly religious, but for some, Mardi Gras is an opportunity to celebrate and be festive as much as possible before lent. Now, here’s a great article I read on Taste of Home… I couldn’t have written a better one myself, so I’ll share it here.

A Family-Friendly Mardi Gras Celebration

Bring the flavor of New Orleans to your home on Fat Tuesday with these party plans. It's easy to turn your house into a family-friendly French Quarter for Mardi Gras with a few decorations and most importantly, some Cajun cuisine.

Traditionally, Mardi Gras is a three-day celebration prior to Ash Wednesday, the beginning of Lent. The final day of Mardi Gras is known as Fat Tuesday. It serves as the last big chance to "live it up" before forty days of fasting.

Here are a few ideas to make your party the hit of the season:

Send out paper masks as invitations to a masquerade ball. In New Orleans, invitations, not tickets, are distributed for attendance at Carnival balls during Mardi Gras season.

Use bright colors and shiny flatware for your table or buffet. The official colors of Mardi Gras are purple, green and gold. Lay aluminum doubloons or shiny chocolate coins around your table interspersed with sparkly, colorful beads and masks.

Bring the party to Bourbon Street by setting the mood with a little Zydeco, Cajun or Jazz music. Bands like the Funky Meters, Buckwheat Zydeco or Preservation Hall Jazz Band are sure to set the tone.

Pass out feathered masks or inexpensive paper masks and beads to guests as they arrive at your party, then ask the guests to add their names to an elaborate Mardi Gras-themed hat. Crown a king or a queen for the day by picking names out of the hat, then have the king and queen wear the hat for the rest of the party.

Bake your own King Cake (see recipe below) —a ring of twisted pastry or bread topped with purple and green frosting or colored sugar that contains a plastic doll hidden inside. The person who finds the doll is supposed to have good luck for the year and is crowned the "King of the Feast."

Have children follow a parade route through the house conga line-style. Give them colorful beads and doubloons to throw to the adults at the party, or vice-versa.”


OK so lets start the day off right with some “Fat Tuesday Mardi Gras Pancakes!” Check out these I made for the kids! (I have 2 sick home today!) I even put their beads on the plate too… extra festive!


Now let’s talk crafts! Like the article said, the colors of Mardi Gras are gold (symbolizing "power"), purple (symbolizing "justice"), and green (symbolizing "faith"). You can find tons of cute and glittery decorations at most Hobby Lobby, Michael’s, JoAnns and other crafts stores as well as party stores like Party City, etc. But you know me and what do I always say? Where’s the fun in that?! Let’s get crafty and whip up some of these great homemade decorations!


Paper chain garland is always a simple decoration. Grab some scrapbook or construction paper in green, purple, and gold and cut into strips. Then glue, tape, or staple the “chain links” together, alternating colors.


Laying strings of beads on the table or hanging them for ceilings and walls can add a nice little flare to your decorations. You can also use Christmas lights to decorate.

You can make your own table runner in the traditional gold, green and purple colors for Mardi Gras. To do this all you will need is some glue, glitter, and a fabric in the color of your choice. Once you have the fabric run glue all around it and add the glitter to it to make it very decorative for Mardi Gras. Cut the fabric down to size for your table and then you can tape the edges down underneath the table. You can get these supplies at your local craft store for about ten dollars and you can use any fabric you choose including plastic or felt. This is a very simple easy homemade idea for getting your house ready for Mardi Gras.

You can also make a homemade Mardi Gras decorative bowl for serving treats. You will need a plastic or glass bowl and some paint in the gold, green or purple colors. Paint the bowl in the color of your choice and then let it dry for a day. This bowl can come in handy as a food serving bowl or you can fill the bowl up with beads to add flare to your house during Mardi Gras. This bowl will be perfect for Mardi Gras and can be made by supplies from your local craft store or retail store for about six dollars. Or you can use a bowl you may already have to save money! If you have a colored bowl, you can also simply dress it up with Mardi Gras and Carnival Stickers for a cheap & easy party prop!


Mardi Gras Shoebox Float
These mini floats make great table centerpieces and can even be made with special places to hold fresh flowers, foods like dips, etc.!

Materials needed:

Shoe box with lid (one for each float you'll make)
Scissors
Glitter, tissue paper, construction paper, aluminum foil, paint, paintbrushes, or other decorative materials
Glue

1: Pick a theme for your float. or use an actual New Orleans Mardi Gras Parades theme. Be creative when choosing your theme. It could be anything you like your favorite movie, political or current events or even Mardi Gras as theme itself.


Shoe Box Float Themes
Usually decorations on Shoe box floats followed simple themes from book report stories, Movies, favorite television shows of which represented story characters scenes and events, to serious themes like "Just say no to drugs", or "Hurricane Katrina Recovery" or "The kingdom of make-believe!" just as an example. These floats theme and design are limited only by your own imagination and of what you have on hand to decorate with.

Remember a Mardi Gras Float is rolling scenery or just a background for the riders. Some floats are castles others battlefields and places created from the imagination of the float designer. You can look up Mardi Gras Float pictures on the internet for lots of great ideas!

Take your box and cover both parts (the lid and the base) with the colored Christmas paperback foil wrapping paper or plain aluminum foil. Then, flip the box over and attach the lid to one side of the box using the stapler or, a hot glue gun, or tape.

2: Remove the lid from the shoebox, turn the box upside down on the table and glue the lid (so that it stands up) to one end. Now your float will have a back.

3: Decorate your float using tinfoil, tissue paper, glitter, paint, markers, and other materials. Toys and even Christmas cards or pages out of story books. Get creative and as they say think out of the box!


Mardi Gras Mask

You need:

Mask Pattern
Purple Craft Foam
Sequins and/or Gemstones
Feathers
Wooden Skewer or Dowel
Glitter
Metallic Pipe Cleaners
Low Temp Glue Gun

Instructions:

Print the Mask Pattern. Staple it all around the outside edges to craft foam. Cut it out. Paint dowel gold. Let dry. Decorate mask using gemstones, glitter and gold paint. Wrap pipe cleaners around a pencil. Glue with feathers to the back of the mask. Hot glue one end of the mask to the dowel.

You can also make some masks and leave the dowel off and hang on the wall for decorations.


Jester's Hat

You need:

Jester Hat Pattern
4 pieces of Craft Foam (green, purple, yellow or gold)
Low Temp Glue Gun
36 Jingle Bells - 3/8"
Scissors
Stapler

Instructions:

Cut a piece of craft foam into a 3" strips. Glue together using a low temp glue gun until you have enough to fit around the child's head. Print 8 pages of the Jester Hat Pattern. Staple to foam around edges and cut out. Glue each piece to the top inside edge of the foam crown. Glue two jingle bells on each point. Glue jingle bells all around the crown.

Mask Bouquet
Mardi Gras mask bouquets are easy and elegant centerpiece ideas. You can buy several different sized and shaped Mardi Gras masks from a local discount or online party store. You will also want to obtain a purple, green or gold vase, flower arrangement foam, a hot glue gun and several long, thin craft sticks.

Place the foam in the vase. Hot glue your masks to the craft sticks and place into the foam in the vase. Vary the mask lengths and placements. Tie a multicolored Mardi Gras ribbon around the neck of the vase to complete the look.

Treasure Chest
You can create a Mardi Gras treasure chest centerpiece that can also double for your guests' party favors. You will need one large box base, scotch tape, a stapler, gold, green or purple tissue paper, ribbon and glitter pen, Mardi Gras beads, doubloons, miniature Mardi Gras masks, feathers, a king cake and cellophane bags.

Begin by taping the colored tissue paper to both the inside and outside of the box. Staple the feathers to the rim of the box. Then fill the box with all your Mardi Gras beads, doubloons and other novelty items. Cut your king cake into individual pieces and place the pieces in cellophane bags. Tie the bags with a ribbon and use the glitter pen to write your guests names on them

If you plan on crowning a king and queen of Mardi Gras, be sure to have crowns, scepters, and royal purple robes. If you aren't going to have a crowning ceremony, these items would be great to create a photo-op area or just use for decorations.

Oh goodness… there is so much you can do for decorations… AND a menu too! Cajun corn chowder, seafood gumbo, crab cakes, Bloody Marys, Shrimp Remoulade, crawfish dip, Andouille Sausage, Jambalaya, Etoufee, etc. You name it! OMG I love Cajun food… and yes that INCLUDES alligator! YUM! Since there are TONS of great Mardi Gras recipes you can make, I want you to 1. Check out Taste of Home Mardi Gras Recipes for tons of awesome ideas and 2. Check out these recipes right at your fingertips that I’ve posted here… all courtesy of Taste of Home.


Chunky Crawfish Spread

Ingredients

1 package (16 ounces) frozen cooked crawfish tails, thawed
1 package (8 ounces) cream cheese, softened
1 medium green pepper, finely chopped
1 medium sweet red pepper, finely chopped
1 small onion, finely chopped
6 garlic cloves, minced
1/2 to 1 teaspoon Creole seasoning
1/2 teaspoon salt
6 to 12 drops hot pepper sauce
Assorted crackers

Directions

Chop crawfish; pat dry. In a small bowl, beat cream cheese until smooth. Add the peppers, onion, garlic, Creole seasoning, salt and hot pepper sauce; stir in the crawfish. Cover and refrigerate for at least 2 hours. Serve with crackers.


New Orleans Jambalaya

Ingredients

1 pound smoked kielbasa or smoked Polish sausage,. cut into 1/4-inch slices
1 pound boneless skinless chicken breasts, cubed or 1 pound of shrimp, shelled
2 celery ribs, thinly sliced
1 large onion, chopped
1 medium green pepper, chopped
2 garlic cloves, minced
1 can (28 ounces) diced tomatoes, undrained
2 cups uncooked rice
2 cups water
1/2 pound fresh or frozen uncooked medium shrimp, peeled and deveined
3 tablespoons minced fresh parsley
2 tablespoons Worcestershire sauce
1 teaspoon salt
1/2 teaspoon dried thyme
1/4 to 1/2 teaspoon cayenne pepper

Directions

In a Dutch oven, saute sausage for 1 minute. Add chicken; saute 2 minutes longer. Add the celery, onion, green pepper and garlic; saute for 2 minutes or until vegetables are crisp-tender. Stir in the remaining ingredients. Bring to a boil.

Reduce heat; cover and simmer for 20 minutes or until chicken is no longer pink; stir. Let stand for 5 minutes to absorb any remaining liquid before serving. Fluff with a fork.


Roasted Cajun Potatoes

Ingredients

2-1/2 pounds medium red potatoes
1/4 cup Crisco® Light Olive Oil or Canola Oil
2 shallots, chopped
1 garlic clove, minced
1 teaspoon salt
1/2 teaspoon paprika
1/2 teaspoon cayenne pepper
1/2 teaspoon pepper
2 tablespoons minced fresh parsley

Directions

Cut each potato lengthwise into eight wedges. In a large bowl, combine the oil, shallots, garlic, salt, paprika, cayenne and pepper; add potatoes and toss to coat. Place in a greased roasting pan.

Bake, uncovered, at 450° for 45-50 minutes or until tender and golden brown, turning every 15 minutes. Sprinkle with parsley.


Traditional Mardi Gras Kings Cake
(No Mardi Gras is complete without this cake LOL! A "King Cake," also known as a "Twelfth Night Cake," or "Twelfth Cake," is a colorful cake which contains a plastic doll (baby) baked inside. Originally, a bean was baked into the cake, but the plastic baby doll is more commonly used today. The most common New Orleans King Cake is rolled with cinnamon and covered with icing or glazing with green, gold, and purple sugar sprinkled on top. The person who gets the slice of King Cake with the baby must provide the next King Cake (or host the following year's "Twelfth Night.")

Ingredients

2 packages (1/4 ounce each) active dry yeast
1/2 cup warm water (110° to 115°)
3/4 cup sugar, divided
1/2 cup butter, softened
1/2 cup warm 2% milk (110° to 115°)
2 egg yolks
1-1/4 teaspoons salt
1 teaspoon grated lemon peel
1/4 teaspoon ground nutmeg
3-1/4 to 3-3/4 cups all-purpose flour
1 teaspoon ground cinnamon
1 egg, beaten

GLAZE:
1-1/2 cups confectioners' sugar
2 teaspoons lemon juice
2 to 3 tablespoons water
Green, purple and yellow sugars

Directions

In a large bowl, dissolve yeast in warm water. Add 1/2 cup sugar, butter, milk, egg yolks, salt, lemon peel, nutmeg and 2 cups flour. Beat until smooth. Stir in enough remaining flour to form a soft dough (dough will be sticky).

Turn onto a floured surface; knead until smooth and elastic, about 6-8 minutes. Place in a greased bowl, turning once to grease the top. Cover and let rise in a warm place until doubled, about 1 hour.

Punch dough down. Turn onto a lightly floured surface. Roll into a 16-in. x 10-in. rectangle. Combine cinnamon and remaining sugar; sprinkle over dough to within 1/2 in. of edges. Roll up jelly-roll style, starting with a long side; pinch seam to seal. Place seam side down on a greased baking sheet; pinch ends together to form a ring. Cover and let rise until doubled, about 1 hour. Brush with egg.

Bake at 375° for 25-30 minutes or until golden brown. Cool completely on a wire rack. For glaze, combine the confectioners' sugar, lemon juice and enough water to achieve desired consistency. Spread over cake. Sprinkle with colored sugars.

Ok, so today we’ve covered Mardi Gras… crafts, foods, and even a bit of history lessons throughout, right? LOL alrighty then… my work here is done LMAO! So I’m off to get dressed in my bestest beads, my brightest purples and greens, and have a crazy Cajun day! Ya’ll be safe and have an awesome day! HUGS!