myspace generator
Showing posts with label Dollar Store. Show all posts

Wednesday, July 14, 2010

AMAZING FINDS

Well a big Hi there and Hello to everyone out there in bloggieland! How are you doing today? I'm really exhausted actually LOL. I fell asleep kinda early last night and then woke up at about 2am with a horrible dream. Once I finally got back to sleep, the cats decided to first aggravate the tar outta me and then hog the bed. Thanks boys! LOL... I had a great time with my mom yesterday, as always, and tend to have some more fun again tomorrow and maybe even Friday LOL!

OMG I have to tell you about something I found yesterday! Ok, so while mom was in her therapy appointment, which I cannot go back for, I wandered across the street into the biggest Dollar Tree in our area. I mean I LOVE this store! So I am walking and wandering, just looking at all the neat stuff like school supplies... ah SCHOOL! YAY!!! I love school! LMAO... ok focus here Renee. Anyway, I was doing a serious food scoping and you will NEVER guess what I found in the freezer section... SEAFOOD! I mean scallops, salmon, etc! Can you believe that???!!! I was like OMG are you serious! We absolutely LOVE scallops! OK so I get a couple of things and head to the checkout... and I see these things called "Mudoku" pads. Have you ever seen those info-mercials about those foot pads that claim to dexot you while you sleep? I think they are called "Kinoki" pads? Many people say that they are a scam and don't really work. WELL... I figured, for a buck... let's find out! So I scrubbed my feet last night with some medical "green soap" and then applied these patches to the bottom of my feet. Applying the adhesive puts a unbreathable barrier around this patch. Now I didn't even notice that there was a faint smell to the patches. I kept thinking it was the grill still hot outside from cooking dinner. And I went to bed. When I woke up this morning, I removed those patches and OMG! WOW they were dark brown and the smell was horendous! I thought OMG they really DO work! That was until I did a little more experimenting! I took one of the NEW patches out of the package. First I smelled it... there was that small hint of odor. THEN I decided to see how "toxic" my tap water was... OMG... a few seconds later guess what was dark brown and stinking like crazy! Yep... total scam! There is a powdered iron sulfate or something in the patch that when your feet sweat at night, under that unbreathable adhesive, turns the patch brown and releases the sulfer stench! Its rather gross... but the experiment is complete and it only cost me $1. I feel sorry for all the people who wasted $20 or more for those things.


Of course, then I just told you how I was grilling last night. Oh boy did I have that sucker flamin and smokin! It was great LMAO! I had taken mom to Kroger and we found some clearanced sea scallops (YUM) so I seasoned those up and stuck them on the grill along with some hot dogs, burgers, and chicken leg quarters. The meal was the burgers, dogs, and scallops... the chicken was some extra batch grilling for dinners later this week. And guess what mom and I found when we went to Kroger. Near the checkout, I found a Coca-Cola cookbook. All the recipes contain cooking with the coke to make something rather interesting. This might make for some interesting meals and an interesting theme in the future but I have to try them first LOL!

Ok, so let's talk crafts! I got some serious fever going on, but I am not quite sure what I want to make. I thought about a travel first aid kit that's foldable about the size of a baby changing pad. I thought about a travel neat & discreet pouch for feminine products. I also thought about a few other things I would have to make up a pattern for. But I am pretty befuzzled on what I want to do, so I'm not gonna feature any specific craft today. Pretty soon, there will be crafts coming out of everywhere LOL!

Alright folks, its that time again! Time to chow down on some TERRIFIC TOMATO dishes! Today we are going simple and easy! Tomatoes are used in many food product, including, of course, tomato sauce (ketchup), pasta and pizza. According to a Steel Packing Council survey of 1997, 68% of chefs use canned tomatoes for convenience, quality and flavoring. It hasn’t changed much since. A fruit is the edible part of the plant that contains the seeds, while a vegetable is the edible stems, leaves, and roots of the plant. Cooked tomatoes have higher concentrations of lycopene than non-cooked tomatoes. Don’t store ripe tomatoes in the fridge. Cold temperatures lessen the flavor in tomatoes. If you have psoriasis, you should avoid tomatoes because of the high acid content.


American Classic BLT

Ingredients:

4 slices of bacon
2 lettuce leaves
2 slices of tomato
2 slices of toasted bread
1 tablespoon mayonnaise
salt & pepper (optional)

Directions:

Cook the bacon in a large, deep skillet over medium-high heat until evenly browned, about 10 minutes. Drain the bacon slices on a paper towel-lined plate.
Arrange the cooked bacon, lettuce, and tomato slices on one slice of bread. Spread one side of remaining bread slice with the mayonnaise. Season if desired. Bring the two pieces together to make a sandwich.


BLT Salad

Ingredients:

1 pound bacon
3/4 cup of mayonnaise
1/4 cup milk
1 teaspoon garlic powder
salt to taste
1 head Romaine lettuce, chopped (or prepackaged Spring Mix salad)
2 large slicing tomatoes, chopped
2 cups seasoned croutons

Directions:

1. Place bacon in a large, deep skillet. Cook over medium high heat, turning frequently, until evenly browned. Drain, crumble and set aside.

2. In a blender or food processor, combine mayonnaise, milk, garlic powder and black pepper. Blend until smooth. Season the dressing with salt.

3. Combine lettuce, tomatoes, bacon and croutons in a large salad bowl. Toss with dressing, and serve immediately.

Ok folks, its time for me to get off of here and get busy being productive somehow LOL. I got "the 3 C fevers"... (crafting, cooking, and cleaning LOL) so I have to take a mental aspirin and decide what I want to do LOL! You have a great day and I will chat with you tomorrow! HUGS!

Sunday, July 4, 2010

HAPPY 4th OF JULY/BIRTHDAY

Good morning and hi there to all my friends! I must say Happy 4th of July to all and a HUGE HAPPY BIRTHDAY to my Dad! Yes, he is an independence baby. And reading Dad’s comments from the other day when I posted the Why God Made mothers, well honestly, made me quite sad. Dad you are in NO WAY “inferior”! Aside from the fact that I love you very much, I sought out something very special for you… remember those cute kids with tons to say about moms? Well, they are back with just as much humor to highlight dads!


Why Did God Create Dads?

“God created dads so they could wrestle with their daughters or their sons or wife,” says Kaitlin, 8.

God created dads to wrestle, but also “to hug on,” says Taylor, 7.

“Sometimes dads like to show off, but the rest of the time, they’re playful,” says Kristen, 8. “They’re all big kids, and they always will be. Most of the time, they just want to be loved. You can tell they love you.”

Dads are a pushover, says Elizabeth, 9: “I think God created dads so they can fall for your little face. Also, they can buy you anything you want when you say ‘please daddy.’ They always fall for that!”

Lauren, 10, adds: “God created dads to tell you ‘yes’ when your mom says ‘no.’”

If it wasn’t for dads, most moms would never go camping and fishing, says Adrienne, 10: “Moms wouldn’t dare go without electricity, bait a hook or touch a dead fish.”

Actually, “God made daddies so that they can help mommies,” says Manasi, 7. “When mommies have babies, dad can help name them.”

Kayla, 12, “Without dad who would support the family? Who would go to work, cut the grass and do all the hard work? “

And when there are problems, “Dad will help you up when you fall. If you are bleeding, he will take care of it,” says Esther, 8.

Whether you fall on the playground or in life, a good dad is always there to pick you up, bandage the wounds and send you on your way.

“God created dads to help people build things for God and to have faith in God,” says Alex, 8. The greatest thing a dad can build is not a house, stock portfolio or business empire, but a relationship with God in the lives of his children.

“God made daddies so they could be brave, grateful and like Jesus,” says Alaura, 7.

Even dogs like dads, says Rebecca, 9: “Dad works so hard every day for my family, and he loves us all. He even loves my dog. And believe me, my dog loves him, too!”

Dad’s are awesome! I remember when my Dad picked me up from school cause I broke my arm, disciplined the dog when it snapped at me, taught me to check the oil in my car, and even was there when I woke up after surgery after my really bad car accident. I have one heck of a Dad… in my opinion… the Best! Don’t get me wrong, we have had our ups and downs, but I wouldn’t trade him for the world! I LOVE YOU DAD! If every kid had a mom and dad like mine, the world would be full of happy kids!


OK, I got a picture for you… check this crazy garden out! I had lost the celery so I took that up and had put a roma tomato plant in place of the 4 sticks that died. OMG this rain and the good dirt and god knows what else made this plant go absolutely haywire! I went to Wal-Mart yesterday (yes in the rain LOL) to get a bigger tomato cage for it and needless to say, it already fills half the cage! The eggplants that you see on the left… well those leaves are as big as my head! I told you this garden was growing crazy!


Ok this is another cute photo I just absolutely have to share with you! Its the newest babies… both the girls. Rescue the Rabbit and Mittens the Cat. (Ignore the hidious double chin I got going on there!) Yes we have named her. She has the gray body with white feet… all 4 LOL! I was going to go with Socks but my DD suggested Mittens and I thought back to that old nursery rhyme my mother used to tell me about the Kittens who lost their mittens and the pie and I thought it was perfect! Ain’t it so cute how the rabbit is a dwarf and STILL bigger than the cat LMAO! I tell ya, these animals are getting smaller and smaller each time! What is next… dwarf hamsters? LMAO! Anyway, she is still drinking kitten milk, which means she was NOT weaned. I have been putting Neosporin on her cuts and then I noticed she only has whiskers on one side of her face… explains the wobbliness! She is eating maybe a half a can of wet food a day though, which is great! And I made a mini-litter box in the carrier I am keeping her in and she is going in the box every time! YAY! Needless to say, she has made some dramatic improvements the last few days! Sadly though, yesterday, I went out in the back yard and found the other baby… .her sibling. The baby was not alive and it was pretty mangled. So I cried and then was really glad I brought this one inside! So I am up to 6 inside cats and a rabbit… SO WHAT! LOL… I take very good care of my animals. I feed them, play with them, and clean up after them everyday! Some could say I care for them better than I do myself! And they would be right LMAO! I love all my babies so much! Yes, I am an animal lover… so sue me LOL! Matter of fact, my bunny is munching on some fresh alfalfa sprouts and apple slices while she sits on my chest right now LMAO!

Alright its time to get crafty! Now you always hear mom and I talking about thrift stores and resale stores, flea markets, and I boast about freecycle too. Well some times you can find pretty and dainty old-fashioned hankies (for those youngsters out there, a handkerchief was a cloth kleenex LMAO) and I saw this craft and thought it was the cutest thing! So I wanted to share with all of you!


Craft Idea of the Day: Vintage Handkerchief Apron

Materials:

Fabric of choice
Skirt Section 35"x22" (90x56cm)
Front Band 14x3.9" (38x10cm)
2x Straps 39" x 5" (1mtx 12cm)

Directions:

This free craft project shows you how to recycle and revamp vintage handkerchief's into a funky vintage up-cycled apron.

If you have a plain store bought apron you can add the handkerchiefs to that also.

Start by cutting out the skirt, front band and strap sections.

Follow the directions on the patterns below.

Sew the Handkerchiefs into place on your apron, these are the pockets.

Gather the skirt section, (pin to keep secure) so that it fits the front band and then sew into place.

Take straps and fold each strap in half length ways. Sew the edges together and across 1 end. Turn inside out and press flat.

Sew down the top fold of the skirt and sew the straps into place at the same time by tucking in to the waist band.

You can finish off the apron by adding decorative edging or lace around the apron.

Ok it’s the last day of Dollar Store Dining, and just as with Russian week, I figure that a whole meal would be the perfect end to a successful adventure. Have you enjoyed the theme this week? What would you like to see in the upcoming future as far as food? I was thinking maybe an “ingredient specific” week. Oh the possibilities are endless… but until then, lets end the week with a Dollar Store Feast fit for a king! Eat & Enjoy!


APPETIZER: Corn Fritters

Makes: about 20
Cost: about $3.99

These little delights remind me of succulent popcorn. Food Club diced green chilies mixed with Knudsen sour cream makes a great, creamy, “chili verde” dipping sauce.

3 (15oz.) cans of Libby’s whole kernel corn
2 country eggs
2 tablespoons Springfresh milk
1 large tablespoon Best Yet flour or Cinch pancake mix
¼ teaspoon Hearth Club-Clabber Girl baking powder
Pinch McCormick salt
Gold-N-Sweet vegetable oil for frying

Directions:

1. Mix all ingredients together

2. Form into quarter sized shapes and fry in oil until golden brown.

3. Drain on paper towels. Serve hot.


SOUP: Maryland Crab Soup

Makes: 4 servings
Costs: about $3.99

Red Wine has been substituted for whiskey in this recipe. I have not strayed from the guidelines of this book, but you can. If you have some whiskey sitting around, go for it! It adds a nice nuance to the soup.

Ingredients:

2 tablespoons Spice Box dried chopped onions (use fresh onions when available)
3 tablespoons Danish Creamery butter
2 (6oz.) cans Chicken of the Sea crabmeat, rinsed and picked over
½ teaspoon Baja Pacific sea salt
McCormick Pepper to taste
3 cups Springfresh Milk
½ cup Hyvee evaporated milk, or cream substitute
2 tablespoons red wine (use what is available)
Spice Box dried Parsley

Directions:

1. Soak the dried onions in hot water for 5 minutes. Drain.

2. Melt butter in a frying pan. Saute dried onions until transparent.

3. Stir in crabmeat, salt, and pepper and cook over low heat for 10 minutes, stirring occasionally.

4. Transfer to a double broiler or place saucepan over boiling water in a larger pot. Add milk and cook for 15 minutes.

5. Add the evaporated milk. When soup is piping hot, stir in red wine. Serve immediately and sprinkle with parsley.


ENTRÉE: Steak Dianne

Makes: 2 servings
Costs: about $3.99

This is a rarer possibility, since steak is not always available. I wanted to include it to show how lavish one can be with good timing and an open mind.

Ingredients:

3 tablespoons Savion dried sliced onions (use fresh onions when available)
2 (4oz.) American Companies beef rib-eye steaks (they DO have these at my local Dollar Tree YAY!)
½ teaspoon Spice Supreme Salt
½ teaspoon of Spice Supreme Pepper
6 tablespoons of Danish Creamery butter
1 teaspoon Grey Poupon Dijon Mustard
1 tablespoon Master’s lemon juice
1 ½ teaspoons Heinz Worcestershire sauce
½ teaspoon Classic Crushed Garlic
¾ cup of water mixed with ¼ cup Aunt Nellie’s beef gravy
3 oz. Forrelli mushrooms, drained
¼ cup Christian Brothers white brandy or ½ cup dry white wine
2 tablespoons Encore dried parsley

Directions:

1. Soak the dried onions in hot water for 5 to 10 minutes. Drain.

2. Season steaks with salt and pepper and refrigerate for one hour.

3. Melt 3 tablespoons butter in a frying pan. Add the mustard and 2 tablespoons of the onions. Saute for 1 minute over medium-high heat.

4. Add the steaks and brown for about 3-4 minutes on each side (until medium rare). Remove steaks to a platter and keep warm.

5. Add remaining butter, lemon juice, worcestershire sauce, garlic, remaining onions, and the watery gravy mixture to the pan drippings. Cook for about 2 minutes, then add mushrooms and brandy or wine.

6. Boil, stirring frequently, until gravy is reduced to about ½ cup. Pour over steaks, sprinkle with parsley, and serve.


DESSERT: Peach Crisp

Makes: 6 servings
Costs: about $3.99

This is a great recipe to whip up when on vacation. Commit it to memory- as long as you have a feel for the consistency of the topping, you don’t have to worry about being perfectly accurate with the measurements.

Ingredients:

4 cups of Early Garden peaches, rinsed and drained
1 cup Best Yet flour or 5 oz. Manischewitz cake meal
¾ cups Spreckels sugar
½ teaspoon Spice Supreme Cinnamon
1 stick of Danish Creamery butter or Imperial Margarine
1 cup Good ‘N’ Hearty quick Rolled oats

Directions:

1. Preheat oven to 375 degrees F.

2. Put peaches in a greased 9” x 13” Pyrex baking dish.

3. In a separate bowl, combine flour, sugar, and cinnamon.

4. With your fingers, blend in the butter until the mixture resembles coarse meal.

5. Add oats and sprinkle mixture on top of peaches.

6. Bake until top is browned and crisp, about 25 minutes.

Well folks, that’s about it for today. I think I am gonna go back to Petsmart and stock up on some of the great sales I found for litter and cat food. Maybe while I am there I will check out those dwarf hamsters LMAO! Kidding! Or am I? LMAO! So be safe in whatever you do today and I will see you back here tomorrow! HUGS!

Saturday, July 3, 2010

GIGANTIC GREENS

Good morning boys and girls. How are you doing this hot humid and wet weekend? I am suffering from a bit of bittersweet joy if you will. What do I mean? Well, seeing its 4th of July weekend, people tend to engage in celebrations with fireworks. They get drunk and inappropriately use fireworks. I don’t like fireworks! SOOO when it rains and keeps the drunken igits inside disabling their firework extravaganzas, I get tickled pink. But I am not fond of all this rain too… or the mosquitoes that come with it. Plus I know that whenever it stops raining they will be shooting those stupid things off… UGH! So you see, its bittersweet joy.

I woke up to the sun trying to peek at us this morning. With no rain this am, I decided to go check in on my garden… or what may be left of it thanks to flooding and winds. Well I almost fell over with shock when I got out there! A couple of my tomato plants exploded and the eggplant… well lets just say the leaves are bigger than my head! They are about 2-2.5 ft tall now! They are growing like weeds! Apparently I found the right blend of dirt/first aid cause these things are growing like wildfire now! The 2 stick banana pepper plants, still look very sickly but are putting off peppers now. I have cherry tomatoes starting to turn red all over the place. There are bell peppers that need to be picked, eggplant blooms by the dozen, berry vines climbing the back wall of my house, you name it! It’s great! It’s like a jungle out there LOL! The pumpkins both have blooms, but never make a fruit, which I find odd. Once the continuous rains break, I will have to go out there and work in there cause its growing wild! Shoot, I may just have to do it IN the rain, cause the weather channel says rain is forcasted for the whole week. Crazy goodness (and low water bills LOL) for the plants at least!

We got the invitations done last night. My lovely DD decided she did not want the treble clef and such on the front. Just the typed up party info cut out with edged scrapbook scissors and glued onto the blue cardstock. Simple and sweet… Then we also enclosed her picture to go with it. I have to run and make a few more copies of the pictures as I didn’t make enough, but those go out today! I also picked up the briskets for her meal (which HAPPENED to go on sale this week THANK GOODNESS!). I got 3 of the 11+ pounders I could find. I hope that is enough meat LOL! It’s set in stone now! The party is on!

Alright, today’s recycled craft was actually picked after thinking about my youngest brother’s GF. She is in a band and she plays guitar (so do both my brothers, but I don’t think this kind of jewelry would look good on them LOL!). When we went to the Casino, she had thee guitar pick earrings and I thought they were pretty cool. I ran across this and thought it might make a good present! Check it out for the “rocker” in your life!


Craft Idea of the Day: Guitar Pick Necklace

Materials:

Tooth-shaped semi-precious top-drilled stone ( I used Agate, but there are a surprising variety of stones available)
Guitar pick of your choice (I chose the glow-in-dark alien. My son thinks it's cool)
Lobster Claw necklace clasp (optional, but nicest alternative. I'll show you how to skip this step if you want)
Split rings (need 3) (optional, only if you’re using lobster claw clasp)
18-20 gauge craft wire (I used anti-tarnish silver) you’ll need about 2 feet
Leather Cord (at least 3 feet)
TOOLS
Wire cutters
Needle-nose pliers
Sharp abject, like heavy sewing needle, small nail (I used an awl) to pierce pick

Directions:

1. Assemble your materials and tools.

2. Pierce guitar pick in the center of the end you want to mount. Make sure you protect the surface you?re piercing into. You need about a 2mm hole (my kids said I should paint the hole with green or red fingernail polish to look like alien blood, but I declined)

3. Cut leather cord. If you're going to use the lobster claw, measure the length you want for your necklace (try it on around your neck) and add 3." If you?re skipping the lobster claw, cut 30".

4. To mount the pick, cut 4" of wire. Pass the wire through the guitar pick, then pinch ends up toward the top. About 1/4" above the place where wires join, grip both wires with pliers and bend ends at 90* angle. Grip pliers at joint after angle, and wrap ends back over pliers to form a loop, bringing wires down and around the vertical shank wires. Wrap ends around shank a few times, cutting any rough or uneven ends. Tuck edges in to avoid getting scratched by raw edges, and file if necessary with metal fingernail file.

5. To mount the stone, cut 8" wire. Pass through holes in stone, then pinch ends up toward the top. About1/4" above the place where wires join, grip both wires with pliers and bend ends at 90* angle. Grip pliers at joint after angle, and wrap ends back over pliers to form a loop, bringing wires down and around the vertical shank wires. Wrap ends around shank a few times, cutting any rough or uneven ends. Tuck edges in to avoid getting scratched by raw edges, and file if necessary with metal fingernail file.

6. String the tooth stone and the pick onto the cord. If you?re skipping the clasp, use a 30" piece of cord. Take each end and make a small over hand knot of one cord around the other cord, about 4" from the end. Turn the necklace around, and tie another over hand knot with the end of the free cord over the other cord. Pull both knots tight, and trim about 1/4" from the knot.

7. To adjust the necklace, use both hands, one hand on each knot, and pull your arms apart. You will see the necklace shorten as the knots pull further apart. To loosen, pull the knots closer together. Slip over your head, and pull necklace to tighten to a length that suits for wearing. Congratulations! You're done!

8. To attach the lobster claw clasp, cut 6" of wire. Slip a split ring on one side of the cord. Double the cord over about 3/4" and pinch the cord tightly. Bend a 90* angle in the wire about 1/2" from the end of one side, lay the wire against the folded cord and grip near the split ring/fold. Applying pressure so the wire will not slip, wind the wire around the cord tightly about 4 times to secure the cord and the wire. Angle the wire down toward the loose cut end of the folded over cord, and wind 3 or four times very tightly to secure the clasp assembly. Attach the lobster claw clasp to the split ring. There are special pliers for this, and though they are not really necessary, they work pretty well.

9. If this project is not just a one-time jewelry attempt and you want to make more, I suggest you purchase a pair for yourself. Using them makes split rings less aggravating. Repeat on the other side, without the lobster claw on the end. Instead, attach another split ring to the first ring that is strung on by the leather cord. Congratulations! You’re done!

10. The sky's the limit with this design. I've seen some people use metal guitar string instead of cord, and it looks really nice. Good Luck!

For today’s Dollar Store Dining recipe, I noticed that there was this recipe which is quite popular in many restaurants. I found it quite amusing that you can make a Dollar Store version of it actually. So for those of you with a hunger for Italian… try this one on for size!


Spaghetti alla Carbonara

Makes: 4 servings
Cost: about $2.99

This dish is quick, easy, and delicious. Bacon is the traditional ingredient and may be used if desired. If you are hesitant about the eggs cooking on their own, you can turn the heat on under the pot as you toss but be careful not to overcook.

Ingredients:

8 oz. Allegra No. 8 Spaghetti
1 (6oz.) can Libby’s chunks of ham or 6oz. Hot cooked diced bacon
2 country eggs
3 oz. Messana brand Parmesan cheese
McCormick salt & Pepper to taste

Directions:

1. Cook spaghetti al dente.

2. While it is cooking, cook ham or bacon in a frying pan until browned and crisp separating into bits as it cooks. If using ham, heat through until slightly browned and crisp.

3. In a bowl, beat the eggs well. Add 2oz. Of Parmesan and season with salt and pepper.

4. When spaghetti is cooked, drain and return to pot quickly, and add egg mixture (the heat of the pasta is sufficient to cook the eggs).

5. Add ham or bacon, toss well, and serve immediately with remaining Parmesan.

(***HELPFUL HINT***) Dried pasta doubles in volume when cooked. Measure dried pasta by weight and cooked pasta by volume.

Well folks, that’s all for today. I have to get ready to go to the post office to mail invites and get a couple of things at the store. But today, since there is more rain expected later, it will be all about cleaning and organizing while it rains, cause some areas have gotten a little out of control thanks to all the baby chaos lately. Have a great weekend and I will see you back here tomorrow! HUGS!

Friday, July 2, 2010

JUST “BEET” IT

Good morning boys and girls. How are you today? We are super swamped here with all the rain bans from the storm actually, but other than that pretty good. I am also very sore LMAO! I forgot how it was having a baby around! But oh boy did we have some fun!

The littlest kitten is doing well. I finally got her to eat some shredded wet food along with the kitten milk and pedialyte I have been giving her. However, every time I pick the poor thing up for a feeding, it shivers and shakes beyond control, so I don’t know what’s up with that. But she even tied playing with me last night LOL. She only woke up once instead of twice during the night, so I think that is progress! And she pottied in the makeshift litter box I put in the carrier! YAY! It’s a slow process, but hopefully she will get there.

With all the “mommy work” going on with all the baby kids, cats, and bunnies, I want to share this cute little article I found about moms. This should start your day out with a smile!

"Why God Made Moms" answers given by elementary school age children to the following questions.

Why did God make mothers?
1. She's the only one who knows where the scotch tape is.
2. Mostly to clean the house.
3. To help us out of there when we were getting born.

How did God make mothers?
1. He used dirt, just like for the rest of us.
2. Magic plus super powers and a lot of stirring...
3. God made my mom just the same like he made me. He just used bigger parts.

What ingredients are mothers made of?
1. God makes mothers out of clouds and angel hair and everything nice in the world and one dab of mean.
2. They had to get their start from men's bones. Then they mostly use string, I think.

Why did God give you your mother and not some other mom?
1. We're related.
2. God knew she likes me a lot more than other people's moms like me.

What kind of little girl was your mom?
1. My mom has always been my mom and none of that other stuff.
2. I don't know because I wasn't there, but my guess would be pretty bossy.
3. They say she used to be nice.

What did mom need to know about dad before she married him?
1. His last name.
2. She had to know his background. Like is he a crook? Does he get drunk on beer?
3. Does he make at least $800 a year? Did he say NO to drugs and YES to chores?

Why did your mom marry your dad?
1. My dad makes the best spaghetti in the world. And my mom eats a lot.
2. She got too old to do anything else with him.
3. My grandma says that mom didn't have her thinking cap on.

Who's the boss at your house?
1. Mom doesn't want to be boss, but she has to because dad's such a goof ball.
2. Mom. You can tell by room inspection. She sees the stuff under the bed.
3. I guess Mom is, but only because she has a lot more to do than dad.

What's the difference between moms and dads?
1. Moms work at work & work at home, & dads just go to work at work.
2. Moms know how to talk to teachers without scaring them.
3. Dads are taller & stronger, but moms have all the real power 'cause that's who you got to ask if you want to sleep over at your friend's.
4. Moms have magic, they make you feel better without medicine.

What does your mom do in her spare time?
1. Mothers don't do spare time.
2. To hear her tell it, she pays bills all day long.

What would it take to make your mom perfect?
1. On the inside she's already perfect. Outside, I think some kind of plastic surgery.
2. Diet. You know, her hair. I'd diet, maybe blue.

If you could change one thing about your mom, what would it be?
1. She has this weird thing about me keeping my room clean. I'd get rid of that.
2. I'd make my mom smarter. Then she would know it was my sister who did it and not me.
3. I would like for her to get rid of those invisible eyes on the back of her head.

OK now you all know how I love making unique bags. Well I found this bag that recycles old neckties and I figured it would be right up my alley LOL! Visit the site for some great pictures that will make this craft much easier to replicate along with all the detailed instructions..


Craft Idea of the Day: Neck Tie School Bag

Materials:
Okay, you'll need a bunch of ties. Mine are all paisleys. A lot of lining fabric - mine is black velveteen.
One 18mm magnetic snap
Heavyweight stabilizer
Large graph paper (or newspaper) for pattern
Basic sewing supplies

Directions:

SECTION ONE: Let's start with the gusset/handle:

SECTION TWO: Now we are going to make the pattern for the front and back of the bag.

SECTION THREE: Now we are going to make the flap.

SECTION FOUR: The pocket

SECTION FIVE: Now we will line the bag.

Turn bag right side out - and voila!

Ok, now its time to eat. Time to feature some more Dollar Store Dining! Today we are gonna sing like Michael Jackson and “Just ‘beet’ it”! LOL! I am gonna feature a couple of recipes I found in the book that feature a vegetable that doesn’t get much attention… beets! Some people like them and some people don’t. If you haven’t tried them, perhaps you should using these recipes and it might surprise you! So Eat & Enjoy!


Gingered Beets

Makes: 4 servings
Cost: about $3.99

Ingredients:

1/3 cup of Spreckels sugar
¾ teaspoon Spice Box ground ginger
2 teaspoons Hartford House Corn starch
¼ cup of Apple cider vinegar
2 ½ cups of Libby’s canned beets, drained
2 tablespoons Danish Creamery butter
1 tablespoon Spice Box chopped parsley

Directions:

1. In a saucepan, blend sugar, ginger, and cornstarch and gradually add the vinegar. Stir until smooth.

2. Cook over medium heat, stirring until thick.

3. Add the beets and butter and simmer for 10 minutes, stirring occasionally.

4. Serve hot sprinkled with parsley.

(***HELPFUL HINT***) A teaspoon of apple cider vinegar a day helps keep the doctor away. I like it with sparkling water and a dash of bitters.

Beet and Chive Toasts

Makes: 4 servings
Costs: about $1.99

The rich color of the beets makes this an eye-catching appetizer. For Hors d’oeuvres, serve a dollop of the beet mixture on Grilled Stars (another recipe in the book).

Ingredients:

1 (15oz.) can of Libby’s beets
¼ cup of Spice Box dried chives
½ teaspoon of Morehouse brown mustard
½ cup sour cream
Tabasco sauce to taste
½ teaspoon Master’s Lemon Juice

Directions:

1. Coarsely chop beets.

2. Add the chives, mix in remaining ingredients, and bland well.

3. Chill.

4. Serve on chilled plates with toast as an appetizer, or in a chilled bowl with a plate of toast for a buffet.

(***HELPFUL HINT***) If you’re game, a redhead, or both, reserve the liquid from the beets and use it as a hair rinse. Add 3 times the amount of water as there is beet juice and apply after shampooing for a temporary fun tint.

Alright everyone, its time for me to get off here and get busy with my daily tasks LOL. I hope that you are safe and well and will join me back here tomorrow for more crafts and food and fun! Until tomorrow… HUGS!

Thursday, July 1, 2010

DISH THE DIRT

Good morning everyone! How are you doing today this drizzly first day of July? I am rather soggy but excited… see the little boy named Lucas has come today to visit us for a few hours. Oh we are having such fun! I forgot how much fun babies can be! Today I can get into more detail about subjects I touched on yesterday so you know all of what is going on… so let’s dish some dirt!

Ok first, the newest kitten. We haven’t named it yet, and I am trying not to get attached. It is smaller than my bunny though… maybe 8 weeks if that. Definitely not weaned though… sadly enough. The 2 kittens, Gizmo and Miracle, want nothing to do with this baby. And the bigger cats want nothing to do with any of them. SOOO… if I can nurse this one to sustainable health, perhaps it may go back outside? See, we had a tree get 90% uprooted during Hurricane Ike in our back yard. Well the landlord never pulled it up and the roots hung to make a tunnel under the base. In this tunnel, one of the female outside cats recently had kittens. I saw them playing out there one day. Well, the lawn care man was out there today when I got back. He was cutting down the trees and weedeating around it. Well I have a feeling that this baby got scared of the noises and ran out of the hole and on the way out he inadvertently grazed the kitten with the weedeater, or kicked it, or something. Either he, or maybe one of the bigger cats or another animal. I am not sure. Somehow it got up near my porch for me to find, so someone knew it needed help. I think it’s a little girl and she is a light smoky gray color with white feet and bulging blue eyes… and smaller than the bunny! Cutest little thing you can imagine! But I got to get all these cats over hissing at each other. Even the kittens hissing and they are just so small still! It’s crazy!

Then we had a Hurricane Barreling down on the Gulf Coast. I have been watching non-stop coverage of Hurricane Alex and it made landfall not far from where my grandmother lives on South Padre Island late last night. Alex is the first early season/June hurricane since 1995 and the strongest one since Alma in 1966. We are all concerned about grandma, but she seemed in great spirits when I talked to her last. She was making biscuits LMAO! And she told Mom that people were kayaking down the main road which goes down the middle of the island… the main strip if you will. Just keep her in your thoughts please. Thanks!

Ok, Let’s get crafty! So, are you liking the “man” crafts? I figure most people have a man they would need to gift to for a special occasion. I am gonna give you another one. Lots of Dads, Fathers, Brothers… men in general… are football freaks! How about these cute ideas for a gift!


Craft Idea of the Day: Armchair Quarterback Survival Kit

Purchase a new empty gallon paint can from your local paint, hardware, or even craft store. Fill it with snacks that store well like pepperoni sticks, summer sausage, beef jerky, cheese, crackers, popcorn, candy, etc. Don't forget the Bad Call Brick! You could also add a pizza gift certificate or even the pizza sale coupons that come in the mail. And if you really want to jazz it up add the Tylenol and Tums. Decorate the can with football fabric or logos of your favorite team. Do a search on the web for your team. Add the Armchair Quarterback Survival Kit poem.


Additional Craft Idea of the Day: Bad Call Brick

During football season when shoes, cans, lamps, etc. go flying at the TV when a bad call is made, it is a good precaution to have a Bad Call Brick nearby!

A brick-sized sponge may be used as is or dip it in brickish-colored, watered down paint and squeeze.

If sponge is pre-moistened with sanitizer, rinse it good. Dry sponge in the dryer to make it more dense like a real brick. This also rounds the edges a bit like a real brick. Attach the poem.

Yummy yummy in my tummy time! Yes, another day, another Dollar Store Dining recipe! YUM! Today we are going to talk some baked goods and sweet treats! YUM! Ok now the book has a total of 28 mouthwatering recipes to satisfy the sweet tooth. I’m bringing you 2 of the ones ranking tops in my desires… although I will admit, I won’t turn away cakes, tarts, fruit, flambees, or brownies any day! LMAO! So Eat & Enjoy (and remember to rinse and floss afterwards LMAO!)!


Banana Bread Pudding with Dulce de Leche

Makes: 6-8 servings
Costs: about $3.99

This is by far the most amazing, delicious, affordable, simple (yet extravagant) crowd-pleaser EVER! I came up with the idea of serving this when I knew that making the Flambeed bananas for 20 would make me feel more like a short order cook than a hostess. This recipe doubles easily and it can be prepared hours in advance. Once cooked, it can be frozen and warmed up in a microwave. A perfect dessert for a big party, and so good for breakfast the next day! (You may omit the bananas or even add 1 ½ cups of any chopped chocolate, if you desire.)

Ingredients:

1 to 2 cans of Star sweetened condensed milk, for the dulce de leche
3 to 4 packed cups of cubed bread made from 1 loaf of Premium white bread
2 very ripe Dole bananas
3 Country eggs
3 cups Springfresh Milk or milk substitute (coconut milk is very good to substitute)
1/3 cup Spreckels sugar
½ teaspoon McCormick Salt
2 teaspoons Spice Classic vanilla extract

Directions:

1. There are two ways to prepare dulce de leche. The safer way is to pierce two holes in the top of the can of milk, place in a saucepan with enough water to come three quarters of the way up the can, bring to a boil, and continue to boil on medium high heat for 1 to 2 hours for a runnier sauce or 3 to 4 hours for a more solid form.

2. The way I was brought up to do it as follows: Fill a large saucepan and place the unopened can of sweetened condensed milk in the cool water, making sure that the water comes high enough to cover. Bring to a boil, then turn down heat and simmer about 3 hours. Add water occasionally so that the can is always covered, and make sure to keep the flame very low to avoid an explosion. Remove from heat and cool can thoroughly before opening.

(**Recently, Nestle and other companies have now began offering a can of ready to use Dulce de Leche, making the process of actually making the dulce obsolete. You can simply substitute canned Dulce for the Sweetened Condensed Milk if your local Dollar Store offers them.**)

3. In the meantime, spread the cubed bread on the bottom of a 9”x13” baking dish and slice the bananas evenly, nestling them in the bread.

4. In a mixing bowl, combine the eggs, milk, sugar, salt, and vanilla. Pour this custard over the bread.

5. Bake in a preheated 350 degree oven for about 30 minutes until firm, but not dry.

6. Serve either on individual plates, drizzling the Dulce de Leche on top, or set out so your guests can serve themselves with sauce on the side.

(***Helpful Hint***) Attaching the inside banana skin to a nasty bruise will draw out the internal bleeding.)


Delicious Toffee Oatmeal Chocolate Chunk Cookies

Makes: about 3 dozen cookies
Cost: about $4.99

Ingredients:

1 cup Imperial Margarine
1 cup Spreckels Sugar
1 cup Lucky golden brown sugar
2 country eggs
2 tablespoons Springfresh milk
1 ½ cups Best yet all purpose flour or 1 cup Manischewitz cake meal
½ teaspoon Spice supreme salt
1 teaspoon Arm & Hammer baking soda
2 cups Good & Hearty quick rolled oats
1 (8oz.) Zachary solid Milk chocolate Easter bunny, chopped (or any milk chocolate bars available at that time)
1 (4oz.) can Star Snacks toffee almonds, chopped

Directions:

1. Preheat oven to 375 degrees F.

2. In a large bowl, cream margarine and sugars, ½ cup at a time. Beat in eggs and milk.

3. Add flour, salt, and baking soda and beat well.

4. Add oats, chocolate chunks, and finally the almonds. Blend well.

5. Drop in rounded teaspoonfuls two inches apart onto an ungreased cookie sheet. Bake for 13 to 15 minutes. Remove and let cool.

(***HELPFUL HINT***) For perfectly round cookies, pack the cookie dough inside a clean food can and refrigerate for at least 1 hour. Remove the bottom of the can with an opener and use the disc to push the dough out. Stop at your desired thickness and slice. Use the can as a guide.

Ok gang… now that I have saturated your sweet tooth, I am gonna get off of here and get busy with today’s chores. Gotta try to call my Grandmother who is in South Padre right now, dealing with this whole Hurricane Alex thing. Ah… Kids and kittens and babies everywhere! I feel like the Wizard of Oz… Lions and Tigers and Bears Oh My! LMAO. Ok well ya’ll be safe wherever you are and I will see you tomorrow! HUGS!

Wednesday, June 30, 2010

YET ANOTHER RESCUE

Good evening boys and girls. I am so sorry this blog is so very late. My computer completely stopped working and I had no access to the net… until now! Somehow, I got the cable line to reach into my DH’s PC in the bedroom and so that is where you find me now. I took MY PC over to my dad to see if HE could figure out WTF is going on! I came home and began trying to get the internet line onto DH’s PC so that I could do my daily entries until my on computer was feeling better. It took awhile but I finally got it!

THEN… when I came back, guess what I found? I little TINY kitten that can’t be more than 8 weeks old… and I am for certain is not weaned! It was by my door beaten and half dead, I swear! I think the lawn man may have caught it with the weedeater when he was doing the back yard, etc. or some other bigger cat or animal attacked it or IDK but all I know is I wasn’t gonna leave it outside to die! I can’t! Luckily, the other day I picked up a carton of kitten milk when I got rabbit supplies at Petsmart. I didn’t know WHY I got it, and it was the only one, but something in my gut said to get it… and now I’m glad I did! This kitten is smaller than the bunny!

OK since it’s so late, I am gonna get right to the good stuff today… I am still on the kick about crafting for guys, cause they’re just so dang hard to gift AND I have so many in my family to give to LOL! Well, I don’t know about yours, but the guys in my family are real American red-blooded men who get out and get dirty. TOOLS are a big thing with them… they work on and fix EVERYTHING! SO, I thought that this tool wrap in some really cool materials, like camos, skulls, John Deere, etc. would be something they would really like and use a lot! Maybe it’s a good gift idea for that special man you need a special gift for too!


Craft Idea of the Day: Tool Wrap

SUPPLIES:

Duck cloth, dark color — 1 to 1-1/2 yards per roll-up. This is just a ball-park figure; your roll-up might be significantly different than mine.
Upholstery Thread, dark color
1″ nylon strapping, a 20″ piece — Hold the raw ends in front of a candle flame to heat seal them from ravelling.
1″ inch buckle
1″ strap adjuster
Fray Check

Directions:

The directions are very detailed and include lots of pictures for great step-by-step instructions, so just go to the site and get this great craft there! I hope you enjoy it!


Ok kids, its time for another installment of Dollar Store Dining! WOOHOO! I am having so much fun with this, you can’t even imagine! I hope you are having just as much fun! Today is main course midweek day LOL! I am gonna bring you a couple of main course meals that are sure to please your palate AND your pocket book! BTW, if you want to pick up a copy of The 99 Cent Only Stores Cookbook by Christiane Jory, check your local book stores or go to Barnes & Noble online and buy it there for $11.10… there are tons of recipes in this great little paperback book! For instance, the main course section contains 30 meals alone (Including one for smoked mussels MOM!) LOL! Today I will bring you 2 of the ones that jump out to me and say “Pick Me… Pick Me!” LOL so I hope you like them and… as always… Eat & Enjoy!


Mexican Chicken (sounds like a Mexican Lasagna if ya ask me… sounds good! YUMMMMM!)

Makes: about 6 servings
Cost: about $12.99

A layer of jalapeno slices and/or hot salsa will let you spice this up to your own taste. This can be prepared quickly, and if you freeze your cheese, all the ingredients can be kept in stock.

Ingredients:

1 cup Spice Box dried chopped onions (use fresh onions when available)
2 to 3 tablespoons Dutch Farms Wisconsin margarine
1 (10.5 oz.) can Baron cream of mushroom soup
1 (10.5 oz.) can Baron cream of chicken soup
1 (28 oz.) can Sun Roma sliced tomatoes
3 cups Crider cooked chicken
16 Guerrero corn tortillas, quartered
3 cupsCheese Pleasers grated cheese, jack or cheddar

Directions:

1. Preheat Oven to 350 degrees F.

2. Soak Dried onions in hot water for 5-10 minutes. Drain.

3. Saute onions in margarine until golden.

4. In a large bowl, mix soups, tomatoes, and chicken. Mix in onions.

5. Line a baking dish with quartered tortillas, then chicken mixture, then cheese. Repeat layers, finishing off with the cheese. Bake for 35 minutes.

(***HELPFUL HINT***) If you use commercial products to clean your oven, be sure to cover the thermostat wire with newspaper or foil. Harsh cleaners throw off your cooking temperatures. Be sure to remove your covering after cleaning and before turning the oven on.)


Corned Beef Casserole

Makes: 4 servings
Costs: about $2.99

This, like most meat casseroles, can be doubled easily. It is hearty and makes great leftovers. At about 75 cents per serving, it is a tasty way to get through a financially trying week. (This dish can be prepared the night before and refrigerated before baking. Bring to room temperature before placing in oven.)

Ingredients:

1 tablespoon Spice Box dried chopped onions (use fresh onions when available)
1 cup Allegra macaroni
1 (12oz.) can Clasico Corned Beef
1 (15oz.) can Libby’s cream-style corn
¼ cup Spice Box dried chives

Directions:

1. Preheat oven to 350 degrees F.

2. Soak Dried onions in hot water for 5-10 minutes. Drain.

3. Cook macaroni according to package instructions. Drain.

4. In a mixing bowl, break up corned beef; add onions, corn, and chives.

5. Mix in macaroni and place in a medium-sized greased casserole dish. Bake until golden and bubbly, about 30 minutes.

(***HELPFUL HINT***) Pasta added to water before it starts to boil can become mushy. The heat of boiling water seals the outside of the pasta, preventing it from sticking together as well.

Alright kids, its just about time for me to get off here and try to give this new kitten a feeding. This is insane… why are all these little animals calling/finding me all of the sudden?? Oh well… save a life as my mother says! I will see you all tomorrow for more crazy updates! Until then… HUGS!

Tuesday, June 29, 2010

BABIES, BABIES EVERYWHERE!

Good morning boys and girls! How are you doing on this sticky icky morning? I am good. Still not feeling real well, but still alive with a great family by my side. So what’s new with you? Not much here… PC is still causing me more gray hair than I care to have, finances still making me ulcerate LOL, and house still cluttered with tons of crud! LMAO but I don’t care! I have made it to another day to fill my lungs with fresh air, so I am not gonna complain!

Well, we got word last night that Thursday will be the first day with our little visitor! DH and the kids better be doing some super heavy duty cleaning today while I am away! So much to do and not a lot of time to do it! When my day is done with mom today, I have to go home and do lots of cleaning and such (ya know those things I am not real fond of anyway LOL). I want a safe and happy visiting place for the little man to be. Ah babies, babies, everywhere! First kids, then cats, then bunnies, and now back to kids! The circle of life LOL! Ain’t it great?


Speaking of great… you wanna see the greatest thing? I mean so incredibly cute its almost unbearable?! LOL… Look… this is Miracle and Rescue playing together! I normally have been using the bed as a playpen for the bunny to exercise, and miracle was being nosey, so I let them “meet” LOL. I figure if Miracle can see what the white ball of fluff is, he will be less likely to harass her in the cage… I am hoping anyway! LOL… and I have to remember a salt wheel for Rescue… it’s the one thing I forgot. I remembered when she started licking me LOL!


How about this for cute! My mother harvested this the other day… think it was Sunday when I was over there. She actually got some potatoes to grow! And those green things are okra and on top are some elongated bell peppers! Isn’t that so cool! I’m jealous of the potatoes and the okra LOL! My okra plants are still kinda babies… not growing to incredibly fast, but hopefully soon! And I’ve never grown potatoes before so I can’t really be too jealous LOL! But I think it’s so cool!


So are you ready for today’s craft? With only 177 days left until Christmas (and 27 until I start working on that countdown), I am beginning to think of ideas for everyone. I have big problems with gifting the GUYS in my family most of the time… My Dad buys whatever he wants whenever he wants then tells me he doesn’t want anything (he better watch out, I got a jar of nothing now LOL!), and my first brother… well he’s a very unique person… HARD to gift. My baby brother is easy… he just likes food LMAO! There are 2 things I make (and one of them ONLY at Christmas time) that he absolutely LOVES and REFUSES to make himself LOL! Buttermilk Pie and Crepes! So he asks for nothing but those every year! LOL! I have even given him the recipe so he could make them, but he “claims I do something special to them… like stick my finger in the batter or something.” LMAO he is such a nerd LMAO! But I love him and what he doesn’t know is I will be getting his GF to learn to make them this year too! LMAO! But all year long I hear hints of Buttermilk pies and crepes to annoy me… but it just makes me laugh LOL! Anyway, so if you are like me, gifting for guys tends to be a major pain in the butt! So today I am bringing you something for them that they should like… guys like their cars and music right? Well why not make them a CD holder for their car. You ever see those ones you can buy in the stores that hang on the visor? Yea… those are so easy to make, its not funny! And you can make them for women too… its great! So here is your…


Craft Idea of the Day: Visor CD Holder

Materials:

Cotton fabric or a non scratching fabric (Novelty Prints are great for gift giving)
Craft weight fusible interfacing
Thread
1" wide Elastic ( 2 - 7" Pieces)

Cutting Instructions:

Cut 2 pieces of fabric 12" by 7" (Back both pieces with fusible craft weight interfacing)

Cut 10 pieces (all with the right side of the fabric facing up) to the measurements shown in this diagram.


Directions:

Note: All Directions use 1/2" Seam allowance!

On the angled edge of the pocket pieces, press under 1/4" and press under again, to enclose the raw edge. Stitch the hem.

Starting 1/2 from one end, place the pockets an even distance from each other with the last pocket lining up with the end of the 12" by 7" piece. Placement should be approximately 5/8" apart. Pin the pockets in to place.

Starting with the end pocket, stitch the pocket to the backing piece along the straight edge of the pocket. Once the pocket is stitched, fold it back out of the way and stitch the straight edge of the next pocket. Repeat until all the pockets are attached.

Lay all pockets flat and press. Baste the edges to hold the pockets in place.

Lay the elastic on top of the pockets 2" from each end. Stitch the elastic in to place in the 1/2" seam a allowance.

Take the second 12" by 7" piece and place it right sides together, on top of the pocket section. Starting on a 12" edge, stitch around the edges, leaving a 2" to 3" opening to turn the CD holder right sides out.

Trim the seam allowances (except at the area you left open) and the corners to eliminate bulk. Turn right sides out. Turn elastic to the back side.

Press the opening seam allowance inward, and press the whole CD holder flat.

Top stitch 1/4" from the edge all the way around.

You will want the wide part of the pocket to be at the bottom. Adjust the direction you place the pockets to have a holder for the drivers side and the passenger side of your vehicle.

Well kids, its time for another day of Dollar Store Dining! Today we will be tickling the taste buds with some frugal sides and soups! I tell you when I first picked up this book, I was like OMG are you serious? Some of the recipes in there are pretty smart… that led to my desire to try them! Just reinforced what I have believed for a very long time… that you can make a meal out of just about anything and that it doesn’t have to be expensive to taste or even look good! I admit it… I am a Dollar Store Junkie LOL! And I am lucky that where I am at, we have a few different ones all around us! So when browsing through this book, a couple of soups and sides jumped out at me from the 29 interesting choices this book has and I wanted to bring them to you today. I hope you like them… eat & enjoy!


Alu Bhaji (Savory Fried Potatoes)

Makes: 4 servings
Cost: About $3.99

These are a great accompaniment to Naan (a baked good) and also make a good filling for Chapatis (an hors d’oeuvres). When serving with Naan, include a yogurt dipping sauce to balance this great snack. Since it is also delicious when cold, it would be a nice variation of potato salad for a picnic.

Ingredients:

1 cup Spice Box dried chopped onions (use fresh onions if available)
2 (15 oz.) cans of Libby’s whole white potatoes
1 tablespoon Albergo olive/canola oil
1/4 teaspoon El Pique cumin seeds
1/2 teaspoon Spice Box turmeric
1/2 teaspoon Spice Box Mexican chili powder
1 teaspoon Baja Pacific salt

Directions:

1. Soak dried onions in hot water for 5-10 minutes. Drain.

2. Rinse and drain potatoes. Boil in hot water to heat through without allowing the potatoes to get mushy. Remove from heat, drain, and dice.

3. Heat oil in a saucepan and fry cumin seeds until aromatic.

4. Add onions and fry until golden.

5. Add turmeric and chili powder. Stir, then add potatoes, sprinkle in salt, and toss to mix well. Serve hot or cold.

(***HELPFUL HINT*** A slice of raw potato will keep down the pain and swelling of a bee sting.)


Ham Chowder with Sweet Potato Biscuits

Makes: about 8 servings
Cost: about $7.99

Ingredients:

Biscuits:

2 ½ cups Cinch pancake mix
1/3 cup Imperial Margarine, softened
1 cup S&W candied yams, rinsed, drained, and mashed
½ cup Springfresh milk

Chowder:

1 (15oz.) can of Libby’s whole white potatoes, mashed
1 (10.5oz.) can of Baron cream of chicken soup
1 (15oz.) can Libby’s corn
1 cup of Libby’s cooked diced ham
1 (15oz.) can Veg-All mixed vegetables
1 ¾ cups Springfresh milk

Directions:

1. Preheat oven to 450 degrees F.

2. For the biscuits: Mix all ingredients until a soft dough forms.

3. Place dough on a flour-dusted surface and roll to coat.

4. Shape into a ball and knead four times.

5. Roll to one-half-inch thick. Cut with a 2 ½ cutter dipped in a pancake mix to avoid sticking.

6. Place biscuits with edges touching on an ungreased cookie sheet. Bake for 10 to 12 minutes until golden brown.

7. While biscuits are baking, combine all chowder ingredients in a non-stick frying pan over medium high heat and cook until heated through, about 10 minutes.

8. Place chowder in serving bowls and top with 2 biscuits. Serve hot.

(***HELPFUL HINT*** In the United States, the terms yams and sweet potatoes are used interchangably but in truth, they are very different. They may both be roots, but a yam comes from the yam family and needs hot moist weather to thrive. Sweet potatoes are from the morning glory family and are more abundant in the States since they can withstand colder weather. The USDA requires food with “yam” on the label to be followed by the term “sweet potato”. Chances are, unless you have specially sought out a yam at an international market, you probably have never eaten one.

Well folks, that would be all I have for today! I might just make a visit to the Dollar Tree, which is right across from my mom’s therapy office, while she is in with the doctor to see what kind of tasty treasures I can find. It’s a HUGE store and one can get in lots of trouble in there LOL! They have a full out freezer section as well as non-perishables LOL… okie dokie, so I am off to take mom to therapy. You have a wonderful day and I will see you again tomorrow! HUGS!

Monday, June 28, 2010

DOLLAR STORE DINING

Good day to you my friendly flock! How are you doing this morning? I am alright. I had a rather rough night, and I am feeling a little ragged around the edges this morning, but I am alive so I am grateful. I’m glad you’re here, so grab your cup of Java and let’s chat, shall we?

When I got up this morning, the first thing was to feed the animals… so I thought. I got to thinking and I have to revamp my whole process of doing things because, well frankly, there’s a lot more animals to tend to now LOL! The outside cats are easy, the inside bigger cats are ok, the kittens were in the back whining and screaming their little heads off, and the rabbit was bouncing around crazy in the cage by the bed LOL! Lots to do, so I decided that maybe I should water the plants this morning first instead… LOL.

OK, so I go outside and there are kitties everywhere… getting underfoot and tripping me up. BAM! Down the steps I go with one big thud! Oh that hurts LOL. So I crawl back inside and gain my composure and the open bag of cat food LOL. Let’s try this again… Alright feeding the outside cats FIRST! THEN I go down the steps and get the water hose. Water the rose bed, which has such pretty new blooms that smell so wonderful (wish I could say the same for the INSIDE of the house LOL… just kidding!). Then I water all the plants on the porch… and its off to the back in the garden!

I get to the garden and see that I need to harvest a few things and that my eggplant plants are getting monstrous but the blooms are falling off… not cool1 THEN I see that my Romas are racing to heaven but no blooms even… odd. Then I spot it… holes in my leaves! OH NO!!! I am searching and searching but nothing… I lift EVERY leaf out there and can’t find a single worm, caterpillar, nothing! What on earth is going on… so I back up going down the stairs to the single pots of tons of things. Man my cherry tomatoes really bushes back out… YAY! Ok so anyway, I notice that my Italian parsley… the one that has been a beautiful bush of herby loveliness forever, is really short and spindly looking in some areas… I get closer… OH MY GOD!


I found them! 2 HUGE… FAT… UGLY caterpillars! Eating my parsley! First I got mad and then I started laughing uncontrollably! I remember back a few seasons ago where my mom’s garden was suddenly attacked by “worms” and she was chunking them across the yard LMAO… when she found out they were gonna be butterflies she felt so bad…LMAO my mom, the butterfly assassin! TOO FUNNY! So instead of chunking them across the yard, I gently removed them from my plants and took them and placed them on a branch of one of the trees in the back yard LOL. I let them live… just somewhere else LMAO!

OK back inside after the plants got plenty of water… it was time to feed and play with and love on animals. I started with the bigger cats. They need to know that they are still special, despite all the new critters coming into the house LOL. So after some special loving and canned food, it was off to the baby kittens, who by this time were literally climbing the wall/door and screaming their little heads off LOL! Ok, played with them and gave them some canned food and let them out into the big bedroom to play and have fun… then it was time for the bunny. I refreshed the water and pellets and cleaned the cage. I let her out on the bed after I blocked all the sides and turned it into a big playpen. She played for about 30-45 minutes then just came and cuddled up on me. So I get up to come talk to all of you and she is here with me now, cuddling on my chest grinding her little teeth in contentment LOL. She will soon be back into her home for awhile so that I can get some things done. I have to baby proof my home, because I will be having a visitor soon LOL. I will be “helping out a friend” by watching her little one while she tries to find a better job. I’m always happy to help someone bettering themselves. So since it is looking like rain outside (hearing the thunder now LOL gosh I wish I’d have known before watering the plants LOL), today is going to be inside serious cleaning day LOL! A new baby in the house will be my special motivation… always easier to accomplish goals (for me anyway) with a special “purpose” LMAO!

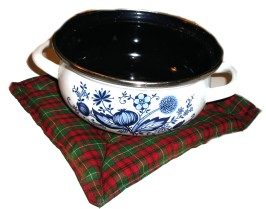
Alright, so after all that rambling, do you feel crafty? Well I saw this craft a while back and tried it and was so happy. So then I was sitting and thinking what I could possibly bring you that was new and unique. When I was in the kitchen feeding my bigger cats, I noticed my hot pad… my lovely lemon smelling hot pad and I thought OMG I could share that! It’s a simple but great little project that I really enjoyed and hope you will too!


Craft Idea of the Day: Scented Hot Pot Mats

Materials:

Desired cotton fabric
Sheet wadding (quilt batting)
Sewing machine access
Ground cinnamon or cinnamon Oil (other scents if desired)

Directions:

When you place your HOT pot on top, the fragrance of cinnamon will come wafting through filling the air with a beautiful aroma. Start by working out what size pot holder you want. Approx. 30cm X 30cm is suitable. Cut your fabric into the size you require allowing for 1/2 inch hems. Sew 3 sides of your fabric closed and slip in the sheet wadding through the last opening. You will need to either begin hand sewing or machine sewing this end closed. Just before you complete the closure Sprinkle about a teaspoon of cinnamon powder into the Project or sprinkle your drops of oil onto the wadding prior to placing it inside. You can finish it off by sewing some diagonals along the top to keep the wadding in place. The quilting also makes it look very decorative.

Ok so are you ready to cook? I hope so, because this week I have decided to bring you some recipes from something very near and dear to my heart… something I absolutely love. No not chicken LOL or strawberries… but Dollar Stores! WOOHOO! Nothing like Frugal cooking to enjoy dinner that much more! Awhile back I bought a book at Barnes & Nobles called “The 99c Only Stores Cookbook: Gourmet Recipes at Discount Prices” by Christiane Jory. I think I saw her or the book or something on a morning show and that’s how I knew what to look for. Anyway, every recipe I bring you this week will be out of that book and can be found in the 99c only store (some stores may not carry the exact same thing, but hey they should have something close to it LOL). I will include all the extra information from that page, recipe, etc. it’s a great little book! Most people have a Dollar store in their area… now I am not talking about a Family Dollar or Dollar general, where things can cost more than that $1. I am talking about a true… nothing is more than a buck store! Some of the more popular ones include: Dollar Tree, Everything $1, The 99c Only Store, Dollar World, etc. You won’t find anything more than $1 in these stores and THAT is the basis of this book! I’m telling ya, it will blow your mind some of the things in there! Easy to make, easy to afford, and easy to enjoy! I hope the theme for the week excites you and that I will tease your taste buds to try something new. We shall start out the Dollar Store Dining week with some lovely appetizers and hors d’oeuvres.


Clams Casino

Makes: about 15 Hors d’oeuvres
Cost: About $3.99

This is a classic that can also be made with oysters or mussels. In the original version, the filing would be put back into the half shell and quickly browned in a broiler. If you want the seared effect, place assembled hors d’oeuvres on a cookie sheet and broil for about 1 minute.

Ingredients:

1/2 cup Spice Box dried chopped onions (use fresh onions if available)
8 tablespoons Danish Creamery butter
1/4 teaspoon Spice Box paprika
Spice Supreme salt and pepper to taste
2 (6.5 ounce) cans Snow’s chopped clams
12 slices Branding Iron bacon, cooked and diced

Directions:

1. Soak the dried onions in hot water for 5 to 10 minutes. Drain.

2. In a large frying pan, saute butter, onions, paprika, salt, and pepper for 2 minutes for the reconstituted onions or if using fresh, saute until tender but not brown.

3. Add clams and simmer for about 3 more minutes.

4. Serve warm, sprinkled with bacon bits on toast of choice.

(***HELPFUL HINT*** Strain the bacon fat and use it to fry your next omelet. Store in the refrigerator for up to one week.)


One Bite Ham & Cheese Pies

Makes: about 12 Hors D’oeuvres
Cost: about $1.99

These are spicy, cheesy bite size biscuits. They can be prepared in advance, leaving out the last step of baking again for 1-2 minutes until right before guests arrive. My snobbiest, most skeptical friend loves them. Of course, I had to wait for her verdict before admitting they were part of the book.

Ingredients:

1/2 container (about 8 oz.) Pillsbury buttermilk biscuit dough
1 (6oz.) can of Libby’s Chunk Ham
1/2 (5oz.) jar of Kraft Old English cheese spread
1 tablespoon Oscar Mayer real bacon bits
Eden garden nacho sliced jalapeno peppers

Directions:

1. Preheat over to 400 degrees F.

2. Peel the thinnest layers possible from the biscuit dough and form into the cups of a mini muffin tin.

3. Bake 3 to 5 minutes or until golden brown, watching closely to avoid burning.

4. Remove from over and fill cups with a layer of ham, then cheese spread.

5. Sprinkle with some bacon bits and top each one with a jalapeno slice.

6. Bake again for 1 to 2 minutes, until cheese is bubbly. Serve Warm.

(***HELPFUL HINT*** These can be prepared and frozen in advance, allowing you to always be prepared for unexpected guests.)

Well everyone, that’s it for me today. I hope you will join me again tomorrow for some more fun and crazy antics. As for me, I am going to get off here and get some cleaning done and maybe finish up DD’s birthday invites! I hope you have a great day, be safe, and see you tomorrow! HUGS!