myspace generator
Showing posts with label wreath. Show all posts

Sunday, April 11, 2010

WREATHS

Good morning everyone. I hope you are doing well this morning. One of my readers asked about my mother yesterday. To answer your questions, she has been injured and not able to use the computer. But don’t worry, she will be back soon! I am super stoked today! Have you subscribed to the $5 Dinners email newsletter yet? You have… did you see who is the Feature topic for April 10th????? ME!!!!!!!! WOOHOO! GO ME! I want to give a HUGE THANK YOU to Erin, the $5 Dinner Mom for posting about me! If you haven’t checked it out yet… shame on you LOL but you’re lucky, cause there is a link on the sidebar to the $5 Dinner website! Run over there once you are done with me and check her out!

Ok, let me ask everyone a question… how do you know when you are old? Could it be that when everyone you used to watch on television as a child or teen passes away? Well that made me feel very old this morning! Just this morning’s announcement on yahoo front page is that Dixie Carter AND Meinhardt Raabe, who played the Munchkin coroner in "The Wizard of Oz" have both died. Carter was famous for playing Julia Sugarbaker on Designing Women. Then not too long ago, Corey Haim passed, and tons of others in the last year or so… Michael Jackson, Patrick Swayze, Ricardo Montalblan, Clint Ritchie, Bea Arthur, Dom DeLuise, David Carradine, Ed McMahon, Farrah Fawcett, and SO many countless others have all departed. These were people I watched growing up… so how should that make me feel? Well I am sad for each family’s loss but it makes me appreciate life more. Time is precious and you never know when you won’t have it anymore, so use it wisely. Be good to others, helpful, and compassionate. Cherish that quality time with your children, family, and friends. Do things you normally wouldn’t do, and live with no regrets! I want to see each one of you lead a healthy and happy life!

Alright, lets get to a lighter topic now, before I get depressed. Ok so with this project of redecorating my kitchen and fixing to be helping my mom with HER new post-storm decorating, I have been thinking about home decorations a lot and what would be versatile for all events and seasons. And it hit me… wreaths! You see them all the time. You have traditional and modern! Check some of these out.

Craft Idea of the Day: Decorative Wreaths


Here you see a traditional Christmas wreath made of pine branches, pinecones, and the ever-famous red bow. Nothing spells “Norman Rockwell” like a traditional pine wreath.


Now, how about a little more modern Christmas Wreath? You can make wreaths out of scraps of material tied around a wreath form and when you get it nice and full, it becomes a beautiful handmade decoration people will talk about constantly!


Christmas Ornaments can be used for more than just Christmas in many ways. Try gluing color coordinated ornaments to a grapevine wreath for a cute holiday decoration like no other! This one happens to be festive for Mardi Gras!


Feather Boas make interesting wreaths as well. Simply secure one end of a boa to a wreath form and wrap it around tightly covering the entire wreath. Secure the second end to the back of the wreath. You can add beads, ornaments, or even foam cutouts. Nothing says Happy Halloween like a bright orange boa wreath greeting you when you walk up LOL!
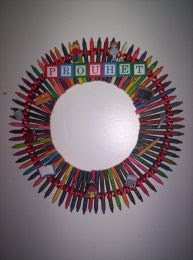


Got a favorite teacher? Check out this crayon wreath I made for my DS14’s teacher a few years ago. Take 2 different sized embroidery hoops and a 64 count box of crayons. Hot glue them to the hoops and adorn with little school related wooden cutouts and trinkets for a unique way to thank that special teacher for all she does! This is ideal for elementary or daycare teachers and special needs teachers as well. The letters you see to spell out the name look like wooden blocks, but are actually flat wooden pieces. I found them in a bag at Michael's Arts & Crafts store.


How about all those 100’s of plastic eggs your kids have thrown all over the house? Glue them into an Easter wreath. Bright and cheery and definitely a conversation starter. Add a bow and hang it up. It’s a wonderful way to greet your holiday guests! I used about 6-8 dozen of various sized bright colored plastic eggs. Simply hot glue them around a grapevine wreath, starting with the larger eggs first. You will fill it in with the other eggs as you go around adding to your wreath. Finish with a bow, if you like, and its ready to be hung and enjoyed!


Are you sentimental at heart? Perhaps you have been saving all those countless cards your husband has given you over the years for Valentine’s Day. Cut out the cute graphics and glue them onto a wreath! You will be able to cherish the memories forever!


Someone expecting? Make them a neat diaper wreath to either use for decoration or utilize the stuff! It makes a great gift and the expecting mommy will be very appreciative to have something so creative, yet so useful!

As you can see, you can go on and on forever talking about all the different things you can use to make the cutest wreaths to dress up your door all year long. I think they are great crafts and great decorations! Just google homemade wreaths and you will find countless ideas.

Now I want to talk food! I picked out this recipe to make a few days ago in my crock pots while I was gone. Then today this recipe was the daily pick on a popular website AND on a cooking show I was watching with my mother yesterday called “Daisy Cooks”. So I set up the crock and let it slow cook on low all day and when I got home it was OMG heaven! I should have made ANOTHER crock pot full, cause everyone was diggin’ it and asking for 2nds and 3rds!


Cuban Ropa Vieja

Ingredients

1 tablespoon vegetable oil
2 pounds beef flank, chuck, or skirt steak
1 cup beef broth
1 (8 ounce) can tomato sauce
1 small onion, sliced
1 green bell pepper, seeded and sliced into strips
2 cloves garlic, chopped
1 (6 ounce) can tomato paste
1 teaspoon ground cumin
1 teaspoon chopped fresh cilantro
1 tablespoon olive oil
1 tablespoon white vinegar

Directions

Heat vegetable oil in a large skillet over medium-high heat. Brown the steak on each side, about 4 minutes per side.

Transfer beef to a slow cooker. Pour in the beef broth and tomato sauce, then add the onion, bell pepper, garlic, tomato paste, cumin, cilantro, olive oil and vinegar. Stir until well blended. Cover, and cook on High for 4 hours, or on Low for up to 10 hours. When ready to serve, shred meat and serve with tortillas or rice.

As a bonus today, I am giving you a recipe for one of my mother’s favorite cakes… I baked it for her last night and am taking it to her today to enjoy (HOPEFULLY in moderation LMAO… yea right!). Doesn’t this just look absolutely full of fruity deliciousness! Well it is, and it makes your house smell wonderful too! Just the smell to fall asleep to and bring wonderful dreams of dancing pineapples… hey it’s not Christmas so it’s a good substitute for visions of sugar plums LOL!


Pineapple Upside Down Cake

Ingredients

1 (10 ounce) jar maraschino cherries, drained
1/4 cup butter
1/2 cup packed brown sugar
1/2 cup flaked coconut, optional
1 (8 ounce) can sliced pineapple, drained with juice reserved
1 (8 ounce) can crushed pineapple, drained with juice reserved
1 (18.25 ounce) package golden butter or pineapple cake mix

Directions

Preheat oven to 350 degrees F (175 degrees C). Coat the bottoms and sides of each 9 inch round cake pan with 2 tablespoons of melted butter. Sprinkle the bottom of each pan with 1/4 cup of brown sugar.

In one of the pans, sprinkle coconut over the brown sugar. Lay pineapple rings in a single layer on top of coconut. Place a cherry in the center of each ring. In the other pan, spread the drained crushed pineapple.

Mix the cake as directed on package, but substitute reserved pineapple juice in place of water. Divide batter between the 2 pans. Remember which pan has the pineapple rings in it.

Bake for 40 to 50 minutes in the preheated oven, or until a toothpick inserted into cake comes out clean. Cool in pans for 20 minutes.

While the bottoms of the cake pans are still warm to the touch, invert the layer with the crushed pineapple out onto a serving dish, then gently invert the layer with the pineapple rings on top of it for a dazzling two layer pineapple upside down cake.

Well kids, I hope you have enjoyed today’s entry. As for me, I’m gonna go set my seedlings out in the sun and then start my day! Please join me tomorrow for more great adventures in blogging land. May you be safe and happy in today’s adventures! HUGS!

Thursday, February 18, 2010

LOVELY LITTLE LISTS

Well GOOD morning everyone! How are you doing today? I’m well… cold but well. Its not as bitter a cold today as we are on a “warming trend” the weatherman says LOL! I am really scatterbrained today, so the topics are all over the place… lists, crafts, food, gardening, you name it and I’m thinking about it! I hope everyone is ok… I’ve noticed a decline in readers. I hope everyone is still enjoying the information I share. Well for those still out there, here we go…

Now, I hate to admit it, but recent party planning and the lists, etc. that I use has put me into overdrive! LIST OVERDRIVE! I learned a long time ago that I function best with lists. They keep me organized and help me accomplish all kinds of things. I suspect I may be ADHD (as does my son’s doctor), and I treat myself as such (even though I have never had an official diagnosis), so I have learned that this is a tool that helps me in life. Without them I tend to be disorganized, forgetful, and downright LOST! Grocery lists, inventory lists, Monthly menus, To Do lists, Guest lists, Bill paying lists, etc. You name it… so guess what I am going to be doing today? Yep LISTS!!!

Craft Idea of the Day: Homemade Menu Calendars

For starters of my pile of lists, I’m going to make my own menu calendars. I found a great free printable blank calendars on another blog entry… check it out HERE! Then I am going to print them out smaller than a full page and bind the months together with some rubber cement. Then I am going to mount the pile of calendars onto some pretty scrapbook paper (food or kitchen related). After that all dries, I am going to put it onto a piece of cardboard cut the same size as the scrapbook paper and mount a strip of magnet on the back. Once completed, I’m going to write a meal on each day and hang it on the fridge so everyone will know what’s in store for the upcoming month. I hope it will turn out cute… and I have all the supplies to do it, so even if I mess up LOL., I can do it again! You can do this too… and not just for meal menus, but just a calendar in general. You can use a picture of your family, your pet, etc. There are also many computer programs to design and print your own calendars as well. The possibilities are really endless. I choose to hand make my own cause it allows me to be more creative.

Then I got in a really crafty mood yesterday when I went through another box from storage. I had some periwinkle blue ceramic tiles that I found on clearance (like 5 cents each at the Home Depot one time. I bought them cause I needed a cheap purchase for a secret shop… the box had like 24 or something… didn’t count them LMAO!) and I sat there thinking… what can I do with these? Then it hit me! I recently found some scrapbook paper that matches my current living room! I have modge podge, decorative papers, and tile… DECOUPAGE TIME!


I cut the paper to fit the tile and decoupaged it on. On 2 of the tile, I just cut out one of the flowers with some special scissors, glued fleece (you could use felt too) and then I sprayed varish/clear sealant on it. I glued a ribbon around all 4 sides and then a tiny bow where the end of the ribbon was and… Voila a pretty coaster to match my living room!!


Now with the tiles that have a full square covering them, I am gonna checkerboard them with the plain blue tile to make a pretty table top! I am going to cut a piece of plywood to the same size as my table and adhere the tile to it. Once it is completed I will have a lovely tabletop to match my living room (as it is right now!) I think it’s turning out very pretty! I just need to go get more paper LOL. Then I thought I could make others and sell them! Small end tables, full size coffee tables… or BOTH! How cool would that be!? And when I redo the living room in 60’s psychadelic… I could do tie-dye and 60’s symbols like peace signs, hearts, moons, etc! COOL huh? LOL…

Then I found more wooden spoons in storage so I spray painted them bright orange. They are gonna be more garden markers and I think this color will stand out very nicely against all the green I hope to be having! I tried a couple in yellow too, but I’m not diggin’ that color as much. Not bright enough! Maybe multiple coats will look better… if not- it’s off to the store for paint YAY! LOL…

Then my brother was a gem and brought me some wooden palates last night, so I think I’m gonna start building my planters on the back porch today. (Can ya tell I am anxious about my gardening coming up? LOL) I’m not sure if I want to line them with plastic or with like a mesh or a moss or something… will have to look around the Garden Center and see what I like best (and what’s cheap)… right now, it looks like the plastic might win! I have plenty of that everywhere LOL! I’m also going to paint some cat litter buckets white and make some hanging planters… I might even decoupage one with Strawberry paper and make a planter for the cute strawberry plants in my kitchen window… which are already giving me baby berries BTW! Isn’t that the coolest!?


Then I think I am going to start cutting material for my daughter’s room and one of the things I want to make is a scrap wreath. Basically you cut strips of material and you tie it around a wire ring/wreath form. You keep tying and tying until you have a very full wreath! I have to cut the closet curtain too… and get all the measurements for everything in her room. The goal is to have her room redone by the end of the month. That only gives me like 9 days YIKES!! I best get motivated and busy huh!? Maybe since I am still in the crafty mood, it'’ll be the perfect time!


Okie dokie so we gotta eat right? A crafter has to eat to keep up their crafting strength if nothing else LMAO… so what to make. I think some Meatloaf with some Broccoli cheese rice and some garlic focaccia bread slices would be nice… last time I made it, it was a huge hit! But I’ll share a different broccoli casserole side recipe with you today that is also a big hit here in my house.


Ritz Broccoli Casserole
(I found the original recipe on the Kraft website and made some adjustments.)

Ingredients

2 pkg. (16 oz. each) frozen chopped broccoli, thawed, drained
1 lb. VELVEETA Pasteurized Prepared Cheese Product, cut into 1/2-inch cubes
72 RITZ Crackers, coarsely crushed (about 3 cups), divided
1 (10oz.) can of cheddar cheese or cream of broccoli soup
1/4 cup (1/2 stick) butter or margarine, melted

Directions

HEAT oven to 350°F.

MIX broccoli, VELVEETA, soup, and half the cracker crumbs until well blended.

SPOON into 2-qt. baking dish. Mix remaining cracker crumbs and butter; sprinkle over broccoli mixture.

BAKE 45 min. or until heated through.

Ok gang, Alex is still home and he just woke back up, so I need to get his medicine to him and get him fed (hopefully he will eat) so that he can be settled in and I can get some crafts going. I hope ya’ll are safe and warm and well wherever you may be. Until tomorrow… HUGS!