myspace generator
Showing posts with label Christmas. Show all posts

Sunday, November 7, 2010

LET THEM EAT CAKE

Well a good frosty Sunday morning to you all! Sorry for the delay but this weekend has been super crazy busy believe it or not! Football games, bike rallies, car shows, coupon shopping, and more! We still have a pizza block party to go to today and a PowWow next weekend! Plus we have football games... well at least 1. Our team made the playoffs for the 4th straight year so its gonna be a week by week thing now.


Remember the young boy who lived with me named Michael who I treated like a son? Well he is somewhat back in our lives now... but not living with me. So Friday was "Senior night" and all the seniors had their parents escort them across the football field. It was a way for the school to "honor" their seniors in the Football, Band, cheer, dance, and drill. Michael had asked me to escort him a while back and I gave my word I would. I keep my word, so no matter what I was gonna be there. I got a little emotional... as I think most people would. However NEXT year when I escort my daughter... I just know I'm gonna cry!

Then of course you have the ongoing saga with the doctors. Last week I went and everything looked really good. My blood cell counts are steady, my BP was back down, I dropped another 4.5 pounds, and my pulse was awesome. She wants to try cutting my BP meds in half... not the actual pill, but the frequency of the med. I currently take one every day in the morning. She wants to try to go every other day to start IF my BP is good at the next visit. So I am trying to eliminate as much stress as possible. I heard from my attorney too! Hopefully sometime after the 20th I go to court and I will be a free woman! YAY! So that's ANOTHER stress factor eliminated!


Ok, so yesterday first thing in the morning the kids and I went and did some coupon shopping. We did assaults on CVS, JCPenny, and Kroger LOL. We started at CVS cause I also had to pick up a prescription for Alex. OK... I picked up a bottle of Arm & Hammer laundry soap, a bottle of the new Gain dish soap (which smells just like my favorite LAUNDRY soap LOL), 2 beef sticks, a jar of peanuts, a box of alcohol swabs, and 4 blue velvet mini stockings. Total was $19.42 and I had lots of coupons... save off a purchase ones, item coupons, and extra bucks. Total AFTER was $7.09! Woohoo!

Then we went to JCPenny where I had one of those lovely $10 off $10 or more coupons. SOOOO I found a very nice Christmas present there for VERY VERY inexpensive courtesy of the coupon and doorbuster savings!


Then off to Kroger! This one was fun! Ok, so they have this "Mega event" where if you buy 10 items then the price is cheaper. I have a load of coupons for most of those items AND others I know are fairly inexpensive! On top of ALL this, they have the Jenny-O turkeys on sale for 39 cents a pound when you buy $20 of additional items. No problem... had that (before coupons anyways LOL). Man did I find the biggest turkey ever!!!!! 25.20 pounds! OMG I started singing and talking to the turkey in a Cartman voice (a character off of the cartoon SouthPark for those who don't know) and people were looking at me funny, but I didn't care! That turkey was like the mother of all turkeys! That is the biggest one I have ever found and you better believe I'da beat down someone who tried to take it from me LOL! Ok so after my moment of madness LOL, we got the rest of the goodies! I even found a butterfly shaped Wilton cake pan on clearance for less than $4! WOOHOO! Total price before was well over $128 and after was $12.37 out of my pocket... so not my personal best, BUT I did save over $115.06 in coupons! WOOHOO! Call us weird, but the kids and I have so much fun doing this... coupon shopping I mean.


OMG I so have to tell you about my cakes! LOL... the other day I got on a baking trip... I wanted to bake cakes. SOOO, since we didn't do anything for Halloween, I baked. The "Betty Crocker Baking Bug" has apparently bitten me quite early! I have baked like 3 cakes in a week! The first one I did was "Jack" the pumpkin cake. It only LOOKED like a pumpkin LOL but it was strawberry with blood red icing in the center, so when you cut the cake, it looked like it was bleeding! I know morbid, but very cool! 2 layers of yummy deliciousness! I was gonna do a sculpted cake, but I did not have enough powdered sugar to make more icing, time to bake more cake, etc... so we stuck with the simple 2 layer decorated version LOL!


THEN we have my Texas cake! I loved this cake! Super cool, right? Too bad nobody got a piece of it but my son! It was a Butter Pecan cake with white icing. I took so much time coloring the icing, sectioning and separating, etc. I was quite proud of this cake! Apparently so was Alex LOL... it started with the Panhandle... ok fine... then west TX disappeared, the Guly Coast, and finally Central Texas and the Hill Country! WTH? Where is my cake?? Then out walks Alex with EVIDENCE! No not an empty plate... but the bluest teeth I have ever seen LMAO! Oh well... guess it was meant to be eaten! LMAO! Just not all by him... which totally threw me off cuz he normally doesn't eat sweets... except pumpkin pie LOL!


So then a couple of days ago was one of my "kids" birthdays. Becky is one of Madison's friends who's been around us for years that calls me mom... okie dokie... She turned 17 and Madison wanted to make her a small cake for her birthday. Ok... so we are rushing around the night before trying to get this cake done and I realize AFTER the cake is made OMG what am I gonna put it in?? LOL. Well the triple chocolate fudge with milk chocolate cake and cream cheese decoration was set enough in the morning to lightly tent a layer of foil, so that's what we did. Becky LOVED it and started to cry!

I think I'm gonna try to go through my recipes today and pick out all the cookie recipes I am gonna do for our Annual cookie party. I have Gator Blue stockings to make as well, and I think I am gonna try to do some crafting this afternoon once we get back from the Pizza Block party. So next week I will try to do more entries and share more recipes, photos, etc... trying to get back to "normalicy" is harder than I thought LOL! OK Until next time... Peace, Love, & lots of HUGS!

Saturday, August 21, 2010

SCRUMPTIOUS SATURDAY

Good early weekend morning everyone! How are you doing today? I am super excited as I am going out with my mom today! Not sure what kind of adventures she has in store for us today, but I can tell you whether we are sitting at home (either her's or mine) just talking or cooking or whatever, or we are running the roads, etc. we always have a blast! Summer has come and gone, summer band ended last night with a fantastic squad competition and super fun pool party, and I have just 48 hours til the most wonderful time of the year! WOOHOO! LOL...


Remember I said I was gonna get some sewing done yesterday? Well this was the first thing I made. Remember a few days back when I brought you the Heat Halter Top craft made from a men's shirt? Then I said I was decluttering the clothes and grabbed this old shirt of DH's to try the craft? Well I changed it up a bit and made it for my DD! I chopped off the curves at the bottom and added a hem. On that, I added some pretty white and gold lace. I added belt loops on the sides, elastic on the top, as well as a ribbon to act as a drawstring (which I inadvertantly picked a yellow with gold music notes LOL), and straps with lace edging on the top. I think it turned out super cute and am excited for Madison to wear it when we go out today!


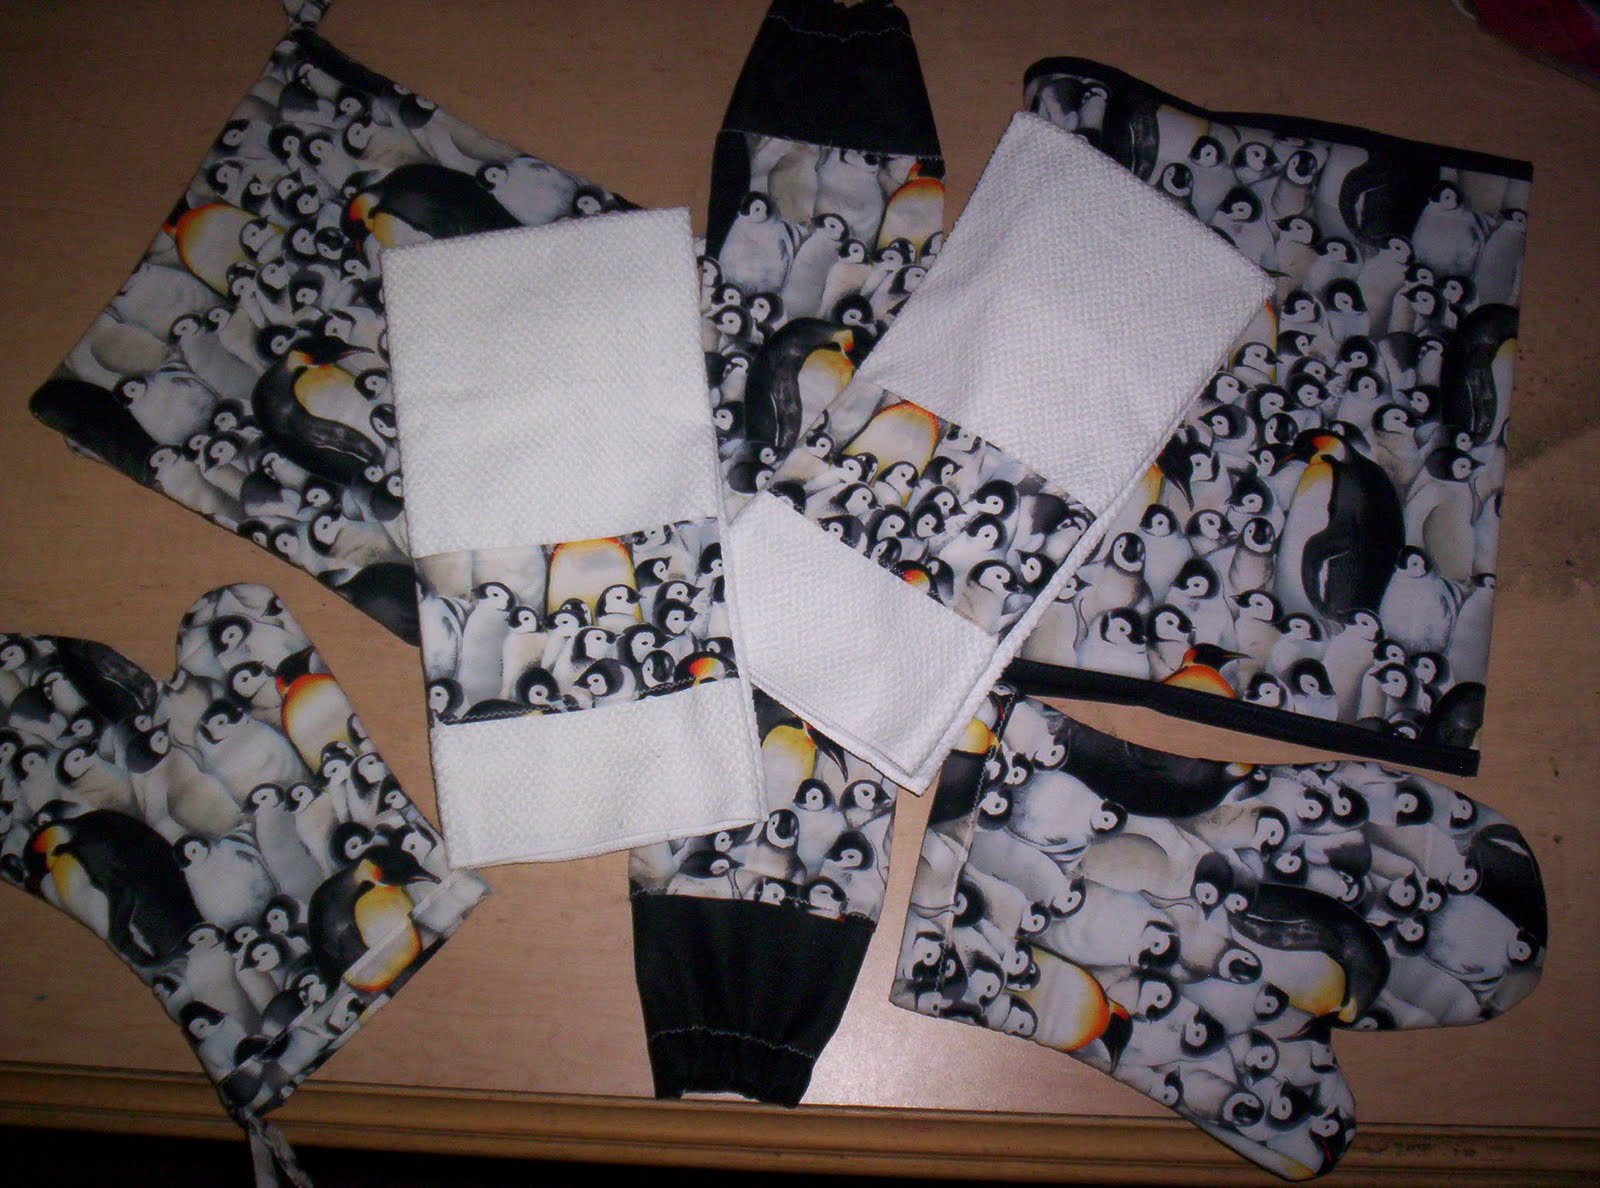
Here you see another kitchen set. Yet one more gift done in the Christmas Countdown! Like the other one, it has a specialty cookbook designed for the recipient, 2 embellished towels, 2 pot holders, 2 oven mitts, and a grocery bag holder. It will be gathered with a sparkly black and sheer wired ribbon with silver glitter on it. I think this person will really like it! I have a little bit of the fabric left, and I am thinking of adding some small items like a cell pouch, makeup bag, etc. Or I might stick with the kitchen stuff and make a "patchwork" apron and some other stuff... not sure yet. I'm liking the apron idea, but how many people really wear aprons nowadays? I know I don't, even though I probably should at times LMAO! I dunno yet... what do you think? BTW, how is YOUR Christmas Countdown Challenge coming along?


Then we have the "Booty for Boobies" bag LMAO! It is a Denim jeans purse decorated with breast cancer fabric and colors! I thought it was so cute that I filled it with my junk and plan to use it as we go out today! Woohoo! Can you see the faces of the people wherever mom surprises me and takes us? Betcha you won't find another one like this... that's for sure!

Ok now for your frugal moment of today, I found you yet another set of tips. Its tips to assure you are being super frugal and ways to acheive it if you're not. Everybody needs a friendly reminder from time to time, and if you are new to the whole frugal thing, then its even more helpful! So check it out!

Do You Have These Frugal Living Habits?

Frugal living requires skills and ways of looking at things that help you take advantage of the money-saving opportunities in life. The truly frugal person makes these into habits. Six of these habits are outlined below. These are techniques that can be learned in a matter of a day or two, and made into new habits a few weeks. Then they will save money for you for the rest of your life.

1. Frugal living requires a knowledge of values. How can you get a great deal on a car if you don’t know what a great deal is. Get in the habit of educating yourself on prices, especially before you’re ready to buy anything that costs a lot. It takes a few hours of looking at listings for sale, for example, to know what homes are selling for in an area, but this is knowledge that can save you thousands.

2. Learn from other people. Most of us know someone who always gets the best deal on cars, boats, homes, or even groceries. Why not ask him or her how they do it! One person will tell you that the cheapest coffee in town is $3 per cup, while another will say 50 cents. Ask the latter about coffee shops. People near you are living a good life on half of what you make. Investigate that. See how others do things, and you’ll know your options.

3. Frugal living means always looking for alternatives. You might have just as much fun taking a discount trip to Mexico as you would going to Jamaica. Maybe you happen to enjoy pizza more than fine French dining. If so, why not skip the expensive restaurant and call Dominoes. This isn’t about sacrificing, but about getting even more of what you really enjoy by paying less for cheaper alternatives that work just as well.

4. Pay cash. What happens when everything you buy costs an additional 20% because of the interest you pay over the years? You can’t buy as much! Everything is cheaper when paid for in cash instead of credit. If you want that new patio set, divide the price by the number of weeks you can wait to get it. Set aside that much each week, and buy it for cash when you have the money. Not only do you save on interest, but you’ll often get a better price when you pay cash.

5. Learn to do the math. Did you really save $400 on that car if it costs you $500 more in gas each year? Did you know that some stores are cashing in on shopper’s assumptions that larger is cheaper? It’s true. That gallon of pickles might actually cost more than four quart jars. Make it a habit to do the math if you want to save money.

6. Tell people what you need. Mention it in conversations. Many people get free or cheap things, just because they talk. For example, a neighbor wanted to upgrade her living room debt, and was thrilled that I would take her three-month-old couch off her hands for $30. I sure am glad that I mentioned I was looking for one. You need to make this little trick a part of your frugal living habits.

About the Author – Steve Gillman has studied unusual ways to make money for thirty years.

Well kids, its time to get crafty! And let me tell you, this would make a super cool gift for any doctor or nurse in your life. Make a few of these in just a fractional amount of time and bunch them as a gift! So they always have one on the scope and one to wash, etc. These cool covers will increase the life of their job hardware as well as probably put smiles on the patients faces, depending on the types of fabrics you use. So you might not only be gifting to a selected person, but tons of strangers who need a smile at that time in their lives. How cool is that? Sew, scroll on down and get yourself rockin on some cool covers!


Craft Idea of the Day: Stethoscope Cover

Materials:

34 inch x 6.5 inches (86cm x 16.5 cm) of Fabric
1 inch square of Velcro or a press stud
2.5 inches (6cm)of Elastic

Directions:

Start by taking your length of fabric. Hem the 2 smaller edges for a neat finish.

Fold it in half so that it is inside out ( the print is facing inwards).

Following the steps in the image below, sew along the edge to close the strip to form a tube.

Take the elastic and sew it into place at end "A" by sewing it into place around 1/2 (1.5cm) inch from the edge.

Using glue or sewing machine secure your Velcro into place by stitching one side of the Velcro to each side of the tube. This will stop the fabric from sliding down the stethoscope.

You could also substitute the Velcro for a press stud if you wish it depends on your sewing skills as to how you wish to tackle this project.

Once you have finished turn it the right way around so that the print is facing out then thread it over your stethoscope with the elastic at the bottom and the press stud at the top.


Ok, its time for another installment of BODACIOUS BANANAS week. Today I want to talk about making "Stuffed" foods. It was once thought that foods that were stuffed were for the powerful, royal, rich, etc. (dishes like Chicken Cordon Bleu, etc. gave the distinction of upper class) (BTW Like my Louis Vitton banana LMAO!). But the truth remains that it is not known when stuffings were first used and were probably used by persons of all classes. The earliest documentary evidence is the Roman cookbook, Apicius' "De Re Coquinaria", which contains recipes for stuffed chicken, hare, pig, and dormouse. Most of the stuffings described consist of vegetables, herbs and spices, nuts, and spelt (a type of wheat/grain), and frequently contain chopped liver, brains, and other organ meat. In the Middle Ages, stuffing was known as farce (from the French); the root of the word 'forcemeat'. The term 'stuffing' is first attested in 1538. After about 1880, the term stuffing was replaced by dressing in Victorian English. But today, rest easy... we are not stuffing with any of those things. We are stuffing with our weekly ingredient! You could also top this with yesterday's curry sauce recipe as well! Anyway, here's to the banana! Eat & Enjoy!


Banana Stuffed Chicken

Ingredients:

4 Boneless skinless chicken breast halves
Salt and freshly ground black pepper
2 Small Bananas; peeled and halved
2 tablespoons Butter
2 tablespoons Minced garlic
1 tablespoon Minced shallots
1 Granny Smith apple; peeled and diced
1 tablespoon Curry powder
3 tablespoons Flour
2 1/2 cups Chicken broth
1/4 cup Flour for dredging
1 Egg, beaten (see note on next line)
2 tablespoons milk (beat with the egg)
1/2 cup Dry bread crumbs
2 tablespoons Vegetable oil
1/4 cup Light cream; optional
2 cups Cooked long grain rice
4 Cilantro sprigs for garnish

Directions:

Cut the chicken breast halves almost in half again and open them up like a book so you form a butterfly shape. Place a piece of plastic wrap over the chicken and, using a heavy skillet or mallet, pound them to even out their thickness and make them thin. Lightly salt and pepper each chicken breast. Enclose a piece of banana by folding up the ends and sides around the banana and rolling up the chicken. Wrap each stuffed chicken piece in plastic and refrigerate for an hour or more.

In a saucepan, heat the butter and sauté the garlic and shallots for a minute or until soft. Stirring with a wooden spoon, add the apple, curry powder and flour and cook for a minute. Slowly whisk in the chicken broth and simmer for 15 minutes. Season with salt and pepper to taste.

Preheat the oven to 450 F. Lightly dredge the chicken in the flour, beaten egg and bread crumbs, making sure each chicken piece is entirely coated with bread crumbs.

Heat the oil in an oven-proof skillet and sauté the chicken on all sides to brown. Transfer the skillet to the oven and bake, uncovered, for 15 minutes or until the chicken is just cooked through.

While the chicken is cooking, puree the sauce in a food processor or blender until smooth. Pass it through a sieve and transfer it to a small saucepan. Add the cream if you wish, and simmer, over low heat until hot. Season with salt and pepper to taste.

Mound some cooked rice in the middle of each plate. Slice the chicken into 3/4?inch slices and set the slices around the rice. Ladle the sauce around the chicken. Garnish each plate with a sprig of cilantro.

Ok folks, time for me to get the gang dressed and head on out of here to have a day of adventures with my mommy. LOL... I am so glad you stopped by today and hope that I will see you again tomorrow for more fun, food, and creative crafting! Be safe, have fun, and stay frugal baby! Until tomorrow... HUGS!

Thursday, August 12, 2010

CHAOS AND CRAZINESS

Hello everyone. How are you doing this crazy Thursday morning? Please excuse my tardiness as its been a crazy day in our house! Had to go on a rescue mission this morning and then of course kids and cats and all kinds of chaos. 'Tis my world, this land of commotion LOL!

Today I found some super spiffy frugal information for you about saving water. Why do I bring this to you? For the simple fact that I was staring at an outragous water bill in yesterday's mail and said OMG there has GOT to be a better way to save! So without further ado...

Frugal Tips to Water Conservation

There are lots of simple things you can do to cut your household water use. It all starts with awareness. If you know some of the ways people tend to waste water, you’ll be better positioned to conserve.

The bathroom

Here are some common ways in which people waste water – hot or cold – in the bathroom.

Leaving the tap running the whole time you brush your teeth. Try putting the plug in the bathroom sink while you do this, and notice how quickly the sink fills up. Shutting off the water until you’re ready to rinse can easily cut 2-3 gallons a day of water use per person.

Using hot water to brush your teeth. Some people don’t like having really cold tap water in their mouth during the final rinse. In cold climates or in water supply systems fed from the bottoms of lakes (such as parts of the Great Lakes Region in the US and Canada), the water supply can be pretty chilly for the cooler months, and sometimes even in the summer. Instead of running the hot water so you don’t have to rinse your mouth out in freezing cold water, always fill your bathroom water cup when you’re done brushing, so the water has time to warm up for the next time you brush.

Using a flush toilet as a waste disposal device. I’ve seen people who blow their nose with a tissue, then throw it in the toilet and flush it down. This is not a very good use of 2-5 gallons of water! Using a toilet as a waste disposal may be convenient but it’s extremely wasteful.

Using a regular toilet instead of a low-flush or dual-flush toilet. Decades ago, toilets typically had 5 gallon tanks. More than a decade ago standards in North America changed and 3 gallon (13 liter) tanks were the new standard. Recently manufacturers have come out with 1.5 gallon (6 liter) tanks, sometimes in response to tightened building code standards. And there are dual-flush toilets that can flush liquids and toilet tissue with as little as 1 liter or quart of water, while solids still take 4-6 liters (1 to 1.5 gallons). If you have an old toilet, you can replace it with a low-flush model, or simply install a conversion kit; see the resources section for details. Another free way to save water on your toilet is to avoid flushing it when it’s not strictly necessary. For example, in my house when the alarm clock goes on, everyone gets up and has their morning visit to the bathroom; only the last person flushes.

Leaving the shower running when you’re not in it. Sometimes you want the shower to warm up before you hop in. So you might turn on the shower, close the curtain or shower door, and work on some other grooming (brush your hair or teeth, shave…) while you wait for the shower water to heat up. Unfortunately people often lose track of the time, and a minute or more of hot water may wind up just pouring down the drain. One easy solution to this is a water-saving shower valve, which cuts the flow of water to a trickle as soon as the water reaches 95F or 35F. You hop into the shower and pull a cord or flip a lever, and the hot water comes out full force. This keeps the water hot for you without wasting much water while you’re doing other things in the bathroom.

Taking a really long shower. This is a favorite teenager move: drain the hot water tank right before Mom has her shower. There’s really no good reason to spend 10 or 15 or 20 minutes in the shower. A shower is said to use less water than a bath, but that’s not the case when you’re in there 20 minutes. I’ve heard some people say they keep their house cool to save on heating, and so they have to take a long hot shower to get warm. Don’t forget it takes a lot more energy to heat a liter of water than a liter of air – and when that hot water goes down the drain, the heat is basically lost!

If you’re serious about saving water in the bathroom, try putting the plug in your bathroom sink when you brush your teeth, just to see how much water one person’s tooth brushing takes. Or put a plug in the shower or bathtub when you shower, to see how much water a shower uses. Or try filling the toilet tank with a measuring cup, one cup at a time, and then track how many times the toilet gets flushed in a day. You might be surprised to see how much water you use.

The kitchen

You might think the biggest water waster in the kitchen is the dishwasher. In fact, modern dishwashers are far better at conserving water and energy than all but the most diligent, energy-conscious human dish washer. And the worst of us are extremely wasteful. Common practices that waste a lot of water are:

Not putting the plug in the sink when you do dishes – just running the water continuously. This typically requires you to add more dish soap to your scrub brush or sponge after every few dishes, because you keep washing the soap down the sink. Try putting the plug in the sink the next time you try to do dishes this way. You’ll discover the sink fills up pretty quickly – it might even overflow! You can almost always do an entire set of dishes with just a half sink of water, and remember, your dishwasher can do even better.

Prerinsing dishes that go in the dishwasher. Remember, modern dishwashers are designed to wash dirty, unrinsed dishes. There should be no need to prerinse. If you find that your dishes don’t come clean unless you prerinse, you either have a dishwasher that is 10+ years old, or there’s something malfunctioning. The pump may be weak, the filter may be blocked with leftovers (we found about 30 olive pits in ours a couple of years ago), or one of the connections to the rotating arms may be blocked or leaking. If you do have to prerinse, an easy way to do so without wasting water is to leave water in the sink after you wash the pots and pans or after rinsing produce, and just scrub the dishes in that water.

Using a sink waste disposal unit. It’s much better to compost your kitchen food scraps than to grind them up and send them down the drain. For one thing, it takes water to wash all that food down the sink. For another, you’re wasting a precious commodity that can be turned into great garden soil. Waste disposal units have been banned in some municipalities because they overload the sewage system and increase water usage.

Not using a faucet aerator. Most modern kitchen faucets come with an aerator installed in the end of the faucet, that draws air in and fills the water with tiny bubbles. These aerators save water by allowing a smaller amount of water to do the job of rinsing dishes or washing hands or fruits and vegetables. Aerators can get clogged up – especially if you have hard water – so if you find you’re not getting a good volume of air in your water, try unscrewing the end of the tap, removing the wire mesh aerator, and cleaning it out. Once you reassemble the faucet you’ll use far less water to wash and rinse.

The laundry

The top loading washing machine is one of the most water-wasting devices in your home. There have been front-loading washers for decades that use as little as a third the water of a typical top loader. But for some reason North Americans are still using top-loaders, and even still buying them. There are a number of very good reasons for switching to a front-loading washer:

* They use half to a third the water of a front loader
* They use half to a third the detergent of a front loader (and you don’t actually need to buy the “HE” detergent – just buy regular detergent and use a lot less)
* They adjust the volume of water based on how much laundry they detect in the drum. For a small load they use much less than for a large load.
* They are more gentle on your clothes, so your clothes last longer
* Their spin cycle is much faster than a top loader spin cycle. Your clothes come out with less water, so you use less energy in the dryer (if you use one), or the clothes take less time to dry on the line or drying rack.

The other ways in which people waste water on laundry are:

Washing clothes that aren’t actually dirty. You don’t have to throw things in the laundry just because you wore them for one day – especially pants and shirts, which will wear out sooner if you wash them too often.

Washing instead of putting away – using the laundry hamper as a way to avoid putting your clothes away. Kids are especially prone to this. My son would sooner throw his clothes in the laundry than fold them and put them in his dresser, because it’s less work for him. Make your kids do the laundry folding and they’ll be less prone to pull this trick.

Separating whites, lights, and colors. Most clothes are color-fast. Of course it pays to check individual garments when new, but chances are almost all your clothes can be washed together in cold water. If you currently do three loads of different colors, try splitting the brights between the darks and whites and cut back to two.

The first step to saving water

Once you understand the ways in which water is commonly wasted in North American homes, it becomes easier to identify where you yourself might be using more water than necessary, and to cut waste. Remember that keeping a weekly measure of your water usage, by writing down the reading on your water meter, will help you stay on task. When you know how much you’re using, you’ll be more conscious of waste, and more motivated to save. In some areas you’ll realize big financial savings by cutting back; in others, where water is still quite cheap, the savings may seem irrelevant from a financial point of view, but you’ll have the satisfaction of knowing you are helping conserve a precious natural resource.

Robin Green runs Green Energy Efficient Homes, a website dedicated to efficient use of natural resources, especially relating to household energy use. For some specific water saving tips see his articles on shower head valves, dual flush toilet kits, and energy saving washers.


Today in talking about the Christmas Challenge, I want to aim the craft ideas for today at us mom's with little kids and crafts you can do with them. For some odd reason, nobody I have ever met has ever had anything negative to say about a handmade gift from a child. What I don't get is why some adults change when it comes to gifts like this from other adults. But anyway, doing crafts with your kids is a great way to stimulate creativity, keep them occupied so they don't get "bored", and create wonderful memories. My mom did it with us, and I did/do it with my kids, and hopefully one day (a LONGGGG time from now LOL) my kids will do the same with their kids! So today's crafts are some cute and somewhat simple crafts for you and your kids.


Craft Stick Trinket Box

Materials
Glue
Some craft sticks
Trinkets or seasonal decorations to personalize the box with

This is how you make the craft stick trinket box

First take 2 craft sticks and set them about 3 inches apart. Then glue 10 sticks across them.

Now flip over the base and begin gluing on craft sticks for the walls, alternating between the sides. Continue this till the walls are as high as you like.

To make the removable lid, set 2 sticks alongside the last 2 wall sticks and add a line of glue along each one.

Now lay 10 craft sticks across them.

To personalize it, glue a small toy, a seasonal decoration or a trinket to the top.


Emoticon Magnets

Materials

A computer and a printer
Different colored markers
A pair of scissors
Clear and flat decorative gems
Some glue
A few small, round self-adhesive magnets

This is how you make the emoticon magnets

Create a variety of emoticons slightly smaller than the gems using a computer.
After taking a printout of the emoticons, use colored markers to decorate and color the faces.

Now cut out the faces, trimming them neatly into circles or ovals slightly smaller than the gems.

Glue each cutout to the back of the pebble glass and then fix a magnet to it.

Wrap up the gifts only after the glue dries completely.

Printed Memo Blocks

Materials

Some colored duct tape
A pair of scissors
A memo pad, memo filler sheets or scrap paper that has been cut into small squares
Foamies craft foam or ink stamps
Double-sided tape and plastic bottle caps
An inkpad

This is how you make the printed memo blocks

First cut a strip of duct tape measuring 2 inches longer that the height of the stack of papers you plan to use.

Then lay the tape sticky side up on the table.

Now grasp the stack and tap the sides against a flat surface. Then hold on its end and press one edge down onto the center of the tape.

Neatly wrap the tape ends over the top and the bottom of the stack, all the while pressing firmly down to bind the paper. If required, use more tape.

Once that is done, lift the top sheet of paper and cut the tape just above the second sheet so that the binding is level with the top of the pad.

Use an ink stamp or a fun shape cut out of foamies craft foam to print a design on the three untapped sides of the block. Use double tape to stick the craft foam to a bottle cap.


CD Coasters

Materials

A few CD’s (preferably plain gold or silver in color)
Some white cotton lace
Some glue

This is how you make CD coasters

Take the CD and spread some glue all along its periphery.

Next take one end of the lace and start sticking it onto the edge, making pleats all the while.

When you have finished doing that, cut the lace and your CD coaster is ready! (you can use any other material you like to personalize the coaster too)


Rudolph the Red-Nosed Reindeer Handprint

Materials

A pencil
Brown craft foam or card stock
A black marker
Red glitter glue
Some gold sequins
Glue
Googly eyes
A red pompom
A brown pipe cleaner
A few paper clips or clothespins

This is how you make a Rudolph the red-nosed reindeer handprint

First use a pencil to trace your child’s hand onto a piece of brown craft foam or card stock.

Then cut out the shape and add black marker hooves to the fingertips.

Now add red glitter glue collar using the gold sequins for bells. That done, glue on the googly eye and a red pompom for the nose. For the tail, use one cut out from brown craft foam or card stock.

Cut a brown pipe cleaner in half for the reindeer antlers. Curl the ends and bend each pipe cleaner in two. Glue the pipe cleaners together, holding them in place with a clothespin or a paper clip until the glue dries.

Using glue put the antlers in place on the reindeer.

Today for thirsty Thursday, we are doing drinks. DRINKS? Yes I said drinks! LOL There are quite a few interesting jalapeno drinks out there and I am gonna bring you a few today to wet your whistle. The last one is kinda complicated for those of you who may engage in the habit of home brewing. Jalapenos are known for providing that ‘kick’ in food. The ‘kick’ comes from the seeds and the rib of the skin so many people remove both these parts if they want just the flavour and not the heat!! The heat or spice comes from a group of 5 chemicals that are called Capsaicinoids. Each chemical in the family has a slightly different affect. The hottest one out of the five is the capsaicin which produces the fire sensation or burning in the mouth.

Capsaicin has no taste or smell and is produced by the glands in the placenta of the jalapeno which is located at the top of the pepper just below the stem. It is interesting that the placenta creates sixteen times more heat than the rest of the pepper. Despite the heat, jalapenos are extremely popular, probably due to their versatility. They can be added to almost anything and everything from soups to drinks to pasta to meats. They are most often eaten with nachos, potato chips, hot sauce, lemonade, vodka and many people actually make cookies, bagels and jams out of them.

It is interesting that the word for Chili in the Mexican Indian language is Nahuatl which actually means chilli In terms of variety, it is Mexico that produces the largest variety of chilli peppers in the region of about 140. Many people make the mistake of drinking water when they find the pepper too hot. This actually exacerbates the problem further as the capsaicin is not soluble in water, hence it encourages the water to spread around the mouth and therefore, spread the heat. The best solution for eradicating the burning sensation in the mouth, is to take a little sugar or milk.

Nutritional Values of a Jalapeno Pepper

Serving size 1 pepper (45g)
Calories 20
Total Fat 0g
Sodium 10mg
Total Carbohydrate 3g
Dietary Fiber 0g
Protein 1g

The Jalapeno pepper is also low in fat (actually there is none in it!!) as well as in Carbs and Protein. Therefore it is suitable for people on all the different diets that exist in the market, be it Low Fat or Low Carb!!

Interesting Facts

The following is a hotness ranking of peppers from mild to hottest.

El Paso (Very mild)
Anaheim
Jalapeno
Hidalgo
Serrano
Cayenne
Tabasco
Red Chile
Chiltecpin
Tabiche
Bahamian
Kumataka
Habanero (30 to 50 times hotter than a jalapeno)


Watermelon Jalapeno Caipirinha

Here’s a spicy drink you’re sure to love. Caipirinha is the national drink of Brazil. Get a taste of South America with this wonderful jalapeno drink.

Ingredients

2 small jalapeno peppers, sliced into spears
2 ounces Leblon Cachaca
1 ounce lime juice
Dash of simple syrup
1 cup chopped watermelon
1 stem of cilantro
Cooking Directions
Mix 1 jalapeno pepper, cilantro, watermelon and simple syrup.
Shake hard with Leblon and remaining ingredients.
Strain over ice into a highball glass.
Garnish with a stem of cilantro, jalapeno spears, and two watermelon balls.


Jalapeno Passion Margarita

Ingredients
1 ounce jalapeño syrup (see below)
2 ounces tequila
1 ounce passion fruit juice
1 ounce fresh lime juice
Sugar and salt the rim of a cocktail glass.

Directions
Combine all ingredients in a shaker with ice.
Shake and strain into your favorite glass.
Garnish with lime.

Jalapeno Syrup

You'll need 1 jalapeno pepper, diced, 1/4 cup suger, and 1/4 cup water.
In a small pan, combine the jalapenos, sugar, and water. Boil, then reduce heat. Stir until the sugar dissolves. Strain the syrup.
Only 186 calories

Here's a nice, spicy drink! Enjoy a cocktail with some jalapeno kick. You can't go wrong with jalapeno peppers. Ever.


Jalapeno Beer: Jalapeno Wheat 50
Shout out to Ted on Facebook for this recipe! Thanks, Ted!

Ingredients/Brewing Instructions
9 pounds Monton DME Wheat Extract (3 – 3lb. bags)
4.5 oz. Malto-Dextrin
2 oz. Hallertau Mittlefrueh hop pellets 2.8% AA/oz. (any low alpha hops will do or use less hops for higher alpha hops)
Bring 6 gallons of filtered water to a boil, add all of above. Boil for 45 minutes, then add:
1 tsp. Irish Moss
Continue boiling for 10 minutes, then add:
50 split jalapenos (or any amount, at least 20)
Continue boiling for final 5 minutes, then turn off heat and let sit for additional 5 minutes.
Chill to about 70F.
Stir vigorously and then pour into plastic fermentor bucket, get the peppers in the fermentor too.
Pour into bucket to provide additional aeration.
Pitch a tube of Wyeast 1056 American ale yeast. Set up blow off tube.
O.G. 1.070
F.G. 1.016
Yield 1 quart and approx 42 bottles various sizes

Ok kids, I am gonna get off here and find something to do. I have tons of things I NEED to do and even more that I WANT to do but I just don't have any idea on what to do LOL! Maybe I will get inspired on one specific path if I just stand there for a bit. Either way, DN goes home tonight so I think we should maybe play with him today too. Oh so many choices LOL. Either way, I wish you well and safety wherever life takes you today and I will see you back here tomorrow. HUGS!


Sunday, August 8, 2010

HAPPY 250TH POST

Good morning everyone! How are you doing this crazy Sunday? I am really good today. The super sewing bug has bit and life is infectious right now... a good infection to have! I want to say HAPPY 250th! Yes folks, this is my 250th blog entry and let me tell you that I have had the best time and so much fun with you all! Thank you for a wonderful trip so far and I hope you will continue to stay with me until I am old and gray... oh poo, I am already partly gray LMAO! How about until I can blog no more LMAO! Yesterday was quite an eventful day and I have so much to fill you in on! So grab your cup of coffee, and sit back and let's dish some dirt, shall we?

We started the day off on a good note... the landlord called and said he was on the way with a new stove! YAY! Only took him 3 months LOL. So he gets here and then there is the bad news. He did not strap the stove down and on the way home, the stove fell and broke off 2 of the burner knobs. So now do I take another broken stove... hmmm. I can have a stove with just 2 working burners (and one of those on the fritz) or a stove with 2 working burners AND an oven to bake and cook. GEE... care to guess what I did?? Yep I can BAKE NOW! YAY! So I made pizzas for lunch and sausage and stuff for dinner! OMG was it wonderful!!!! LMAO... I am gonna see if I can get new knobs for the other 2 burners and if so, just fix those and have a completely functioning stove again!


Then I decided to go boogy and I took the family for a trip to JoAnn's cause they had some sales and guess who had a coupon! YEP... ME! Plus I needed some velcro. I found the perfect fabric for one of my gifts I want to do and then some of the cutest monkey fabric for the DN to make a stocking and a Boppy pillow cover. Of course, I was super annoyed to see they had the pillow already made at JoAnn's and I could've used a coupon AND the bag had a pattern on the back, but oh well... it was still cheaper to make mine!

After JoAnn's, we went to Wal-Mart (yes AGAIN LOL) to get some more alfalfa cause I was out for the rabbit, baby juice, and a few other things. Well when we pulled into the parking lot, I saw local police had "jimmied" a lock open on a car. Parked next to the police was Animal Control! Someone had left a dog in the scorching heat in the car with the windows up. I guess someone walking by saw this and called. The A.C. took the dog and the Police waited for the people to come out with tickets, metal bracelets, etc. Score one for the helpless little animals! YAY! I told the A.C. officer thank you for helping, etc. She was very nice. Serves those people right! You don't do that to little animals... you might as well lock up a KID in the heat!

Ok, so they had samples out yesterday, so we walked around Wal-Mart shopping and trying all kinds of things and filling up on bits and bites LOL. However, I did walk out buying one of the items I tried. It had a good flavor and thought it would make a good thing to have in the freezer in the event I was too tired or in too much pain to cook. They were Lean Cuisine steamer bags. Individual portion steamer microwave bags. I thought these would be great for the DD for like after a Football game or late night band practice. Well last night, I got hungry late, so I heated it up and was severely dissapointed... so much that I will be writing them and letting them know. The portion in the bag was NOT a full size adult portion in my opinion and it was mainly asparagus stalk as a veggie instead of the carrots and broccoli they picture as well... I got maybe 1 or 2 pieces of each! I can make a much better and BIGGER pot of something similiar at home and freeze it in normal human portions! LOL.


SO do you see this baby Monkey stocking? Tell me that's not the cutest thing in the whole entire world! Its a cool powder blue with baby monkeys, bars of soap, rubber duckies, etc. I wouldn't mind going back and getting more of this fabric to do more baby things with as it was just too cute! I also made a boppy case out of it (had some technical difficulties with it, so it doesn't quite fit like I would like) and I decorated some bright blue "burp towels" with it too! I have maybe a foot or so left, so I am not sure what else to make but I am sure I will figure out something LOL!


Ok, so yesterday I talked about the Ronald McDonald Challenge of the crayon totes and such. Mom asked to be a little more specific about what was needed, etc. So let me break this down for you. Total cost to fill all 30 crayon totes will be roughly about $105 plus tax (which I always take care of) IF I can get all the supplies bought while the school supplies are on sale at places like Wal-mart, where crayons right now are 25 cents per box! The markers and the map pencils are $1 each. Spiral Notebooks of lined paper are 15 cents and coloring books are $1 each. So example... $7.50 will buy all the boxes of crayons we need for the tote bags. If my readers want to mail actual items like coloring books, etc. that would be great. Or they can make a monetary donation via paypal or postal mail and I will go get the items locally. I think that would be best for things that might have the potential to be destroyed in the heat... like crayons, markers, etc. Can't really use melted crayons ya know. If you need more info, shoot me an email and lets talk. I would love to see my readers become a part of something great... like giving a seriously needed smile and a whole lot of hope to a little kids' life! I have also decided I am going to make some burp clothes for the little babies in the McDonalds fabric for the parents too... provided I have enough material left. But that is not priority like the bags are.

Now let's talk more about crafts. Are you enjoying the things I am bringing to you? I try to get a wide variety of crafts for you because I know that not everybody can sew, or crochet, or cross stitch, etc. I try to cover crafts for every age range, gender, etc. I even try to bring pet crafts, because I know, if you are like me and mom, your pets are just like your children too! Today I caught myself thinking about my mom's little crocheted animals and people and thought of all the cool ones she has. Then I thought about the holidays. Mom... I know you are reading this and you need some holiday creatures... I mean characters LMAO... so today I have brought you one for Christmas... SANTA CLAUS! I want to share this with all the knitters and crochet crafters out there! These would be cool toys as gifts or even donations to your local children's hospitals or other organizations. Have fun!


Craft Idea of the Day: Santa Shelf Sitter

Materials:

8ply/DK/(USA - WW/4ply) Courtelle, allow 25grms(1 oz) of Red and oddments of flesh, white and black.
No.11 (3mm)(USA2) knitting needle
Toy stuffing

Directions:

This is a knitting pattern for a Santa Shelf Sitter.

Tension & Size:

Worked at a tension of 26 stitches and 36 rows to 10 x 10cm over stocking stitch, using No.11(3mm) needles throughout.

Height: From base to top of hat 17.5cms (6.5/8") not including legs.
Head: 17cms (6.5/8") around centre;
Waist: 21cms (8.1/4") around centre

Abbreviations:
K, knit;
p, purl;
st(sts), stitch, stitches;
sl, slip;
tog, together;
inc, increase (by working twice into same st);
dec, decrease (by taking 2 sts tog);
ss, stocking stitch (k on right side and p on wrong side);
psso, pass slipped stitch over;
skpo, (slip1, knit1, pass slipped stitch over);
ytb, yarn to back of work;
NR: next row;

Coloured marker:

Use a small length of yarn that is a different colour to the yarn you are using at the moment; Cast off: bind off.

PLEASE NOTE: Sew up all seams in back stitch and stuff Santa firmly unless stated otherwise.

BODY: (make 1 piece) Starting at base edge and using red yarn, cast on 40sts. Placing a coloured marker in 18th and 23rd sts in the first row, ss8 rows. Break off red and join in black yarn and ss4 rows. Break off black and join in red yarn and ss10 rows.

Shape for shoulders: K4, (k2tog) six times, k8, (k2tog) six times, k4 (28sts). NR: P4, (p2tog) three times, p8, (p2tog) three times, P4 (22sts). Ss2 rows. Cast off all sts.

HEAD: (make 1 piece) Using flesh yarn and starting at neck edge, cast on 22sts and ss2 rows. NR: K2, inc, in each st to last two sts, k2 (40sts). Ss17 rows.

Shape for top of head:
1st dec, row: (K3, k2tog) to end of row (32sts). Purl every alternate row.
2nd dec, row: (K2, k2tog) to end of row (24sts).
3rd dec, row: (K1, k2tog) to end of row (16sts).
4th dec, row: (K2tog) to end of row (8sts).

Leaving a long end, break off yarn and thread through sts and put aside.

BASE: (make 1 piece) Using red yarn, cast on 18sts and ss12 rows. Cast off all sts.

ARMS: (make 2 pieces) Using red yarn and starting at top of sleeve cast on 12sts and ss7 rows.

NR: Inc, one st each end of row (14sts). Ss8 rows. Break off red and join in white yarn and knit four rows.

Break off white and join in flesh yarn and ss4 rows. NR: K1, (k1, k2tog) to last st, k1 (10sts). NR: P. NR: K2tog, to end of row (5sts). Break off yarn and thread through sts and put aside.

LEGS: (make 2 pieces) Using black yarn and starting at the foot, cast on 12sts and purl one row. NR: K1, (inc) in next 10sts, k1 (22sts).

Starting with a purl row, ss7 rows. NR: K5, (k2tog) six times, K5 (16sts). NR: P. NR: K5, (k2tog) three times, K5 (13sts). Ss6 rows.
Knit 3 rows.

Break off black and join in red yarn and starting with a knit row, ss20 rows. Cast off all sts.

HAT: (make 1 piece) Using white yarn, cast on 42sts and knit 10 rows. Break off white and join in red yarn and ss10 rows. 1st dec row: K1, (k3,k2tog) to last st, k1 (34sts). NR:P. 2nd dec row: K1, (k2,k2tog) to last st, k1 (26sts). NR:P. 3rd dec row: K1, (k1,k2tog) to last st, k1 (18sts). NR:P. 4th dec row: K1, (k2tog) to last st, k1 (10sts). 5th dec row: (P2tog) to end of row (5sts).

Bobble:
Break off red and join in white yarn and knit one row. NR: (Inc) in every st knitwise (10sts). Knit 7 rows. Leaving a long end, break off yarn and thread through sts, and set piece aside.

COLLAR:
(make 1 piece) Using red yarn, cast on 31sts and knit 3 rows. NR: (k1, inc) to last st, k1 (46sts). Knit 6 rows and cast off all sts knitwise.

BEARD: (make 1 piece) Using white yarn, cast on 20sts and knit 4 rows. Dec 1st each end of row until 2sts remain. K2tog, thread yarn through sts and pull up tightly and sew in.

MOUSTACHE: (make 1 piece) Using white yarn, cast on 9sts and knit one row. Cast off all sts.

MAKING UP:

Legs: Sew row ends together. Sew foot seams together. Turn leg to right side. Stuff foot firmly, stuff boot lightly and leave rest of leg empty.
Body: Sew row ends together. Turn so that right side of work is facing you. Pin the legs to base either side of markers, leaving a 4st gap in the middle and the front of legs facing the body.

Boots should be facing the neck line with the back seam of legs now facing outwards. (See photo 2 for placement)

Pin cast on edge of base to legs with one st overhanging each side of legs. Turn body and legs to wrong side and continue to pin base to cast on edge of body. Sew base to body. Turn body right side out and stuff firmly (see measurements for correct waist size).

Head:
Pull up sts tightly and sew row ends together. Stuff head (see measurements for correct size) and attach to body at neck opening.

Arms:
Pull stitches up tightly and sew side seams together. Stuff hands and 2cms(1") of arm, leaving the rest of arm empty. Fold arm so that side seam is in the centre and facing body. Sew arm to body on first row of shoulder decreasing through the first cast on row of arm.

Collar:
Place the collar on neck and attach the row ends of cast on edges together with a couple of overstitches. Lift the collar up towards the face and attach collar to neck with a row of sts through the first row of cast on edge of collar. Pull the collar down.

Hat:
Sew row ends together. Turn piece to right side and stuff bobble. Pull up sts tightly and sew in ends. Place hat on head (see photo 1 for placement) and attach hat to head by working a row of sts through the 10th row from cast on edge of the white band. Turn Band up.

Facial features:

Eyes: Leaving a gap of 3sts between eyes and using black yarn work a daisy st in one st and work a second daisy st around the first st.

Nose: Using red yarn, work the same as eyes.

Beard: Sew beard to face through the cast on row, attaching ends of beard to hat.

Moustache: Sew to the centre of beard and through the centre sts of moustache, leaving the 4 sts either side loose.

Buckle: Using black yarn, work a square of chain sts, 5sts wide and 6 rows deep.

This pattern is Copyright (c) Jean Woods 2001, all rights reserved. This pattern may be printed for your personal use only and not copied or resold without the permission of the author. This copyright notice must be kept intact.

Now let's talk about food! Its the last day here on WACKY WATERMELON WEEK and today we are cooking outdoors! Let's get the coals fired up (or for those of you who have to do it inside... your pans and plates) and let's get grilling!! I have had so much fun bringing you new and different ideas for this summer favorite! I hope the wide variety of ideas has inspired you to try something unique this week. So for today... Eat & Enjoy!


Maple Citrus Watermelon Glazed Chicken

Watermelon Glaze

Ingredients:

2 cups watermelon puree
Juice from 3 fresh lemons
1 tablespoon lemon zest
½ cup maple syrup
1/2 teaspoon cinnamon

Instructions:

Simmer ingredients together in a heavy saucepan for 20 minutes or until sauce is thick

Servings: Makes 2 cups. Keep warm.

Chicken

Ingredients:

Skinless boneless chicken breast splits
2 cups pineapple juice
½ cup soy sauce
1 tablespoon minced fresh ginger
3 cloves minced fresh garlic

Instructions:

Place the chicken in a large zipper lock bag with rest of the ingredients and seal tightly. Allow to marinate at least 2 hours or up to 12. Grill until cooked and arrange on a warm platter. Pour the glaze over the chicken and serve immediately.
Servings: Serves 8.


Grilled Scallop and Watermelon Kebabs

12 sea scallops
4 cups boiling vegetable or chicken broth
24 1" x 1" watermelon cubes
¼ cup soy sauce
1 tablespoon sesame oil
1 tablespoon minced garlic
1 tablespoon fresh minced ginger

Cut the scallops into halves across the diameter to create half-moon shapes. Place them in a heatproof casserole dish in a single layer. Pour the boiling clear broth over the scallops and let them poach for 5 minutes. Drain and cool the scallops. On each skewer alternate 1 half-moon scallop, then 2 watermelon cubes, then another half-moon scallop. Mix together the soy sauce, sesame oil, garlic and ginger and brush the kebabs as they are grilled over a medium hot grill for about 90 seconds per side turning once. Serve warm. Serves 12 as an appetizer.


Grilled Shrimp Skewers with Watermelon Lemongrass Glaze

Ingredients

2 tablespoons vegetable oil
4 cloves garlic, minced
1 tablespoon minced fresh ginger or 1 teaspoon ginger powder
2 tablespoons minced fresh lemongrass or 1 teaspoon dry shredded
1/4 cup extra dry vermouth
2 teaspoons soy sauce or to taste
1 cup watermelon puree
1/2 cup sugar
2 lbs. skewered grilled shrimp

Instructions:

Make the glaze by heating the oil in a 2- or 3-quart saucepan over medium high heat and in it sauté the garlic, ginger and lemongrass for a few minutes. Reduce heat to low and stir in the remaining ingredients. Divide the mixture in two, setting aside one half for serving as glaze/drizzle. Use the other half for basting or marinating the raw shrimp. Note: do not mix liquid from the two halves to avoid contaminating the glaze/drizzle.


Grilled Spicy Watermelon

Transform watermelon from sweet to savoury with this mouth watering Thai-inspired sauce. Watermelon wedges are grilled until caramelized, drizzled with garlic chili sauce and garnished with cilantro. Serve as a side dish along with ribs, chicken or shrimp.

1 tbsp Lime Zest
1/4 cup Lime Juice
1/4 cup honey, divided
2 tsp. Garlic Chili Sauce
pinch of salt
1 medium watermelon
1 Tbsp. fresh chopped cilantro

Preheat grill to high. In bowl, whisk together, lime zest, juice, 3 tbsp (45 mL) of the honey, garlic chili sauce and salt.

Cut watermelon into 1-inch (2.5 cm) thick wedges. Lightly drizzle each side with remaining honey and place on grill. Grill until just browned, about 2 minutes per side. Place watermelon slices on a plate and drizzle with lime dressing. Garnish with cilantro.

Makes 8 to10 servings.
Tip: Garlic chili sauce makes a great marinade for ribs, chicken and shrimp.

Well folks, thats everything to wrap up an incredible week. I hope you have had a blast and will come back tomorrow to start another amazing week! I think the DN and I are gonna go bake something yummy LOL! See you tomorrow! HUGS!

Saturday, August 7, 2010

WE HAVE BOPPY!!

Good Saturday morning everyone! How are you this bright and sunny day? I am good... woke up feeling like a pretzel LOL but good. Had a busy busy day yesterday, but it was fun. So come on in, grab your java, and have a seat so we can chat a while, eh?

Well yesterday started out with Band as normal... dropped her off for practice and then pictures. They release early after pictures, so I waited for the call to pick her up. Then my DN (nephew) was dropped off and we started our day! We ate, played, and had fun. Aunt Nay sewed a bit during the morning nap. Let me show you a couple of things I snapped a picture of from the last few days I haven't shown you.


This first thing is that Boppy Pillow I told you I was going to try to make. Its just the pillow, no case yet, but isn't it cute! It seems a little smaller than the one they have for the DN but I think its spiffy! The material is a stiff blue material that looks like denim but isn't. Its a pretty shade of blue though. I cut the pattern and sewed the 2 sides together and stuffed it up firm but flexible. Now they said on the site I found not to make it too firm, but my pillow will be used strictly for aiding DN in sitting while he eats, etc. so I think its ok! And I would know... I'm a mom, right? LOL!


The second thing I made is an extra large diaper changing pad. Now... this is kinda funny LOL. A multitude of things brought this on... the fact DN is a "boogie baby" going everywhere with us, those filthy diaper chaging stations you see in the restrooms out in public, and my mother and her germophobeness LOL! I made this extra large so that DN is completely covered when I put him on one of those stations... not just his back and butt, but ALL of him- I'm talkin' head, arms, legs, etc! It's double sided, so I can put either side I want out. One side is a pretty yellow snuggle fabric with baby stuff printed all over it, and the other side is more of that denim looking fabric like the pillow! Velcro closure and a batting lining makes this thing 100% machine washable as well! So you ALWAYS know its sanitary! Pretty cool I think!


Then I couldn't remember if I showed you the stocking with the music stuff on it, so just in case... here it is! Its a beautiful fabric of white with black music note staff and notes all over it as well as red ribbons and pine cones, etc. Very Christmas-y looking and I made the inside lining with red fleece. (I will work on getting a better picture soon!) I think its a beautiful fabric actually and I hope the recipient likes it! I have a purse I made for the holidays out of this fabric too. Its awesome and I will have a bittersweet moment when all the fabric is used LOL! I'm not sure if the fabric has been discontinued... might have to check on that if I can remember where I got it LOL!


Sew... there ya go LOL. A few things I have been working on. I have to take pictures of all of the rest of stuff still after I clear out my phone LOL. now as for today's craft, well I think I am gonna work on some things for some of the "band kids" that are like family. I'm not sure yet. I may work on some crayon wraps for the Ronald Mc Donald donation... ah thought I forgot about that huh? LOL nope! Oh BTW people... I have figured it out. We are gonna need 30 bags, as our local Ronald McDonald House houses 30 families at any 1 given time. So I figure 30 bags, stocked with crayons, etc.Seeing as I have most of the fabrics, etc, this will be rather inexpensive to do. I just need the filling for each bag. That's where you can help! I have looked and right now with the school supplies on sale, it will cost me about $3.50 to fill each bag! That's crayons and pencils or washable markers, paper, etc! I am looking for some kind souls to help me out here. Your name will go on a tag attached to each donation unless you choose to be "anonymous". Sadly, after school starts the prices will skyrocket, so I am trying to get it all now. Just think, for the price of one trip to Starbucks, or a pack of cigarettes, or even that one can of afterwork beer, you can bring hours of fun and smiles to a young person's face who 99% of the time doesn't even own a smile because of the pain that they go through everyday battling their illnesses. Don't they deserve just a little bit of happiness and time where they can forget they are even sick and just be a kid? So if you want to help, please make a donation via the paypal button or email me with other ways to help. Thank you...

Now, let's talk about sewing some more happiness shall we? Like I said, I'm not quite sure what I want to accomplish but I'm sure as I sit and stitch, I'll figure it out LOL. I thought of some scented sachets for dresser drawers, closets, etc. and think that those would be a cute idea for today. Sachets are fabric bags that are filled with potpourri and tied off with ribbons. They can be placed in clothing drawers, hung in closets or given as gifts. Fill them with potpourri you buy at the store or potpourri that you make yourself.


Craft Idea of the Day: Scented Fabric Sachets

Materials:

Narrow Ribbons
Fabric Chalks
Fabric-marking Pens
Fabrics
Ironing Boards
Irons
Potpourri
Sewing Machine
Threads
Decorative Charms
Scissors
Scissors
Heavy Paper Or Cardboard
Ruler Or Yardsticks

Directions:

Step 1: Decide what size your sachet will be and what fabric you will use.

Step 2: Choose a ribbon that coordinates with the fabric. A ribbon that is 1/4 inch wide or narrower works best. You'll need approximately 1/4 yard of ribbon for each sachet.

Step 3: Make or purchase potpourri. Many different blends are readily available. Choose your favorite.

Step 4: Use a yardstick or ruler to measure out a strip of fabric 10 1/2 inches by 3 1/4 inches. Cut out the strip.

Step 5: Fold in the raw short edges, toward the wrong side of the fabric, approximately 1/4 inch.

Step 6: Iron to hold the edges in place. Use a sewing machine to stitch turned-under edges into place. Repeat, turning the short edges in 1/4 inch more.

Step 7: Fold the fabric strip in half, right sides together. Stitch a seam on each side of the bag, 1/4 inch from the raw edges.

Step 8: Turn the bag right side out and fill it one-half to three-quarters full with potpourri.

Step 9: Tie the bag closed with ribbon. Avoid knotting the ribbon. These bags are made to be opened and refilled when necessary.

Now for today's edition of WACKY WATERMELON WEEK I wanted to find something with a little asian persuasion! And boy did I! I figure since a large amount of watermelons are produced in Asia, that there were bound to be some interesting cultural recipes. I love Asian foods and that motivated me to find something I thought would be FOOD-nomial LOL! So I hope you are pleased with these choices I brought you today... Eat & Enjoy!


Kung Pao Watermelon Shrimp

2 tablespoons peanut oil
6 garlic cloves, sliced
2 pounds large shrimp, peeled and cleaned
1 cup dry roasted and salted peanuts
1 cup prepared Kung Pao sauce
2 cups chopped watermelon

Heat the oil in a large heavy sauté pan or wok over high heat . Sauté the garlic for 30 seconds and then add the shrimp. Stir-fry until the shrimp begin to cook and plump up. Add the peanuts and sauté another 30 seconds. Reduce heat to low and add the sauce. Simmer just until shrimp are cooked. Remove from heat. Stir in watermelon and serve immediately. Serves 6.


General Tsao Watermelon
Recipe By: Joseph K. Poon for the National Watermelon Promotion Board
Serving Size: 2

8 ozs watermelon -- sliced
1 cup cornstarch

BATTER
1 cup flour All purpose
1/2 cup cornstarch
1/2 tsp salt
1/2 tsp baking soda
1/2 tsp white vinegar
1/2 tsp vegetable oil
1/2 cup water to adjust thickness

SAUCE
1 tbsp soybean oil
1/2 cup white vinegar
1/2 cup Sugar
1/2 cup chicken broth
1/2 cup mushroom soy sauce
1/2 cup Sherry or chardonnay
1 tsp garlic -- minced
1 tsp ginger -- minced
1 tsp hot sauce
cornstarch in water to adjust thickness

1. Dust the sliced watermelon in the cornstarch before dipping into the batter.
2. Deep fry the watermelon until golden brown.
3. Set to the side to cool, then deep fry it again to crisp up.
To make sauce:
1. Heat soybean oil in a hot wok, and add garlic, ginger and hot sauce.
2. Stir for a couple of seconds.
3. Add one cup of the general Tsao sauce to boil, add dissolved cornstarch to thicken sauce. Put the golden watermelon in and coat with the sauce. Serve

Note: After you make the batter, let the batter rest for at least 20 minutes before frying. The end result will have a far better texture.

Well that's all for me today folks. I have to get off here and get ready for my landlord to supposedly FINALLY bring me a new stove! 3 months in the waiting! It's about time! Then I am gonna find some projects to work on and maybe somewhere to take the kids to boogie today LOL. Thanks for joining me this morning and I will see you again tomorrow for more fun and excitement on The Frugal Mom. Until then... HUGS!

Thursday, August 5, 2010

THIRSTY THURSDAY

Good morning guys and dolls! How are you doing this bright and sunny day? I am good really. Got the band thing rockin' and my little dude here visiting with me, so everything is cool as a watermelon! LOL! Speaking of watermelons, to answer your question... the orange watermelon has been said to grow in the following regions:

Miami, Florida
Augusta, Georgia
Alexandria, Indiana
Wells, Maine
Austin, Texas
Mckinney, Texas
Riverton, Utah
Troy, Virginia
Kennewick, Washington

I have seen this breed of watermelon down here... I want to say at Farmer's Markets and a couple of grocery stores, so just watch for them. I have heard the larger they are, the sweeter they are too.

Ok as a mom, I saw an article and wanted to bring it to the attention of all the other mom's out there. Its about our kids and what we may feed them when we go out. After reading this article, it's quite disturbing actually to me that while the government is trying to make the meals at school better for the problem of our "obese kids", they have absolutely NO regulations about what they eat at restaurants... read this.

The Worst Kids' Meals in America
By David Zinczenko

My friend Karen came to me a couple of weeks ago worried about her two kids. She's a single mom who works long hours and usually feels too tired to cook when she gets home at night. So she and the kids end up eating fast-food dinners from whatever restaurant they happen to pass on the way home from soccer practice. Now, Karen's no dope—she knows that a fast food diet is often a fast way to poor health. She also loves her kids, and wants them to stay fit and active. So she came to me, pleading: "What can I do to make sure they're eating well, even when I can't cook for them myself?"

Karen's right to be concerned. Childhood obesity rates in America have tripled since 1980: today, 20 percent of children between the ages of 6 and 19 are obese. What's more, a disturbing 70 percent of overweight adolescents end up that way as adults. And since obesity increases your odds of heart attack, stroke, and early death, consider the impact of an entire generation of overweight children on our country's health care system—and our families.

It's a chilling thought. But here's the thing: I told Karen that restaurant food every now and then is perfectly fine. She just needs the nutrition information and recommendations that Eat This, Not That! provides on all of America's popular fast-food and sit-down restaurants. This way she can choose the smart options--and stay away from the worst restaurant kids meals--while eating her favorites foods and losing weight. Below are five of the unhealthiest kids' meals in America--and the healthier (and equally tasty) alternatives that they should choose instead. And remember: Teaching your kids healthy eating habits is only half the equation--passing on healthy fitness habits is just as important. (So this list of The World's Fastest and Easiest Exercise Tips will help keep them, and you, fit and lean for life!)

#5: A BIG 'NOT THAT!' at OLIVE GARDEN!
Olive Garden Fettuccine Alfredo meal
800 calories
48 g fat (30 g saturated)
810 mg sodium
SATURATED FAT EQUIVALENT: 1.5 full jars of Nutella!

I don’t know who this guy Alfredo is, but I’d like to give him a piece of my mind. This sauce is made with oil, butter, cream, and cheese. It’s always going to be rich, but the saturated fat here is just out of control. The American Heart Association recommends that we don't consume more than 7 percent of our total calories from saturated fat, but this sauce has four times that. It’s true that most kids don’t have to worry about heart attacks, but they do have to worry about obesity. About a third of the calories on this plate are from saturated fat. Another third come from carbohydrates. That leaves very little room for anything even remotely nutritionally redeeming.

Eat This Instead!
Cheese Ravioli
300 calories
8 g fat (4 g saturated)
440 mg sodium

This meal still provides the rich flavor of cheese, but it serves it in a reasonable portion size. The secret here, and you should always look for this when you’re eating Italian, is that it’s served in a low-fat, highly nutritious tomato-based sauce. Try to steer your child away from anything made in a white sauce.
Bonus tip: Something else to keep in mind: One way to cut hundreds of calories from your kids' diets is to watch the sugary drinks. Start with the beverages on this list of The Absolutely Worst Drinks in America. (Some of them have more than a day's worth of calories, fat and sugar!)

#4: A BIG 'NOT THAT!' at APPLEBEES!
Applebee’s Grilled Cheese with French fries
1,020 calories
54 g fat (17 g saturated)
2,170 mg sodium

CALORIE EQUIVALENT: 400 Cheddar Goldfish Crackers (that’s 1.3 full bags!)
Here’s the crazy part: You can make a grilled cheese sandwich in your own house—using real cheese and toasting it with real butter—and still manage to slide in at about 300 calories. This one has 620 calories, and the fries account for another 400.

Eat This Instead!
Hot Dog with Applesauce
300 calories
13 g fat (4 g saturated)
860 mg sodium

A hot dog is no nutritional ideal, but as long as it’s not a big stadium brat, it does have the advantage of being relatively low in calories. And kids love them. Swap out the fries for something truly nutritious, like vegetables or applesauce.
Bonus tip: Want to know how many calories you should be eating in a given day? Multiply your ideal body weight by 11. For more of the latest nutrition and health secrets to help you live better right away, follow me here on Twitter.

#3: A BIG 'NOT THAT!' at OUTBACK STEAKHOUSE!
Outback Steakhouse Kookaburra Chicken Fingers meal with Aussie Fries
1,030 calories
60 g fat (21 g saturated)
2,052 mg sodium
FAT EQUIVALENT: 12 Frosted Chocolate Fudge Pop-Tarts!

Beige food? Never a good choice. If this is what they’re eating down under, we’re better off staying up here. And here’s something else we don’t talk about enough with kids’ foods: sodium. This meal has almost as much as your child should eat in an entire day. That’s dangerous for two reasons: 1) It puts a strain on a child’s cardiovascular system; and 2) It reinforces a taste preference for sodium-loaded foods, so they’ll have a hard time ever breaking free from the salt shaker.
Bonus tip: For more examples of sodium-stuffed foods to avoid, check out this truly horrifying list of the 30 Saltiest Foods in America!

Eat This Instead!
Joey Sirloin with Fresh Seasonal Veggies
435 calories
28.5 g fat (15 g saturated)
631 mg sodium

If we can get kids eating real food earlier in life, they’ll be primed for staying fit and healthy well into old age. Despite what some people might think about eating red meat, sirloin steak is immensely nutritious. It’s lean, loaded with protein, and rich in vitamins and minerals.

#2: A BIG 'NOT THAT!' at DENNY'S!
Denny’s Slap Shot Sliders (2) meal with Finish Line Fries
1,070 calories
53 g fat (16 g saturated, 2 g trans)
1,180 mg sodium
CALORIE EQUIVALENT: 505 Jujubes (that’s just over 2 full boxes!)

This meal is an assault to children’s health and the world of sports. It uses sports terminology to sell food that turns kids into little sumo wrestlers. Again, there’s more than 1,000 calories in this meal. A 10-year-old kid should be eating only about 1,600 to 1,800 calories over the course of an entire day.

Eat This Instead!
Spaghetti, Set, Go! with Apple Dunkers and Caramel Dip
390 calories
7 g fat (2 g saturated)
325 mg sodium

Again, you’ve got the red marinara sauce, which is very good. You’ve also got slices of apple with caramel dip. This is something we’re seeing on more and more restaurant menus. Kids like it because it has the same finger-food appeal as french fries, and parents like it because it won’t make their kids look like lumpy sacks of potatoes.

Bonus tip: Here's another sneaky source of kid calories: Wayward snacking. Is your child snacking smart? See the good—and bad—chips and dips choices on our list of the Best and Worst Chips and Dips.

#1: THE BIGGEST 'NOT THAT!' at FRIENDLY'S!
Friendly’s Mac & Cheese Quesadilla meal with Friendly Frank, Shirley Temple and Friend-z Peanut Butter Cup
2,270 calories
109 g fat (45 g saturated)
3,320 sodium
CALORIE EQUIVALENT: 45 Glazed Munchkins from Dunkin Donuts!

Friendly? Ha! This restaurant deserves the Phoniest Name of the Decade Award. This meal has an entire day’s worth of calories for a full-grown adult. Plus it has more saturated fat or sodium than you should ever see at one table. Part of the problem here is the pile-on policy: The entrée plus the side plus the drink plus the dessert. All of that comes with the meal. And dessert? Since when did dessert stop being extra? This is just dangerous food that gets a boost from a bad policy.

Eat This Instead!
Grilled Cheese With Mandarin Oranges, 1% Milk, and a Double Shot Cone
800 calories
34 g fat (19 g saturated)
1,150 mg sodium

Now, here’s what’s crazy: The same sandwich that had more than 600 calories at Applebee’s—the grilled cheese—has only 290 calories at Friendly’s. That’s good, but it still comes with that obligatory dessert, which keeps this meal in the caloric danger zone. At 270 calories, The Double Shot Cone is the best you can do, but if you tell your server to scrap dessert altogether, your child suddenly has a reasonable 530-calorie entree.


Now, let's talk Christmas! WHAT? It's too early you say? Never! I am always thinking about my favorite holiday and how to make it better each year! I have tons of people I give gifts for and so it requires alot of planning and preparation. So I start early. Plus I like being one of those people who are relaxed and enjoying the holidays while watching others scramble around in a feverish frenzy at the last minute. Trust me, been there too and I don't particularly care for it! Now yesterday I forgot to get my dimensions for a gift that I know is going to take more than 1 day... it might take as much as a whole week for this one. Its something I am creating an original design for and must get the dimensions and fasteners, bibbles and bobbles, etc, etc, etc. JUST RIGHT! I must sketch out a template/pattern, deside on proper materials, write down step by step instructions for sewing assembly, you name it. This truly is going to be an original homemade gift LMAO. We're starting from scratch! And the funny thing is, I bet the recipient won't even understand what it is for until I demonstrate it or tell them! How much more unique does that make it!? My kind of gift! WOOHOO! This will be fun. So this gift IS part of the challenge, but NOT a one day, so I plan on working on 2 gifts at once over a couple of days... ambitious huh? I think so LMAO! So what kind of gifts have you been making?

Now since we got bit with the craft bug, today I will be working on a couple of purses. But not just any purses... they will be gifts. Also if I have time, I will be making a couple of baby items... like toys and changing pads and such. And for you, I am going to bring you another fabulous craft idea! Its baby in nature but would make an excellent gift for a new mom! Have you ever seen those round pillows called "Boppy" pillows? They were originally made for breastfeeding mothers to use to lay their arms on and prop up their child while feeding. However, they also make great aids in helping baby sit up, eat, etc. I use one for the little man whenever he comes to see me. I put it around him and he sits up to eat. Hey it works if you don't have a high chair LOL! So anyway... after seeing this for the first time, I wanted to make one for myself to keep here for him. I found a site online with a mother who felt the same way so she wrote the instructions and shared them. And if it works, maybe I will make a few extra as gifts, to sell, etc. LOL! So here it is ladies and germs... make sure to visit the site for great pics and instructions.


Craft Idea of the Day: The Baby Boppy Pillow

Materials:

1. 1 yard of 45” or 60” fabric for pillow cover. Bright cotton prints or soft baby fabrics work great. You can also use flannel (most have 41” width, but you will be fine using my pattern), but be aware that flannels peel very fast –those little fuzzy beads will form very soon and drive you nuts.
2. 1 yard of 45” or 60” fabric for the actual pillow. Use thicker cotton fabrics, or if you want to save even more money, an old flat sheet will work just fine.
3. 1 lb (apprx.)of 100% polyester fiberfill – you might use a little less.
4. 18” invisible zipper for pillow cover. However, you can use Velcro if messing with zippers is not what you want to do, or simply hand-stitch the closing.

Ok, so today for the WACKY WATERMELON WEEK I want to talk about drinks. Now we all normally consume more beverages during the summer months, and research supports this. The reasoning is that it is natures way of both keeping the body hydrated and our core tempurature at safe levels. I foe one always have a drink of some kind with me... I can't ever get enough to drink. Same with my DS. I send big coolers of gatorade with the DD to band practice too. Diabetics also tend to get an "incurable thirst" as well. SO see, drinks are a big part of everyday life. And sense we rely so much on hydration, why not make it something that is both delicious AND good for us (minus the alcohol and such of course)? So today on this thirsty Thursday, I bring you some tasty treats to please your palate. Drink & Enjoy!


Nobody's Strawberry Watermelon Shakedown

Ingredients

1 1/2 cups frozen strawberries
1 1/2 cups frozen diced watermelon
1/4 cup cream
1/4 cup plain yogurt
2 tablespoons orange or lemon juice
1 tablespoon white sugar or Splenda (optional)
1/4 teaspoon vanilla extract

Directions

Blend the strawberries, watermelon, cream, yogurt, orange juice, sugar, and vanilla in a blender until smooth.


Watermelon and Strawberry Lemonade

Ingredients

8 cups cubed seeded watermelon
1 cup fresh strawberries, halved
1/2 cup fresh lemon juice
1 cup white sugar
2 cups water

Directions

Combine the watermelon, strawberries, lemon juice, sugar, and water in a blender.

Blend until smooth.


Watermelon Vodka Slush

4 cups watermelon flesh, seeds removed
2 fluid ounces simple syrup
2 tablespoons lemon juice
1 cup vodka
2 fluid ounces melon liqueur
4 twists lemon zest, garnish

Directions

In a food processor, puree the watermelon flesh. Pour the pureed watermelon into empty ice cube trays and freeze for at least 4 hours. Also, freeze 4 martini glasses.

In a blender combine the frozen watermelon cubes, simple syrup, lemon juice, vodka, and melon liqueur; blend until smooth. Pour into 4 frozen martini glasses and garnish each with a lemon twist.

Well that's everything for today. Its time for my llittle buddy and me to get down to some serious eating, play, cartoon watching, and crafting! LOL! I hope that you have an awesome day and be safe in wherever life leads you today and everyday. I will see you again tomorrow in my little cyber-haven I like to call The Frugal Mom's Blog! Until tomorrow... HUGS!