myspace generator
Showing posts with label gift baskets. Show all posts

Saturday, April 17, 2010

THE TIES THAT BIND

Welcome boys and girls. How are you doing today? I am doing alright… its gonna be a busy full road ahead of u s, but you know what, I’m ready! For those of you who “know” my mom from here, you know she has recently had an injury that has left her needing a little bit of help around the house. Hense, me… cooking, cleaning, etc. Well, she finally got in to see her normal doctor and he was not happy with how people have treated her medically the last couple of weeks. Long story short, it’s a major injury and she’s gonna have a little while for recovery. F-A-M-I-L-Y… the ties that bind and make us strong! SOOO what we’re gonna do is show how much we care! Let her know… email, comments, snail mail, whatever… let’s show her she is loved shall we! Meantime, its gonna be some major mass cooking for awhile and that means more recipes for you! YAY! You get to benefit too! So get ready for some wild and crazy adventures!

Ok, I got an email asking me why I “sign” every post with the very last word “HUGS”. It’s kind of corny, but I’ll tell you. With so much misery and despair in the world today, I figure everyone needs a good old hug. So just like if you leave your mom’s house or your grandma’s house and hug her when you say goodbye, its my cyber-hug for you when you leave. Silly, huh? Oh well deal with it! LMAO… j/k!


Well don’t ask me how I did it, cause this basket gave me a heck of a time, but I pulled off the flirty basket. She wanted flirty sexy but not over the top raunchy sex, so that’s what I gave her. The recipient is a Gym teacher and he is into working out, etc. She wanted things to flirt with him but not fatten him LOL… healthy if you will. So this is what I came up with… really playing on words and packaging.

1. Feather Mask- Indulge in your “Secret Desires” was printed on the package.
2. Bare Naked Granola (the name was good enough for me LOL!)
3. Kiss Me, Its My Birthday Flashing Lapel Pin (Birthday: the gift, Kissing and flashing? Too perfect!)
4. Truth or Dare Coupons (You KNEW coupons were gonna be in there somewhere, right? LOL)
5. Red Hots- A Fat Free food (you got it he’s hot and spicy flirting right? LOL ok just checking)
6. Sexy Dice- “Roll the dice and take a chance ON me” (Couldn’t have said it better.)
7. Trojan (hey gotta promote safety Just in Case!!)
8. Fresh Pecans… (NUTS are always good LOL!)


I wrapped it all up in a cool looking birthday paper because she didn’t want anyone knowing her business (understandable) and put a bow with the guys 2 favorite colors on it. I think it turned out really well actually. I was quite impressed I was able to pull it off. Shoot, even the clerk told me it was a tough one at one of the stores I went to buy some of the “sexier” stuff at. He was right. BUT I did it and I’m proud. Just hope nobody else wants to be flirty sexy! LOL! I like the raunchy people… its easier to shop for! LMAO!

I took some meals out to mom and dad last night for the weekend so that I could free up for shopping. I need to go bulk items and fast! I have a few things to do this morning but I’m packing up the kids & DH and guess where we are off to today? Yep super shop-a-thon at the BIG farmer’s market. Gonna see if I can nab some of those 25 and 50 pound bags of produce for cheap. I’ll share pictures with you when I come back tomorrow.

Ok let’s get crafty, shall we? We’ve talked a lot about recycling and reusable shopping bags comes up a lot. Its like they are the new trend. BUT the thing is, I’ve been making them for years LOL. And I have learned that there are so many things you can make reusable bags out of. Today I am gonna show you how to make them out of a tarp.


Craft Idea of the day: Tarp Shopping bags

1. Cut a piece of plastic tarp 18 x 36". This will give you a finished bag approx 17"w. Fold this in half, right sides together, so that it now measures 18x18". Have it so the fold is at the bottom.

2. In order to make a bottom for your bag, you must fold up the folded edge of your bag half the width of what you want your bottom to be. So if you want a 4" wide base, fold up 2". Secure the fold and sides with tape. Sew both sides with a 1/4 to 1/2" seam. You can sew right over the tape. Remove tape after sewing.

3.Now the top of the bag is your only raw edge. Fold it over about an inch and sew all the way around.

4. Straps: Cut 2 strips of tarp 18" long by about 4" wide. Fold it in half lengthwise, wrong sides together, to get a crease. Open it out and fold the raw edges in and make crease. Tape and sew along edge. Attach straps at desired location on each side of the bag, maybe 3-4" from ends, where ever is comfortable. Sew to the bag securely. Sew over it a few times, since these will get lots of stress.

5. Turn bag right side out. Note: You could purchase webbing for the straps, or be creative and use rope, heavy twine, etc. The average cost of a 6x8' tarp in my area is $4, and I was able to make 8 bags out of it. This comes out to 50 cents per bag.

As an added strength, you could also buy some of the different duct tapes in a wide range of colors and put strips on one side (to be the outside) of the tarp. I recently saw some tie dye that was pretty cool.

And there you have it! Yet another way to recycle and have a unique conversation piece all in one! Ok, time to eat! Do you remember those chickens that were roasted and deboned? Guess what… today is their day to shine! As you know, there are a few things I really love… I have an obsession with my slow cooker/crock pots and I make a lot of soups and casseroles. When you feed as many as I do, it’s nutritious and inexpensive! I also have a thing for Rosemary and fresh garlic LOL! Anyway, here is something that you can complete start to finish in under an hour and it’s a crowd-pleaser!
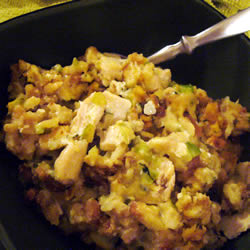


Farmhouse Chicken Casserole

Ingredients

2 (6 ounce) packages stuffing mix
4 cups cubed cooked chicken
2 (10.75 ounce) cans condensed cream of celery soup or cream of chicken soup, undiluted
1 cup milk
2 celery ribs, finely chopped
1 teaspoon dried minced onion
1/4 teaspoon pepper

Directions

Prepare stuffing mix according to package directions; set aside. Place the chicken in a greased 13-in. x 9-in. x 2-in. baking dish. Combine the soup, milk, celery, onion, and pepper until blended; pour over chicken. Top with stuffing. Bake, uncovered, at 350 degrees F for 30-35 minutes or until bubbly.

Ok everybody, that’s it for me today. I hope you have enjoyed your journey to the center of my Earth LOL! I’m off to market to market but fear not… I’ll be back tomorrow for another cup of OMGisthatpossible! LOL. Be safe in your journeys, be happy, and be alive! Until tomorrow… HUGS!

Monday, December 14, 2009

READY, SET, BAKE!

Morning kiddies! How are you doing this morning? Are you excited yet? A new week, a smaller countdown, and a tired blogger here! We had the High School Band Christmas Concert and Tea yesterday and the kids did so wonderful! They made me cry! Then of course, I didn’t look forward to socializing with the stuck up moms or the moms that just don’t care during the year but try to make a good show on this day. I can’t stand hypocrits really… aggravates the tar out of me cause I know what these kids go through all year cause they are all at my house! And you could tell too! I had 5 platters on the snack table LOL and the kids were hanging out with me and calling me mom! Had a couple of glares from the other adults but its ok… that crap doesn’t bother me! I find it kind of humorous actually. My DD is the one on the end in red LOL looking so festive!


Then when we got back, we had about 10 minutes rest before I forgot I had an order due THIS MORNING! Sew, I stay up sewing til late into the night to get this order done. Guess it just slipped my mind until I saw the material sitting on the end of the sewing table! It doesn’t happen that often though… guess I may be trying to spread myself too thin lately.

I found an article online a while back that gave some ideas for gifts under $10 but I think most of them were pretty lame on their own but could maybe be cute dressed up/paired with other things… I don’t remember the site though. “There are hundreds of great gifts that can be purchased or made by hand for under $10, gifts that are both thoughtful and frugal at the same time. Put them in an inexpensive basket or wrap them with a pretty ribbon and you'll truly have a beautiful gift--without breaking the bank!”- I couldn’t have said it better myself! “I know you've probably heard it before but it's really true that you don't have to spend a lot of money to find that perfect gift for someone. Just be sure to put some time and thought into it and your gift will be well received”... Our family and friends usually appreciate our time and love more than anything, so something to show how much time and effort we put forth on them is a precious thing. I found this out many years ago, and I for one love handmade Christmases! Here's a few of my favorite inexpensive gift ideas that they had on the list... followed by the way I would make them “better” LOL!

Child's artwork, framed- there is no way to improve on this one!

Holiday serving bowl or platter- better be puttin’ some homemade goodies in/on it LOL! YUM!

Makeup brush set- make a fabric makeup tote bag to hold the brushes/makeup to accompany this!

Set of dish towels- sew some pretty fabric strips across the ends and make it special!

Locally made or homemade BBQ or steak sauce with basting brush- Add some other sauces or BBQ tools or a grilling cookbook found at like the half-price book store or with a coupon at other stores!

Handwritten copies of your favorite recipes in a spiral to make a Specialty cookbook- cover the spiral with some pretty paper or fabric and you have a very special gift!

Christmas ornaments- what can you say here? Not much as the possibilities are endless on what kind of ornament you can make! We painted puzzle pieces one year and glued them together to make an Autism Christmas Wreath… and gave those that year! People loved them!

Any of these items are cool if you put them in jars or a pretty basket:
Homemade special jams or mustards
Homemade cocoa mix in a pretty jar
Home baked bread, include recipe
Homemade cookie mix with instructions for baking
Variety of bread mixes
Home baked cookies!
Homemade Pancake or waffle mix and a bottle of syrup
Homemade Muffin mixes with muffin pan
Homemade baking/sweets mixes along with a special baking pan

I hope you will be inspired by this list, after all, it's not the amount of money you spend for a gift that matters the most, but that you cared enough to give something special.


Craft Idea of the Day: Gift Baskets
Take any of those ideas up there and place them in a pretty basket and you have a great gift that people think you spent hundreds on! Have you seen some of those places where you can buy those? They cost hundreds sometimes for a decent basket! So what’s better than taking your homemade creations and sprucing them up a bit!? And it doesn’t have to be a “basket”… lots of containers will work! Example- for a gardener, get a plastic pot, or a road trip just cover a cardboard box with an old map! Auto detailing, buy a wash bucket, baby, get a cheap small laundry basket, cooking/baking/kitchen- use a colander, pot, pan, skillet, you name it! See, the possibilities are endless! All you need is a little imagination.

So, are you ready for the relay race we call holiday cooking? LOL Well strap on your boots and spurs and hold on for the ride, cause its gonna be a fun one! I promised you 1 craft, 1 dinner, and 1 sweet each day until Christmas Eve so you could adorn your tabletop, under your tree, and your life in general with unique ideas! And as you have seen, there are days where you have received a lot more than one idea or food… just cause the mood hits me LOL! I’ve put on a big pot of “garbage stew” to cook all day LOL that will be served with cornbread or dinner rolls. I called it “Garbage Stew” not to gross anyone out, but because if I didn’t use up the ingredients, they would have had to become garbage. So this is a good way to use things that might soon spoil… hense…


GARBAGE STEW

Round steak cut, stew meat, or whatever beef you may have cut into cubes and browned with butter, salt pepper and garlic powder in a skillet for about 5 minutes or so. USE THE JUICE in the pan after cooking too for flavor!

1 bell pepper, onion, carrots, potatoes (raw), and other veggies cut up in chucks or diced (your preference)- basically whatever you have that will soon be going bad!

1 can of diced tomatoes

1 jalapeno or hot pepper for "kick" (make sure it is fresh and deseeded- omit if you don’t want too much spice)

1 can of kernal corn, drained

seasonings: (I use) garlic powder, salt, pepper, parsley... just use whatever you want...LOL put them in on top of everything in the pot.

broth: you can use a can of beef broth or I use the juice from cooking the meat, 1 cup water and 1/2 cup flour.

Once you brown the meat throw everything in a crockpot/slow cooker, mix well, and cook on high for about 1 hour, then lower heat to low and cook for about 8-10 hours. Then yummy stew! and your house smells good too! Make cornbread or an accompanying bread with it... this freezes beautifully too! See it’s a fun recipe that gives you the basics, but you can adjust to your liking! Now, I got a hankering for somethin’ sweet this morning! Here is the baking for the day (courtesy of Taste of Home):


BROWN SUGAR CUTOUTS

Ingredients
1 cup butter, softened
2 cups packed brown sugar
3 eggs
2 teaspoons grated lemon peel
3 cups all-purpose flour
1 teaspoon baking soda
1 teaspoon ground ginger

FROSTING:
1-1/2 cups confectioners' sugar
1/2 teaspoon vanilla extract
2 to 3 tablespoons half-and-half cream
Green food coloring, optional

Directions

1. In a large bowl, cream butter and brown sugar until light and fluffy. Beat in eggs and lemon peel. Combine the flour, baking soda and ginger; gradually add to creamed mixture and mix well. Cover and refrigerate for 2 hours or until easy to handle.

2. On a floured surface, roll out dough to 1/8-in. thickness. Cut with lightly floured 2-in. cookie cutters. Place 2 in. apart on ungreased baking sheets. Bake at 350° for 8-10 minutes or until golden brown. Remove to wire racks to cool.

3. For frosting, in a small bowl, combine the confectioners' sugar, vanilla and enough cream to achieve spreading consistency. Add food coloring if desired to some or all of the frosting. Decorate cookies. Yields: About 6 dozen.

Now don’t go freaking out on me… I know I didn’t frost the ones in my picture!! I simply sprinkled colored sugar on them before baking. Still yummy… you can do either, or just eat them plain. They are really good!

Ok my dears… I’m off to bake, Bake, BAKE (and sew and clean in between LOL). Hope you enjoyed this rather winded blog and I will see you in the morning! HUGS!