myspace generator
Showing posts with label eggs. Show all posts

Tuesday, July 20, 2010

SONGS OF THE SOUTH

Well good morning everyone! How are you doing this tempid Tuesday? I'm fair to midland... rather exhausted really. I am sitting here watching cooking channels and advertising for culinary school... you think its a sign? LOL! I actually have been having a reacurring dream lately and thoughts that are consuming my mind, so I might start checking in on it pretty soon. Gotta get projects done and kids in place where they belong!

Ok, I am gonna get a couple of things off my chest this morning, so I can enjoy the rest of our visit. First off, last night I fell asleep watching the food network, ok? So when I wake up this morning, there is one of those paid infomercials for DIET and exercise crap on TV! Are you kidding me??? They are trying to sell diet and exercise crap on a channel devoted to nothing but food and 50% of the chefs are not exactly the thinnest people you have ever seen?! What kind of message does that send? And who is the idiot who thought that was a good idea? Come on people... seriously! Ok then, we all know that every person has at least one issue that just sends them in a rant. I have a few... and I must admit, its a doosy! The other night I saw a commercial on TV for a show called "Toddlers in Tiaras"... and I blew my top! It showed these little girls... I am talking maybe 5 at most... all dolled up and the overzelous pagent mothers teaching their KIDS to be adults. I'm talking waves, sexy walks, smiles, you name it! OMG that SOOOO ticked me off! Does the world not remember a poor little "pagent baby" named JON BENET RAMSEY who was MURDERED? OHHHHH it makes my blood boil! Babies and little girls do not need to wear more makeup than I do and be (in my opinion) exploited like that! I'm sorry, but in my opinion, no good can come of that and cheaply made trophies are not worth my child's life! I think the mom's do it more for themselves than the kids. Ok I'm gonna shut up now and get off my soapbox cause I'm "All Shook Up" now!

Ok, we got some frugal tips today about a topic of favoritism of my mom's LOL! LAUNDRY! Yes, there are lots of ways to be frugal and save money on doing your laundry. Now I will admit, I don't like doing laundry at all! If there was a way to have it magically do it itself, I would be in heaven. But alas, I have no magic wand to say poof and its done LOL. So frugal tips are the next best thng I suppose! Hope these help ya a bit!

Laundry Tips

1. When washing dark clothes for the first time use cold water and put salt in the water. The salt helps set the color. To brighten dark clothes after they have been washed several times, repeat the procedure.

2. Black clothing tends to look brown after several washings. To restore the black color, add coffee or strong tea to the rinse water.

3. Many garments labeled "Dry Clean Only" can be safely handwashed using mild soap like Woolite and cold water.

4. Cut dryer sheets in half before using. They still work just as well. Keep a kleenex box on the dryer for the used ones - use to dust furniture.

5. To dye fabric a brown color inexpensively, soak it in a bucket of strong black coffee. This technique will also camouflage a non-removable coffee stain on a white table cloth.

7. You do not need to wash with hot water unless you are trying to sterilize your laundry. Use the warm or cold setting to save money. Set your rinse on the cold setting. Washing in cold water can save the typical family over $120 a year!

8. The best overall laundry tip: Make your own laundry detergent and fabric softeners! It works great, and costs so much less!

9. When you first switch from store-bought detergent to homemade, wash laundry once with washing soda alone to get rid of the detergent residue and avoid yellowing of fabric.

10. Even your washer needs to be washed once in a while. Run the machine on hot water, normal cycle, and add a bottle of vinegar to clean the soap film and scum that's built up inside.

11. Wash and dry clothes inside out to prevent fading.

12. Tie or pin socks together for easier sorting.

13. Use a mesh bag when washing/drying socks, especially baby socks.

14. Close zippers, button buttons, and tie strings before washing and drying. This keeps clothes from being tangled together.

15. Spot cleaning - Use Tilex Shower Spray (mildew) to spot bleach on clothes that can be bleached, but you don't want to bleach the whole load.

16. Always empty the lint trap every single time you dry clothes in the dryer.

17. If instructions aren't printed on the washer lid, type, laminate, and hang them over the machine.

18. Label or color-code bedroom baskets to prevent laundry room mixups.

19. Pilling is caused by items rubbing against each other in the washer and dryer. Prevent it by turning susceptible clothes inside out and washing them in a mesh bag or a drawstring pillowcase.

20. The difference between "Dry Clean" and "Dry Clean Only" is fragile fabric, but washable. Dry cleaning fluids are tough on fabrics, so whenever they can be avoided, the life of a garment is prolonged.

21. Make your own Spray Starch - 2 tablespoons cornstarch + 1 pint cold water. Place in spray bottle and shake well before each use.

Ok kids, let's make something wonderful. Its craft time! Now its just a few more days til the Christmas Challenge starts, so life will be crazy soon LOL. But "Its Now or Never" to get them done cause band starts August 2nd, so I will be one busy woman LOL! Today I think it would be rather interesting to try making a gift idea for the one who loves to read in your life. Make sure to go and visit the website for the crafter's great step by step instructions and pictorials!
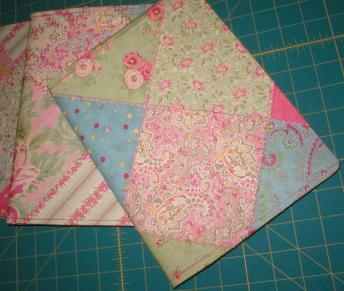


Craft Idea of the Day: Patchwork Notebook Cover

Materials Needed:

a thread-bound composition notebook
around 15 charm pack squares (or 5 x 5-inch fabric squares)
a piece of neutral lightweight fabric cut 11″ x 27″
fusible webbing/iron-on adhesive (I use Heat ‘N Bond Lite)
rotary cutter and mat OR scissors


Ok time to talk about a hunka hunka "Burning Love"... ELVIS! Elvis' very first single was in 1954: "That's All Right"/"Blue Moon of Kentucky." Elvis recorded several singles for Sam Phillips, owner of Memphis' Sun Studio, and first toured locally as the "Hillbilly Cat," singing in a style associated with black musicians like B.B. King. Signed by RCA in 1955, he became an overnight sensation on radio and in concert halls, singing both up-tempo rock songs and haunting ballads. His performance style featured a commanding voice and a charismatic stage presence sneers, twitches, pelvic gyrations leading to mass hysteria among teenage audiences and threatening parents and religious leaders. In 1956, Elvis, already a millionaire at 21, began his film career. His 33 movies (the last in 1972), vehicles for his singing and personality, were box-office, if not critical, successes.

Elvis once said....

"It's hard to explain rock and roll music. If you feel it, you can't help but move to it. That's what happens to me, I can't help it."


Elvis married Priscilla Beaulieu in 1967. The couple had a daughter, Lisa Marie, in 1968, and were divorced in 1973. With the advent of The Beatles and other artists of the so-called British Invasion in the 1960s, Elvis' popularity declined and he cut back dramatically on personal appearances, concentrating on his films. Elvis made a stunning comeback as a rocker with an electrifying TV special, simply titled "Elvis" and broadcast on December 3, 1968. In the early '70s, Elvis resumed touring and achieved great success, especially in Las Vegas. A new generation of fans were won over with a new series of hit records. During his lifetime, he sold some 600 million singles and albums.

Now on the journey of PERFECTLY PRESLEY favorites, we learn that the King loved his egg pie in the mornings. So what I bring you is the "traditional" simple egg pie. BUT let's gived it that super twist... and that's more simple than the recipe! Some chefs nowadays call this an egg custard pie, some even call it a quiche. I just call it Southern Comfort in the morning! YUM!


Egg Pie

Ingredients
5 eggs, beaten
2 cups milk
1 tsp vanilla
1 1/2 cups sugar
1/4 stick butter
1 unbaked pie shell

Directions:

Beat eggs

Add sugar and beat well

Scald milk and butter in boiler

Pour scalded milk and butter mixture into egg mixture, beating well as you pour it

Add vanilla

Bake in pie shell in 300 degrees for approximately 30 minutes

Pie is done when it will quiver in center only

Now, here is the fun part... jazzing this up! Elvis probably loved to eat this with another one of his favorite foods... some burnt bacon. Yes, you heard me... BURNT bacon! While I don't recommend burnt, I can say that if you make some crispy bacon and mix that into the pie before baking... OMG! YUM! How about some browned breakfast sausage, some creamy cheese, some sauteed onions, you name it! You can add lots of sauteed veggies, cheeses, etc. Its kind of a fail-proof recipe and ANYTHING will spruce this up from BLAND to BAM! You could even buy a can of smoked oysters at the Dollar store and throw those in for a snazzy seafood surprise (drained of course LOL)!

Well folks, that's all she wrote for today. I hope the King and I have inspired you to get up and "Rock-a-Hula"! LOL... so "Don't Be Cruel" and join me tomorrow for more fantastically regal rock trivia and food! Until then... HUGS!

Sunday, May 16, 2010

THE PASSING OF PIZZA

Well howdy ya’ll! What’cha doin’ here so early this morning? LOL! I am just sitting here wishing that just once my DS14 would sleep in so I could sleep in! But alas, he doesn’t so neither do I. Got lots of topics to address this morning, so grab your cup of Java and let’s get started! No rest for the weary ya know LOL!

To my dear Tabitha- Thank you for the compliment on the quilt and I am sorry to hear of your loss. Breast cancer has effected our family as well in more than one member, so you are not alone when you say it hits home. BIG HUG to you!

To my Jean- girl you scared the tar out of me! I was worried that something happened to you. You are one of the reasons I started this blog in the first place, so I owe a lot of the “success” to you! Don’t you dare desert me! LMAO.

And to my Mom and Dad- Dad, thanks for being a good sport about the “big head” thing! And mom, don’t worry… in time we will get all of your things replaced that you lost from the storm. Just like you just put out your magnets the other day… one thing at a time and things will slowly get back to “normal”.


I got some great parents… wouldn’t you all agree? Speaking of parents, remember I told you (and mom did too) about his big hands and that I was gonna try to take a picture? Well check it out! Here is my Dad’s hand on a standard 10 ½ in. dinner plate! Crazy big huh?! Sadly I have his “moose hands” (as he calls them) too! I wear a 11.5-12 MAN’S ring on my ring finger!! It makes tiny tedious work really bothersome sometimes!


Look it’s a super yummy crazy omelet for dinner! OMG they just sounded good and I had a few veggies in the fridge that needed to be used up (some green onions, jalapenos, etc.) that I diced up and used in the “Omelet bar”. I had small bowls with different stuff in it and each person picked what they wanted in theirs. DD picked just a simple cheese and sausage omelet. DS18 wanted all the veggies and no sausage. DH took the works! DS14… cheese. And for me? Sausage, cheese, jalapenos, and pickled Mediterranean garlic! OMG! I’m drooling again just thinking about it!


We found this little Italian lady at the Home & Garden Show my mom and I went to in Galveston. She was selling different things she made and one of them was this jar of roasted pickled garlic cloves. DS18 says they sound really nasty but they taste really good. And boy is he right! They are super crazy good! See I have this love affair with garlic and for finding a way to eat the clove and nothing but the clove is garlic euphoria for me! Her name was “Mother Teresa” and you should check her out on the web at Mother Teresa’s Fine Foods and see all the things she has to offer! I highly recommend the garlic and mom tried the mushrooms and she liked those too!


Here you see another purse package I made last night from this very pretty pansy fabric. This was really the only thing I “completed” last night. I started on all the curtains and closet drapes for Madison’s room too. I plan on having everything sewn for her room by the middle of the week and putting it up and surprising her while she is at school LOL! She amazed me and her room was clean when I came home! OMG I was shocked… only having to tell her once to get it done?! Let me mark this day on the calendar LOL!


Graduation is coming up in a couple of weeks and guess what Madison wants for some of her friends? Yep you guessed it, candy bouquets. This is one of the types I made last year for some of the band kids that left us LOL. I plan on making more of these this year too. I also used a small gift box as the base that I found at Party City for some other ones… just depends on what kind of Graduation goodies I can find this year.


Alright, I want to take a moment and address a food theme that was brought to my attention… CARNIVAL foods. Now, I COULD do a “healthy”version of carnival foods, but honestly… why on Earth would you want to mess with sheer perfection?!? The whole purpose of carnival foods is to indulge in something fun and delicious. Just like you don’t ride the ferris wheel everyday or play games to win a big stuffed animal you really don’t need cluttering up your house… its just fun! I mean if you wanted to, you could substitute the hot dogs and corn dogs with tofu dogs or turkey links. You could have garden veggie burgers instead of the greasy hamburgers, fry some broccoli instead of tater tots, use wheat instead of the white flour for a funnel cake and not put the powder sugar on the top (use honey or agave nectar instead), etc. But like I said, WHY would you want to LOL! In my book kids, there are a few things you just don’t tamper with… and this is one of them! NO WAY am I upsetting the Carnival Gods by tampering with the yummy deliciousness we call the Funnel Cake… see even the name says enjoyment! F-U-N-nel cake! You want healthy at a carnival, eat a caramel APPLE LOL! There’s your “healthy” FRUIT for ya! LMAO

Ok, so I hear you asking… what is on the schedule for today? Well once the gang wakes up, after breakfast I am thinking about taking a ride… scout out the berry patches (remember to bring the wading boots LOL). With luck, we will be picking some berries! After that, we’re gonna come back and I am gonna sew like crazy! I got lots of things I want to get done today! Gonna work on Madison’s stuff, work on the BC quilt, work out of that green crate, etc. The Ronald McDonald crayon bags are kinda on hold until I get some more quilt backing as I don’t have any big enough to use… its all little pieces. BUT when payday and the next JoAnn’s coupon comes my way, I’ll get back on that like white on rice! LOL!

Alright, now its time to get crafty. Father’s Day is coming up soon, so I saw this idea on one of my favorite sites and I thought how great this would be for all the mom’s with little people out there who need a gift. Its recycling, its homemade, its absolutely perfect!


Craft Idea of the Day: Father's Day First Aid Kit

Make a great first aid kit for Dad on Father's Day from old lunch boxes.

Approximate Time: 30 minutes or less (allow for drying time of paints and glue)

Supplies:

Lunch box
Photo copies of pictures, magazine clip art, etc
Mod podge glue
Brushes for applying mod podge glue
Spray paint color of choice
Clear Spray Paint to seal finished item
Inside first aid articles (band aids/alcohol/tape etc)


Instructions:

First clean your lunch box well with soap and water and remove any old stickers or label that is on them.

Then close up your lunch box and spray paint its outside exterior with your color of choice. We used white.

We left the inside its original purple color.

After the box has dried then gather any photo copies you have made from your favorite photos of dad or dad and child and any other clip art you like from magazines.

Decoupage those on the box first brushing the mod podge glue to the back of the papers then place your clip art down to the box and brush glue on top of the clip art. Smooth out any bubbles or wrinkles you have with your fingers. Mod podge will look milky but will dry clear.

Let dry completely then spray paint box with 2 coats of clear spray paint to seal it.

Add contents inside and present to Dad on Father's Day. Great for dad to keep in his garage/car/boat for any first aide treatment he may need.

We used our clip art theme of shop tools for our decoupage and added a picture of them to the center of a cross shape with a red cross shape behind it and added the text words around it, then just put on other tool clip art to the other side of the lunch box.

You could use any theme you like; such as fishing, golfing,gardening, etc.

By Julie from Tenn


Ok girls and boys, today is a sad day as it’s the last day of the “Unique Pizza Week”. We are gonna end it with a bang… a big Sunday breakfast pizza for your pleasure. My family LOVES this pizza fresh baked on a weekend morning. So guess what I am making this morning? Yep… a big steaming…


Breakfast Pizza

Ingredients

1 (8 ounce) can refrigerated crescent rolls
1 pound bulk pork sausage
1 cup frozen shredded hash brown potatoes, thawed
1 cup shredded Cheddar cheese
3 eggs
1/4 cup milk
1/4 teaspoon pepper
1/4 cup grated Parmesan cheese

Directions

Unroll crescent dough and place on a greased 12-in. pizza pan; press seams together and press up sides of pan to form a crust. In a skillet, brown sausage over medium heat; drain and cool slightly.

Sprinkle sausage, hash browns and cheddar cheese over crust. In a bowl, beat eggs, milk and pepper; pour over pizza. Sprinkle with Parmesan cheese.

Bake at 375 degrees for 28-30 minutes or until golden brown. Let stand 10 minutes before cutting.

Well kids, that’s all the time we have today. Its time for me to go make the house smell like breakfast pizza and have the aroma wake the gang up from their sweaty slumbers LMAO. Tomorrow I will start a new theme of food for the week for you to enjoy (and thanks to everybody for the suggestions!) but you have to visit again tomorrow to find out the theme LOL! Thanks for stopping by and I hope you drop in again tomorrow for more sweet treats and exciting adventures. HUGS!

Thursday, March 25, 2010

THE BATTLE OF THE STORAGE UNIT

Well good morning my darlings! How are you this bright sunny day of days? I am actually in a pretty good mood LMAO! I am so proud to announce that I have done it! I have completed my goal of emptying the storage and eliminating that monthly expense! YAY GO ME! I am a month and 6 days ahead of my deadline I set for myself! WOOHOO! I should hold a party LMAO! I defeated the storage unit YAY! LOL! I am super stoked about this even though it looks like an A-bomb went off in my living room LOL! Boxes and bags everywhere… but its ok! I can work on that now at a super human pace without worrying if the bill is paid or if they are going to lock me out of my own belongings! Oh don’t get me wrong, the people who work there have been super nice to me over the years, but not having to pay that chunk of money is even NICER! LOL! I have to go back one last time to sweep out the trash and pick up a couple of BIG items, but then I am done! YAY! Everybody dance a little chair jig now in my honor… LMAO j/k.

Ok, Jean, to answer your question, yes ALL those plants are running rampant at my parents property. And the thing is, I know people pay good money for those plants too, so after consulting with my parents, I have found that I think I am going to include some of these beauties in my plant sale, provided they all take off, which it looks like they are going to! YAY! Mother nature has given me yet ANOTHER gift… the gift of CASH LOL!

I know some of you are wondering how my doctor appt. went, so I will fess up right now LOL. All of my lab work came back naughty, my Blood Pressure is decreasing but she is not happy still, so I am permanently on yet ANOTHER medication daily for that, I have to have more labwork done in 2 months, and she griped about my diet and weight. Ya know, all the normal stuff LMAO. HOWEVER… there IS one bit of good news! Since my last visit 2 weeks ago, I have lost 7 pounds! YAY! Another GO ME moment LOL! She WAS happy about that… of course most of it was water weight but still… that’s a lot of water! LOL! Just more motivation for me to keep going and doing what I have been.

Ok its time to get crafty! I saw this craft on Thrifty and I just HAD to tell you about it! Its sooooooo cute! I might see about making some with my kids this weekend!


Craft Idea of the Day: Egg Dioramas

These are adorable hanging above a table from a light fixture. They are eggs with tiny scenes inside.

Approximate Time: a couple days, for drying time

Supplies:

Jumbo eggs
Dye
Shellac
Sponge brush for shellac (unless spray-on variety is used)
Moss
Figurines
Faceted and pony beads
Fake flowers
Ribbon
Tiny flowers or pearls
Hot glue gun
Needlenose pliers
Cuticle scissors
Sharp scissors

Instructions:


Using real jumbo eggs, make a hole in the side with cuticle scissors, and drain the egg and let it dry.

Dye them and let dry.

Shellac, and let dry.

Place moss inside, and a cute figurine.


Decorate the edges of the hole with faceted beads or a pearl string and add poms and pony beads to the top and bottom.

Add flowers bows and a hanger.

By Lily from Elkhart, IN

Aren’t those the cutest things?! OK, so now I want to eat… all this super mega hard work the last few days has made me monstrously hungry!!! And sorry doc, but I want me some REAL food… and LOTS of it LOL! I mean some meat, potatoes, veggies, breads, and lots of OH-SO-NOT-GOOD-FOR-ME Yumminess! LMAO!


Barbecued Pot Roast

Ingredients

1/4 teaspoon salt
1/8 teaspoon pepper
1 pound boneless beef chuck shoulder steak, cut 3/4 inch thick
1 tablespoon canola oil
3/4 cup water
3/4 cup tomato sauce
1 medium onion, sliced
1 garlic clove, minced
3 tablespoons lemon juice
3 tablespoons ketchup
4 teaspoons brown sugar
2 teaspoons Worcestershire sauce
1/4 teaspoon ground mustard

Directions

Combine salt and pepper; rub over steak. In a Dutch oven, brown steak in oil on both sides. Add the water, tomato sauce, onion and garlic. Cover and simmer for 30 minutes.

Combine the remaining ingredients; pour over the meat. Cover and simmer for 1 to 1-1/4 hours or until meat is tender.

And then I thought that this cake made into individual portions would be a cute party treat for a future party… maybe a garden or outdoor theme… check it out!


Dirt Cake

Ingredients

1/2 cup butter, softened
1 (8 ounce) package cream cheese, softened
1/2 cup confectioners' sugar
2 (3.5 ounce) packages instant vanilla pudding mix
3 1/2 cups milk
1 (12 ounce) container frozen whipped topping, thawed
32 ounces chocolate sandwich cookies with creme filling

Directions

Chop cookies very fine in food processor. The white cream will disappear.

Mix butter, cream cheese, and sugar in bowl.

In a large bowl mix milk, pudding and whipped topping together.

Combine pudding mixture and cream mixture together.

Layer in flower pot, starting with cookies then cream mixture. Repeat layers.

Chill until ready to serve.

Add artificial flower and trowel. Enjoy!

Alright kids, let me get off here for now and go finish the last step in this battle of the storage unit so I can rest easy and pack leisurely LOL! I will meet you back here tomorrow for another great day full of excitement LOL! HUGS!

Monday, March 15, 2010

HAPPY HOMECOMING!

Well a bright and early first-day-of-spring-break morning to you! How are you doing today? I am super peachy! My garden is thriving, my family is happy, and my DD comes home today! YAY!!!! It’s been a long few days without her. I am so glad she had so much fun, and I will be even MORE glad when I can give her a humongous bear hug! I know, from talking to her, I think she is ready to come home.

Alrighty, lets get down to some business… I got some updated garden pics to share with you first. Check out this great stuff! I am a proud plant momma! LOL!


Ok, do you remember those cute little Pea sprouts I had started from seeds? Well they went wild! SOOO it required that they are now in their own planter! I cut the 6ft trellis in half and put the half in the pea pot. Since Peas grow up, I needed a down. What better than my sugar baby watermelons!? Yep, got those in front of the peas. So that’s the newest planter! I am sad because it looks as if I lost a corn and one of the bush cucumber plants. I was quite sad.


So while I am planting the crazy peas, I had a visitor. I’m calling it “Sugar” LOL because I was planting the sugar snap peas at the time. Sugar just kinda sat there and watched me while I planted. And he was on bug patrol for me too, eating about 3 gigantic mosquitos while I sat there LOL! My garden is open to all of natures creatures. Even the wasps who were trying to pollinate my head yesterday morning!


Can you see it? It’s the first strawberry of the season… sitting there just taunting me! It says “Oh don’t I look so juicy and delicious? Don’t ya just wanna cover me in chocolate and eat me up?” LOL! Yes I am a strawberry fiend! I love those little red bites of bliss!


Isn’t this the cutest thing?? Its my first Roma tomato of the season!! I have this one, which is the biggest, and 3 more tiny little babies! Oh they just tickle me pink… or in this case tomato red! LOL!


Here you see the biggest group of Husky Cherry tomatoes I have so far! Every Husky Cherry has groups of tomatoes on them. I am so excited about my upcoming first harvest! I see delicious fresh garden salads in my future! I have the lettuce, tomatoes, and cucumbers all in my own garden! OH and cabbage and hopefully carrots!


Seed sprouts! You gotta love them! I am having so much luck with the seeds this season… something I have never had. Baby eggplant and okra is what you see here. I am so proud of them. I transplanted the lonely giant pumpkin into a 4in. pot yesterday so it would have more nutrients and space. These just kinda popped up out of nowhere LOL!

While I was looking at my seeds and placing the peas in the container, I got a thought. Around here in our area, you can find little produce stands on the side of the road with their fruits and veggies for sale. Well I thought that if I have enough produce from my plants, then maybe I could do something like that. And that’s when it hit me… may I can go one step further! Plants for sale! I am having such good luck with the seeds (knock on wood) that I already have more sproutlings than I might have room for… so why not sell them? I never planned on my seeds doing well (from past experiences). Home & Garden centers do! I could start a ton of seeds and once they sprout, offer them for sale. What do you think? I think it might be a good idea… and I would love your feedback on it!

Ok, so you have grown all this wonderful stuff… but when is the right time to pick it? Well check out this article which gives some great harvesting advice!

Hints For Harvesting Common Garden Vegetables
By Ellen Brown

Ideally, you want to pick your vegetable crops when they at the peak of freshness. For some crops this means keeping almost a daily vigil to ensure you catch them at their peak. Here are some hints for when to harvest some common garden vegetables.

Asparagus: Harvest asparagus spears from established beds when they are 4 to 10 inches long. To prevent spears from becoming fibrous, harvest them at least every other day. Spears with loosely formed heads have passed their prime.

Beans: Frequent harvesting will keep bush and pole beans producing longer.

Beets: Harvest beets when they reach the size of a golf ball up to a tennis ball. Smaller beets will give you less overall quantity, but better quality.

Broccoli: Harvest them when the buds on the head are firm and tight (approx. 4-5 inches across). Cut the heads 5 to 10 inches down the stalk to promote an abundance of tender side shoots that can be harvested later.

Brussels Sprouts: You'll get the best flavor after a light frost. Pick individual heads as needed or harvest the entire plant (place the roots of whole plants in a pail of water to keep them fresh).

Cabbage: Cabbage tastes best after a frost or two. Harvest them when firm, glossy heads have formed (they may look small). When left too long the heads will split. If too many are maturing at once, try giving a few heads a gentle twist while still in the ground. This will break some of the roots and temporarily prevent splitting.

Carrots: Carrots can be pulled every few days as soon as they are big enough to eat. They are easier to pull out of the soil on a day when the ground is slightly moist. In cool weather they can be left in the ground for several weeks.

Cauliflower: Harvest when the heads are solid, before the curds roughen and start to separate.

Celery: Use a knife to harvest single stalks from the outside or dig up whole heads using a spade.

Corn: Check for readiness when the silks have turned brown but are not completely dry. Pull back the husk and poke a kernel with your thumbnail. If the liquid is milky, pick the corn. If clear liquid comes out, it's not ready. If no liquid comes out, it's past its prime.

Cucumbers: Clip them from the vine as soon as the cucumbers are large enough. Harvest pickling types daily to keep the vines productive.

Eggplants: Pick when the fruits are big enough to eat. The skin should be glossy not dull. Pick often to keep plants productive.

Lettuce: Harvest leaves early in the morning to preserve crispness. Once lettuce start to bolt, it gets bitter. Shear rows or patches of leaf lettuce with scissors. They will resprout for additional harvests.

Onion: Pull green onions as needed. If storing bulb onions, allow the bulbs to mature before harvesting. When tops start to yellow, the bulbs are maturing. This process can be sped up by bending the tops over.

Peas: Pick garden peas when the pods are plump and the peas are just touching. Wait too long and they'll get starchy. Snow peas should be harvested when they're 3 to 4 inches long, but before the seeds start to swell. Harvest dry peas when the pods are brown and dry and the seeds rattle when you shake them.

Peppers: For maximum flavor, harvest peppers after they have completely changed to their mature color.

Potatoes: You can start harvesting potatoes shortly after they flower. At this early stage, they are called "new" potatoes. Once the foliage starts to turn brown they have reached their full size.

Pumpkins: Wait to harvest pumpkins until the vines have died back. (usually 90 - 130 days after planting). If you can't break or dent the skin easily with your thumbnail, the pumpkin is ready.

Rhubarb: Don't harvest the first year after planting. The second year after planting, harvest for two weeks. The third year after planting, harvest for one or two months. From then on, harvest as often as you like.

Squash: Summer squash are best if harvested while they are still small - about 3 to 4 inches across or 4 to 6 inches long. Winter squash should be allowed to ripen fully on the vine before picking. It's ready when you can't pierce the skin with your fingernail.

Sweet Potatoes: Start checking sweet potatoes about 70 days after planting and harvest them when they reach the desired size. The crop should be fully harvested after the first frost or when the vines turn yellow.

Tomatoes: Pick them when they develop their mature color. Check them daily because they can pass their prime quickly.

Turnips: Pick them for their greens anytime they are large enough to use. The roots taste best when they are 1 to 3 inches in diameter.

About The Author: Ellen Brown is an environmental writer and photographer and the owner of Sustainable Media, an environmental media company that specializes in helping businesses and organizations promote eco-friendly products and services. Contact her on the web at http://www.sustainable-media.com

Did you think I forgot about a craft for today? Nope! I found this adorable PIG egg and I had to share it with you. My friend Vicki would LOVE this craft as she is a huge pig freak!


Craft Idea of the Day: Pig Eggs

Courtesy of hard-boiled eggs, vibrant egg dye, a cute pipe cleaner stand, and some glued-on details (paper ears, pom-pom nose, and so on), this critter is an Easter favorite. Want to make the entire crop of egghead critters? Find instructions for the rest of the creatures at our Easter egg decorating party.

Materials

eggs
newsprint
egg dye
paper towels
birthday candles or crayons
pom pom
marker
pink paper
glue

Instructions

Color Hard-boiled Eggs: Before you begin decorating, cover your worktable with newsprint. Set out plastic cups with assorted colors of prepared egg dye, either homemade (For each color, stir one cup of hot water and one teaspoon of white vinegar in a plastic cup. Then stir in 10 to 20 drops of concentrated food coloring) or store-bought. Have a roll of paper towels on hand and plenty of hard-boiled white eggs. Let the kids take turns submerging eggs into the dye until the eggs reach a desired shade. Gently blot excess dye with a paper towel. Set the eggs atop plastic bottle caps to dry. For eyes and spots, draw circles on the eggs with a birthday candle or crayon before submerging them in the dye.

Pig: Start with a pink egg with eyespots. Glue on a pom-pom nose and pink paper ears. Draw eyeballs and nostrils with a marker. Curl the tail.

Craft Pipe Cleaner Legs: Set the decorated animal on a pipe cleaner stand. To make one, bend a pipe cleaner into an oval and twist it closed, using the excess as a tail. Cut a second pipe cleaner in half. Wrap one half around the back of the oval to form the back legs; wrap the other half around the front to create the front legs. Bend the ends into feet.

Ok so let’s talk some munchies! Remember I told you I was gonna have the DH get me some sour cream so I could eat my jalapeno dip from the mix I found at the show Saturday? Well he got me some and then he and the DS18 proceeded to bogart my dip! I didn’t get very much of it LOL… they were loving it! So I figured, in case you like different chip dips, you might want to try some from this company. Its called Mesquite Country Seasoning and their spices are (to me) impressive. I will be ordering more of the jalapeno dip mix (if I can’t figure out what’s all in it LOL!) in the future.


Here is the dinner I made for the guys last night… pork tenderloins (remember the ones I found on clearance at Kroger at the beginning of the month… yea those), mashed potatoes with some of that garlic I got Saturday chopped up in it, corn, and butter croissants. They were really loving it.

Ok so I got to thinking about all the neat things I am growing and all the kind of things I will be able to make once it all starts growing. One thing I am growing is Eggplant. Now normally, many people do not like eggplant. BUT try making this vegetarian meal and I bet your little carnivores don’t even notice that there is actually no meat in this dish!


Eggplant Parmesan

Ingredients

3 eggplant, peeled and thinly sliced
2 eggs, beaten
4 cups Italian seasoned bread crumbs
6 cups spaghetti sauce, divided
1 (16 ounce) package mozzarella cheese, shredded and divided
1/2 cup grated Parmesan cheese, divided
1/2 teaspoon dried basil

Directions

Preheat oven to 350 degrees F (175 degrees C).

Dip eggplant slices in egg, then in bread crumbs. Place in a single layer on a baking sheet. Bake in preheated oven for 5 minutes on each side.

In a 9x13 inch baking dish spread spaghetti sauce to cover the bottom. Place a layer of eggplant slices in the sauce. Sprinkle with mozzarella and Parmesan cheeses. Repeat with remaining ingredients, ending with the cheeses. Sprinkle basil on top.

Bake in preheated oven for 35 minutes, or until golden brown.

Ok friends… I’m gonna get started doing some things I need done before Madison gets here. Also have to check the water of the babies outside and get dressed even LOL! I wish you a very happy Monday and I will meet you back here tomorrow! HUGS!

Thursday, March 11, 2010

EGG-CELLENT ADVENTURES

Well an early morning hello to my friends out there on the information super highway! I’ve been up since 2am and I can tell ya… I am one tired pup! I would like to lay back down until I have to pick up the boys this afternoon but I have to go back to the doctor this morning for fasting lab work. It feels so weird without my mini-me… but she’s gonna have a great time and I told her to take lots of pictures for me! So we won’t tell her that I cried myself back to sleep when I got home (for at least an hour) and I frantically watched the Southwest Airlines “Check Flight Status” website all morning! LOL…


I thought this was supposed to get easier and I would WANT them to go away, but it’s not working out like that… someone fibbed to me! LOL. And to make matters worse, when I dropped her off, she wanted me to walk her in, where I got a group hug from like 10 other kids… all calling me mom of course… and all looking to me for those “comforting words” ya know? So I told them I loved them all, to have fun, be safe, stay together, take lots of pictures for me, and I would see them when they got back Monday. I hugged them all and the first AND last one… the most important one… was DD15. I hugged her tight and told her I loved her and would see her soon. I quickly ran out to the car where I proceeded to start balling. So I got that 30 minute power nap before I was up and running again! But not having to get her ready for school triggered another crying session and I haven’t stopped yet. Hopefully it will stop soon.


Ok, let’s get distracted (me basically)… I have had a couple of people ask me about the doctor, so I will just tell you it did not go well. I am now on high blood pressure meds, a new water pill, and they will discuss different diabetes medications and other problems once they get the lab results back. I have to go back for a follow up in 2 weeks. I have gained an excessive amount of weight since July so of course, they harped on that too! I’m not sure what these doctors expect when you have an injury and/or disease that incapacitates you for 9 months… HELLO MD’s… YOU’RE GONNA GAIN WEIGHT YOU MORONS! Ugh, that’s why I hate going to the doctors. They are trained to point out your flaws! And I don’t like acknowledging I have any (even though I KNOW I do) LOL! She said the migraine the past few days is due to the blood pressure. My sugars were also very high, so I have to keep a log of my BP and my sugars for the next 2 weeks until I go back. Fun FUN! NOT!

I ran out to Mom & Dad’s yesterday to borrow a bigger suitcase for the DD and while I was there I grabbed more scrap wood from the garage. I am also gonna be calling Home Depot and Lowe’s today to see if they have any scraps. They are even doing some minor construction on a house behind ours, so I am gonna go over there too and check for scraps! Care to guess what I am gonna do with them? Yep… MORE planters! LOL you can call me crazy if you want, but the project was fun for me and they turn out so cute and really, right now, I need SOMETHING to keep me busy/distracted so why not!?

Alright its time for some more Easter crafts. Today I want to talk about eggs. What would Easter be without the traditional Easter Egg!?

Craft Ideas of the Day: Easter Eggs


Speckled Easter Eggs
by Jane Lake

This method of decorating Easter eggs is very messy - but lots of fun! Just to be sure to wear an apron and spread lots of newspaper around your work surface to catch the flying paint.

Supplies:

hard boiled eggs
egg dye
tempra, watercolor or craft paint or food coloring
old toothbrush

Instructions:

1. If you want to begin with colored eggs, then dye the eggs using commercial egg dye or natural egg dye.

2. Spread newspaper over your work surface. It's also a good idea to protect the front of your clothes with an apron or smock.

3. Dip the toothbrush in a small amount of paint or dye in a contrasting color.

4. Run your finger or thumb over the top of the toothbrush bristles to splatter the eggs with small drops of color.

Variations: You can wash the toothbrush and use a second or third color to make speckled eggs with lots of different colors.


Tie Dyed Easter Eggs

Supplies:

eggs, hard-boiled, boiled in a saucepan of water with 1 tbsp of vinegar added or blown eggs
food coloring in assorted colors
paper towels
plastic wrap
old shirt or apron

Instructions:

This is such an easy way to make tie dyed Easter eggs - and very pretty too.

Boil your eggs or blow the eggs out if you wish to keep them permanently.

To blow out an egg: Poke a small hole in each end of the egg. Use a long needle or skewer to break the yoke. Hold the egg over a bowl and blow hard through one hole until the egg has emptied out of the shell. Rinse with water, let dry, and decorate.

To Tie Die Eggs: Take a paper towel and dampen the towel with water and vinegar, making sure it is just damp.

Place a piece of plastic wrap under the paper towel.

Drip small drops of food coloring onto the paper towel. Allow colors to drop next to each other so they bleed slightly together. Make sure there is enough area with food color to cover egg.

Wrap an egg in the paper towel and the plastic wrap. The longer you keep the egg in the brighter the egg will get.

Repeat until all your eggs are tie dyed. Every one will be different, but all of them will be pretty!


Naturally With Dyes From Your Kitchen
by Debra Lynn Dadd

The most beautiful dyes for Easter eggs come from foodstuff you probably already have in your kitchen.

I have been delighted with the results of the colors I have tried and my friends have been thrilled to receive them as springtime gifts. The colors are very unusual -- gentle, earthy, soft, and very vibrant, without being harsh like the artificial dyes -- and when I tell people the colors come from plant dyes, they always want to know the origin of each color.

To color these eggs, you boil the eggs with the dyestuff, rather than boiling the eggs separately and then dying them.

General directions:

Put raw, white-shelled, organically-raised eggs in a single layer in a pan. Cover with cold water. Add a little more than a teaspoon of white vinegar. Add the natural dyestuff for the color you want your eggs to be. (The more eggs you are dying at a time, the more dye you will need to use, and the more dye you use, the darker the color will be.)

Bring water to a boil, then reduce heat and simmer for 15 minutes.

Quickly check the eggs for color by removing them from the dye liquid with a slotted spoon.

If the color is as desired, pour off the hot dye liquid and rinse the eggs immediately in cold water to stop the eggs from cooking. Continue to change the water until it stays cool in the pot because the eggs are no longer releasing heat. Drain and allow eggs to cool in the refrigerator.

If you wish a deeper color, strain the hot dye liquid into a container, then rinse the eggs immediately in cold water to stop them from cooking. Continue to change the water until it stays cool in the pot because the eggs are no longer releasing heat. Drain the last of the cold water, then cover the eggs with the strained dye liquid. Add more water if necessary so that the eggs are completely covered. Put into the refrigerator immediately and keep eggs in the refrigerator until the desired shade is achieved. Overnight is good. Longer than about twelve hours some of the colors just get muddier instead of deeper, and the lighter shades are more vibrant.

Try these foods to dye your eggs:

Red - Pink -- lots of red onion skins, cranberry juice, or frozen raspberries.

Orange -- Yellow onion skins

Brown -- Red beet skins or grape juice (produces a beautiful sparkling tan), coffee.

Yellow -- Saffron, tumeric or cumin, orange or lemon peels, or celery seed.

Green -- spinach, or carrot tops and peels from Yellow Delicious apples for a yellow-green.

Blue -- Red cabbage leaves make the most incredible robin's-egg blue.

Deep Purple -- Red wine makes a beautiful burgundy color

Tips for successful results:
Use filtered or distilled water. Chlorine and other chemicals will work against the dye, making it less intense. Buy distilled water or use your own filtered water.

For deeper colors, use more dyestuff or let the eggs soak longer. For even coverage, cook eggs in a pot large enough to hold enough water and dyestuff to completely cover the eggs, even after some of the liquid has evaporated during the 15 minute of boiling.

Again, for even coverage, if you continue to soak the eggs in the refrigerator after cooking, make sure the eggs are completely covered with the dye liquid. Blot the eggs dry or allow them to air dry, as for some colors the dye will rub off while still wet. On the other hand, if you wish to make a white pattern on the egg, you can rub off some of the dye for some colors immediately after cooking.

Make sure eggs of different colors are completely dry before piling them up in a bowl together, as wet dye from one egg can transfer to another.

About the Author: Hailed as "The Queen of Green" by the New York Times, Debra Lynn Dadd has been a consumer advocate for products and lifestyle choices that are better for health and the environment since 1982. Visit her website at http://www.dld123.com for 100s of links to 1000s of nontoxic, natural and earthwise products, and to sign up for her free email newsletters.


Easter Egg Wreath

For thousands of years, the egg has been a symbol of new life — and spring — for people the world over. Craft the time-honored symbol into a wreath for your door, and you've got the perfect way to welcome spring into your home.
Materials
14 plastic pull-apart eggs
Puffy paint
Egg cartons
2 large heavy-duty paper plates
Scissors
Glue
Green craft foam
Twist ties
Instructions

First, decorate 14 plastic pull-apart eggs with puffy paint and let them dry. (Overturned egg cartons make great workstations and drying racks; just set each egg half over a carton cup bottom.)

Cut the rims from the paper plates and glue them together. Glue green craft foam leaves around the ring, leaving 1 1/2 inches between them.

To attach the eggs, tightly wrap twist ties (one for each egg) between the leaves around the paper plate ring, then simply close the egg halves together over the ties.

You can also decorate eggs by dying them the color you want and allowing them to dry. Then with craft glue, cover the egg in crystal beads (used in jewelry making). You will have a precious jeweled egg. Or perhaps you can decoupage some cute clippings from magazines, etc. The possibilities are endless. The point is to make them unique!

Ok, time to eat. Well tonight I think I will be making Chili Rellenos for the guys. You and I, however, will feast our eyes (and if you are ambitious, our palates) on this yummy dessert!


Brownie Caramel Cheesecake

Ingredients

1 (9 ounce) package brownie mix
1 egg
1 tablespoon cold water
1 (14 ounce) package individually wrapped caramels, unwrapped
1 (5 ounce) can evaporated milk
3 (8 ounce) packages cream cheese, softened
3/4 cup white sugar
1 teaspoon vanilla extract
3 eggs
1 cup chocolate fudge topping

Directions

Preheat oven to 350 degrees F (175 degrees C). Grease the bottom of a 9 inch springform pan.

In a small bowl, mix together brownie mix, 1 egg and water. Spread into the greased pan. Bake for 10-15 minutes.

Melt the caramels with the evaporated milk over low heat in a heavy saucepan. Stir often, and heat until mixture has a smooth consistency. Reserve 1/3 cup of this caramel mixture, and pour the remainder over the warm, baked brownie crust.

In a large bowl, beat the cream cheese, sugar and vanilla with an electric mixer until smooth. Add eggs one at a time, beating well after each addition. Pour cream cheese mixture over caramel mixture.

Bake cheesecake for 50 minutes. Chill in pan. When cake is thoroughly chilled, loosen by running a knife around the edge, and then remove the rim of the pan. Heat reserved caramel mixture, and spoon over cheesecake. Drizzle with the chocolate topping.

Ok peeps (oh those sound good right now LOL!) its time for me to get off of here and head down to the doctors so the vampires can attack me. Hopefully that won’t take too long, that way I can come back and catch a nap! Make sure you always tell the ones you care about how you feel so they always know! It will make them feel important and brighten their day! I will see you all tomorrow. Peace, Love, and LOTS of HUGS!